Lesson 16
Distinguishing Between Surface Area and Volume
16.1: Attributes and Their Measures (10 minutes)
Warm-up
This activity strengthens students’ awareness of one-, two-, and three-dimensional attributes and the units commonly used to measure them. Students decide on the units based on the attributes being measured and the size of the units and how appropriate they would be for describing given quantities.
As students work, select a few students to share their responses to the last two questions of the activity (on the quantities that could be measured in miles and in cubic meters).
Launch
Consider a quick review of metric and standard units of measurement before students begin work. Include some concrete examples that could help illustrate the size of each unit.
Then, pick an object in the classroom for which surface area and volume could be measured (e.g. a desk). Ask students, “What units might we use to measure the surface area of the desktop? What units might we use to measure the volume of a drawer?”
Clarify the relative sizes of the different units that come up in the conversation. For instance, discuss how a meter is a little over three feet, a yard is three feet, a kilometer is about two-thirds of a mile, a millimeter is one tenth of a centimeter, etc.
Give students 4–5 minutes of quiet think time and then a couple of minutes to share their responses with a partner. Prepare to display the answers to the first six questions for all to see.
Student Facing
For each quantity, choose one or more appropriate units of measurement.
For the last two, think of a quantity that could be appropriately measured with the given units.
Quantities
- Perimeter of a parking lot:
- Volume of a semi truck:
- Surface area of a refrigerator:
- Length of an eyelash:
- Area of a state:
- Volume of an ocean:
- ________________________: miles
- ________________________: cubic meters
Units
- millimeters (mm)
- feet (ft)
- meters (m)
- square inches (sq in)
- square feet (sq ft)
- square miles (sq mi)
- cubic kilometers (cu km)
- cubic yards (cu yd)
Student Response
For access, consult one of our IM Certified Partners.
Anticipated Misconceptions
Depending on the students’ familiarity with metric and standard units, there may be some confusion about the size of each unit. Consider displaying measuring tools or a reference sheet that shows concrete examples of items measured in different-sized units.
Activity Synthesis
Display the solutions to the first six questions for all to see and to use for checking. Then, select a few students to share their responses to the last two questions.
Ask students what they notice about the units for area and the units for volume. If not already mentioned by students, highlight that area is always measured in square units and volume in cubic units.
16.2: Building with 8 Cubes (25 minutes)
Optional activity
This activity clarifies the distinction between volume and surface area and illustrates that two polyhedra can have the same volume but different surface areas.
Students build shapes using two sets of eight cubes and determine their volumes and surface areas. Since all of the designs are made of the same number of cubes, they all have the same volume. Students then examine all of the designs and discuss what distinguishes shapes with smaller surface areas from those with greater ones.
As students work, monitor the range of surface areas for the shapes that students built. Select several students whose designs collectively represent that range.
Launch
Give each student (or group of 2 students) 16 snap cubes, two sticky notes, and 8–10 minutes of work time.
Explain that their job is to design and build two figures—using 8 cubes for each—and find the volume and surface area of each figure. Ask them to give each figure a name or a label and then record the name, surface area, and volume on a sticky note.
Student Facing
This applet has 16 cubes in its hidden stack. Build two different shapes using 8 cubes for each.
For each shape, determine the following information and write it on a sticky note.
- Give a name or a label (e.g., Mae’s First Shape or Eric’s Steps).
- Determine its volume.
- Determine its surface area.
Student Response
For access, consult one of our IM Certified Partners.
Launch
Give each student (or group of 2 students) 16 snap cubes, two sticky notes, and 8–10 minutes of work time.
Explain that their job is to design and build two figures—using 8 cubes for each—and find the volume and surface area of each figure. Ask them to give each figure a name or a label and then record the name, surface area, and volume on a sticky note.
Student Facing
Your teacher will give you 16 cubes. Build two different shapes using 8 cubes for each. For each shape:
- Give it a name or a label (e.g., Mai’s First Shape or Diego’s Steps).
- Determine the volume.
- Determine the surface area.
- Record the name, volume, and surface area on a sticky note.
Student Response
For access, consult one of our IM Certified Partners.
Anticipated Misconceptions
Even though students are dealing with only 8 cubes at a time, they may make counting errors by inadvertently omitting or double-counting squares or faces. This is especially likely for designs that are non-prisms. Encourage students to think of a systematic way to track the number of square units they are counting.
Some students may associate volume only with prisms and claim that the volume of non-prism designs cannot be determined. Remind them of the definition of volume.
Activity Synthesis
Ask all students to display their designs and their sticky notes and give them a couple of minutes to circulate and view one another's work.
Then, ask previously identified students to arrange their designs in the order of their surface area, from least to greatest, and display their designs for all to see. Record the information about the designs in a table, in the same sequence. Display the table for all to see. Here is an example.
| shapes | volume | surface area |
|---|---|---|
| Andre's cube | 8 | 24 |
| Lin's steps | 8 | 28 |
| Jada's first shape | 8 | 28 |
| . . . | . . . | . . . |
| Noah's tower | 8 | 34 |
Give students a minute to notice and wonder about the designs and the information in the table. Ask students to give a signal when they have noticed and wondered about at least one thing. Invite a few students to share their observations and questions. Then, discuss the following questions (if not already mentioned by students):
- “What do all of the shapes have in common?” (Their volume)
- “Why are all the volumes the same?” (Volume measures the number of unit cubes that can be packed into a figure. All the designs are built using the same number of cubes.)
- “Why do some shapes have larger surface areas than others? What do shapes with larger surface areas look like?” (The cubes are more spread out and have more of their faces exposed.)
- “What about those with smaller surface areas?” (They are more compact and have more of their faces hidden or shared with another cube.)
- “Is it possible to build a shape with a different volume? How?” (Yes, but it would involve using fewer or more cubes.)
If students have trouble visualizing how surface area changes when the design changes, demonstrate the following:
- Make a cube made of 8 smaller cubes. Point to one cube and ask how many of its faces are exposed (3).
- Pop that cube off and move it to another place.
- Point out that, in the “hole” left by the cube that was moved, 3 previously interior faces now contribute to the surface area. At the same time, the relocated cube now has 5 faces exposed.
Design Principle(s): Optimize output (for explanation)
16.3: Comparing Prisms Without Building Them (20 minutes)
Optional activity
Previously, students studied shapes with the same volume but different surface areas. Here they see that it is also possible for shapes to have the same surface area but different volumes. Students think about how the appearance of these shapes might compare visually.
Students are given the side lengths of three rectangular prisms and asked to find the surface area and the volume of each. Some students can visualize these, but others may need to draw nets, sketch the figures on isometric grid paper, or build physical prisms. Prepare cubes for students to use. Each of the three prisms can be built with 15 or fewer cubes, but 40 cubes are needed to build all three simultaneously. (If the cubes are not centimeter cubes, ask students to treat them as if the edge length of each cube was 1 cm.)
As students work, look out for errors in students’ calculations in the first question, which will affect the observations they make in the second question. Select a few students who notice that the volumes of the prisms are all different but the surface areas are the same.
Launch
Arrange students in groups of 2. Provide access to snap cubes and geometry toolkits. Give students 6–7 minutes of quiet think time and then 2–3 minutes to discuss their responses with their partner. Ask partners to agree upon one key observation to share with the whole class.
Supports accessibility for: Conceptual processing
Design Principle(s): Support sense-making; Cultivate conversation
Student Facing
Three rectangular prisms each have a height of 1 cm.
- Prism A has a base that is 1 cm by 11 cm.
- Prism B has a base that is 2 cm by 7 cm.
- Prism C has a base that is 3 cm by 5 cm.
-
Find the surface area and volume of each prism. Use the dot paper to draw the prisms, if needed.

- Analyze the volumes and surface areas of the prisms. What do you notice? Write 1 or 2 observations about them.
Student Response
For access, consult one of our IM Certified Partners.
Student Facing
Are you ready for more?
Can you find more examples of prisms that have the same surface areas but different volumes? How many can you find?
Student Response
For access, consult one of our IM Certified Partners.
Anticipated Misconceptions
Students may miss or double-count one or more faces of the prisms and miscalculate surface areas. Encourage students to be systematic in their calculations and to use organizational strategies they learned when finding surface area from nets.
Students may need reminders to use square units for area and cubic units for volume.
Activity Synthesis
Ask students to share their observations in response to the second question. Record them for all to see. For each unique observation, poll the class to see if others noticed the same thing. Highlight the following observations, or point them out if not already mentioned by students:
- The volumes of the prisms are all different, but the surface areas are the same.
- Volume is described in terms of unit cubes and surface area in terms of the exposed faces of those unit cubes.
Explain that, in an earlier activity, we saw how different shapes could have the same volume (i.e. being made up of the same number of unit cubes) but different surface areas. Now we see that it is also possible for shapes with different volumes (i.e. consisting of different numbers of unit cubes) to have the same surface area.
If students have trouble conceptualizing the idea of figures with different volume having the same surface area, refer to the filing cabinet activity in the first lesson on surface area. The number of square sticky notes needed to cover all of the faces of the filing cabinet was its surface area. If we use all of those square notes (no more, no less) to completely cover (without overlapping sticky notes) a cabinet that has a different volume, we can say that the two pieces of furniture have the same surface area and different volumes.
Lesson Synthesis
Lesson Synthesis
In this lesson, we refreshed our memory of measures of one-, two-, and three-dimensional attributes. Reiterate that length is a one-dimensional attribute of geometric figures, area is a two-dimensional attribute, and volume is a three-dimensional attribute. Revisit a few examples of units for length, area, and volume.
We also explored the surface areas and volumes of polyhedra and noticed that two shapes can have the same volumes but different surface areas, and vice versa.
-
"How could two figures with a volume of 4 cubic units have a surface area of 16 square units and 18 square units?" (Surface area and volume measure different attributes of a three-dimensional shape.)
-
"What kind of measure is surface area? What kind of measure is volume?" (Surface area is a two-dimensional attribute; we measure it in square units. Volume is a three-dimensional attribute; we measure it in cubic units.)
-
"Are the two measures related? Does a greater volume necessarily mean a greater surface area, and vice versa?" (No, one measure does not affect the other. A figure that has a greater volume than another may not necessarily have a greater surface area.)
16.4: Cool-down - Same Surface Area, Different Volumes (5 minutes)
Cool-Down
For access, consult one of our IM Certified Partners.
Student Lesson Summary
Student Facing
Length is a one-dimensional attribute of a geometric figure. We measure lengths using units like millimeters, centimeters, meters, kilometers, inches, feet, yards, and miles.
Area is a two-dimensional attribute. We measure area in square units. For example, a square that is 1 centimeter on each side has an area of 1 square centimeter.
Volume is a three-dimensional attribute. We measure volume in cubic units. For example, a cube that is 1 kilometer on each side has a volume of 1 cubic kilometer.
Surface area and volume are different attributes of three-dimensional figures. Surface area is a two-dimensional measure, while volume is a three-dimensional measure.
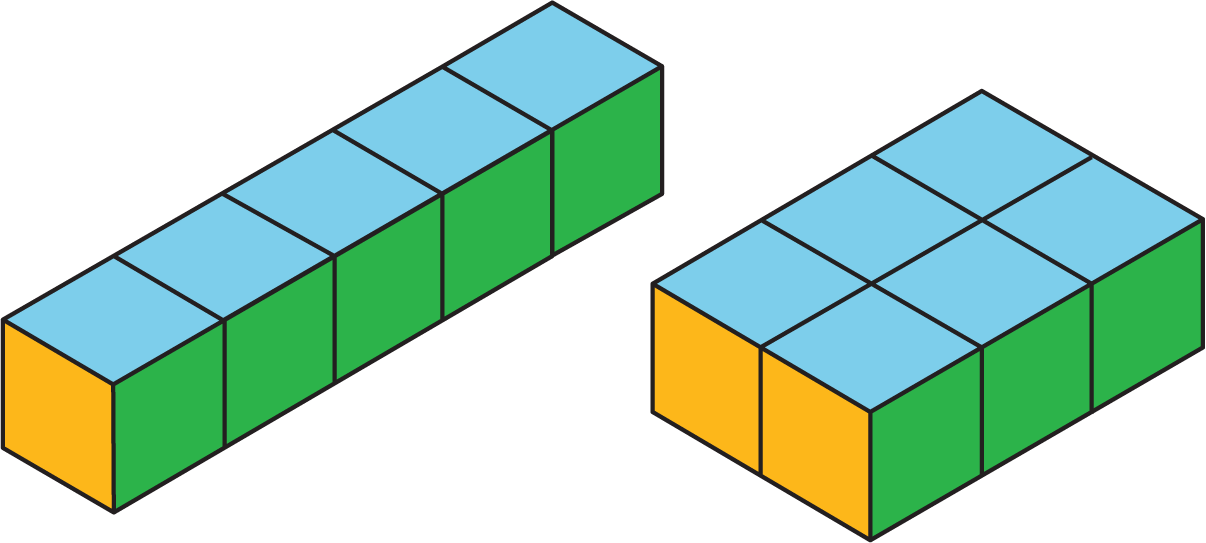
Two figures can have the same volume but different surface areas. For example:
- A rectangular prism with side lengths of 1 cm, 2 cm, and 2 cm has a volume of 4 cu cm and a surface area of 16 sq cm.
- A rectangular prism with side lengths of 1 cm, 1 cm, and 4 cm has the same volume but a surface area of 18 sq cm.

Similarly, two figures can have the same surface area but different volumes.
- A rectangular prism with side lengths of 1 cm, 1 cm, and 5 cm has a surface area of 22 sq cm and a volume of 5 cu cm.
- A rectangular prism with side lengths of 1 cm, 2 cm, and 3 cm has the same surface area but a volume of 6 cu cm.