Lesson 13
Polyhedra
13.1: What are Polyhedra? (10 minutes)
Warm-up
In this warm-up, students analyze examples and counterexamples of polyhedra, observe their defining characteristics, and use their insights to sort objects into polyhedra and non-polyhedra. They then start developing a working definition of polyhedron.
Prepare physical examples of polyhedra and non-polyhedra for students to sort. These examples should be geometric figures rather than real-world objects such as shoe boxes or canisters. If such figures are not available, make some ahead of time using the nets in the blackline master.
As students work and discuss, notice those who can articulate defining features of a polyhedron. Invite them to share later.
Launch
Arrange students in groups of 3–4. Give students 1 minute of quiet time to study the examples and non-examples in the task statement. Ask them to be ready to share at least one thing they notice and one thing they wonder. Give the class a minute to share some of their observations and questions.
Next, give each group a physical set of three-dimensional figures. The set should include some familiar polyhedra, some unfamiliar ones, and some non-polyhedra.
Ask groups to sort the figures into polyhedra and non-polyhedra (the first question). If groups members disagree about whether a figure is a polyhedron, discuss the disagreements. When the group has come to an agreement, give them 2–3 minutes of quiet time to complete the second question.
Student Facing
Here are pictures that represent polyhedra:

Here are pictures that do not represent polyhedra:

-
Your teacher will give you some figures or objects. Sort them into polyhedra and non-polyhedra.
- What features helped you distinguish the polyhedra from the other figures?
Student Response
For access, consult one of our IM Certified Partners.
Activity Synthesis
Invite students to share the features that they believe characterize polyhedra. Record their responses for all to see. For each one, ask the class if they agree or disagree. If they generally agree, ask if there is anything they would add or elaborate to make the description clearer or more precise. If they disagree, ask for an explanation or a counterexample.
Students will have a chance to refine their definition of polyhedra later in the lesson—after exploring prisms and pyramids and learning about nets, so it is not important to compile a complete or precise set of descriptions or features.
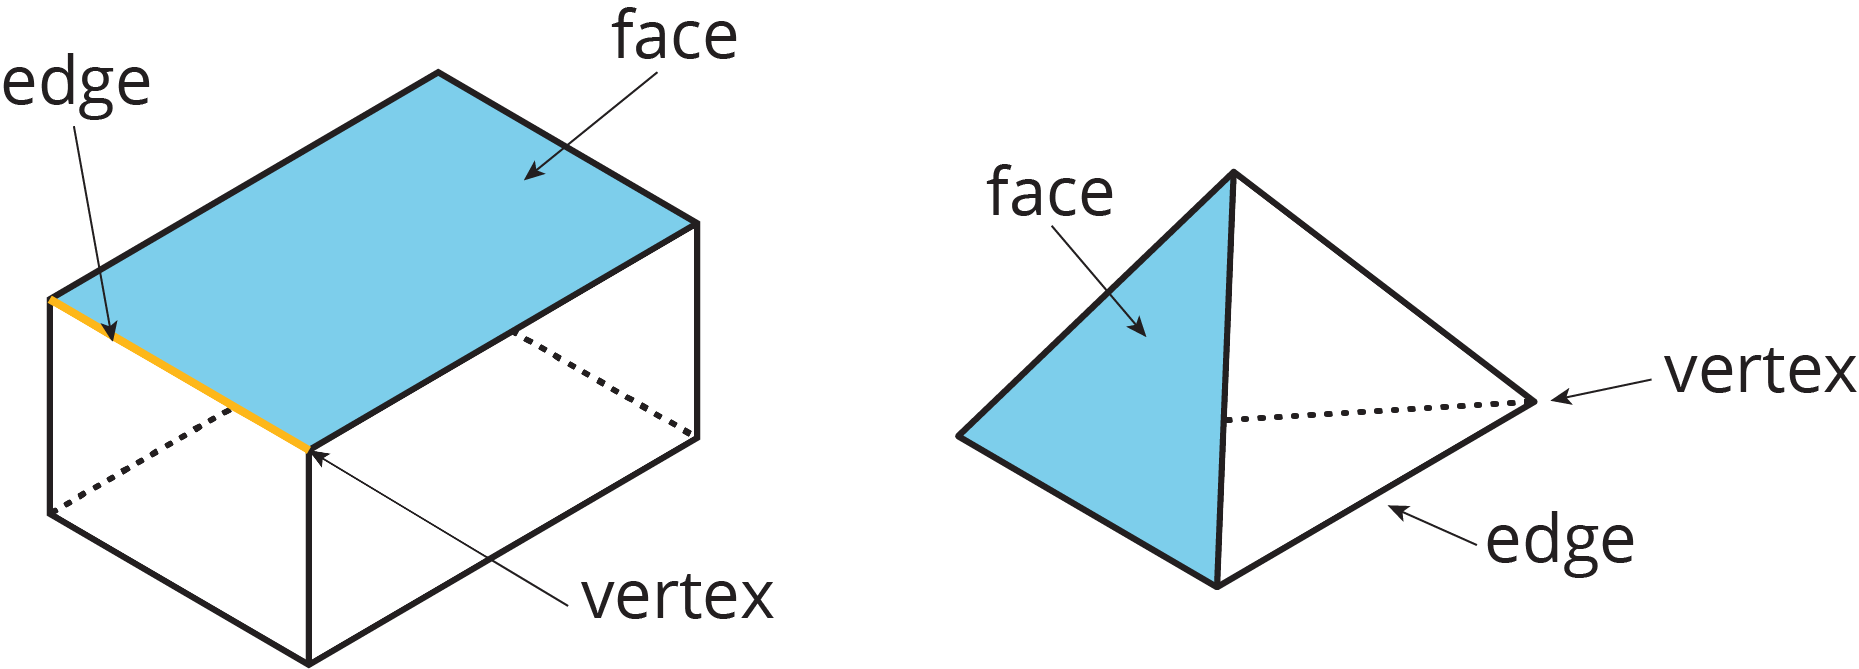
Use a sample polyhedron or a diagram as shown here to introduce or reinforce the terminology surrounding polyhedra.
- The polygons that make up a polyhedron are called faces.
- The places where the sides of the faces meet are called edges.
- The “corners” are called vertices. (Clarify that the singular form is "vertex" and the plural form is "vertices.")
13.2: Prisms and Pyramids (30 minutes)
Activity
This activity serves two goals: to uncover the defining features of prisms and pyramids as well as to introduce nets as two-dimensional representations of polyhedra.
Students first analyze prisms and pyramids and try to define their characteristics. Next, they learn about nets and think about the polygons needed to compose the nets of given prisms and pyramids. They then use their experience with the nets of prisms and pyramids to sharpen and refine their definitions of these polyhedra.
Ask students discuss the features of prisms and pyramids, encourage them to use the terms face, edge, and vertex (vertices) in their descriptions.
Launch
Arrange students in groups of 3–4.
For the first question:
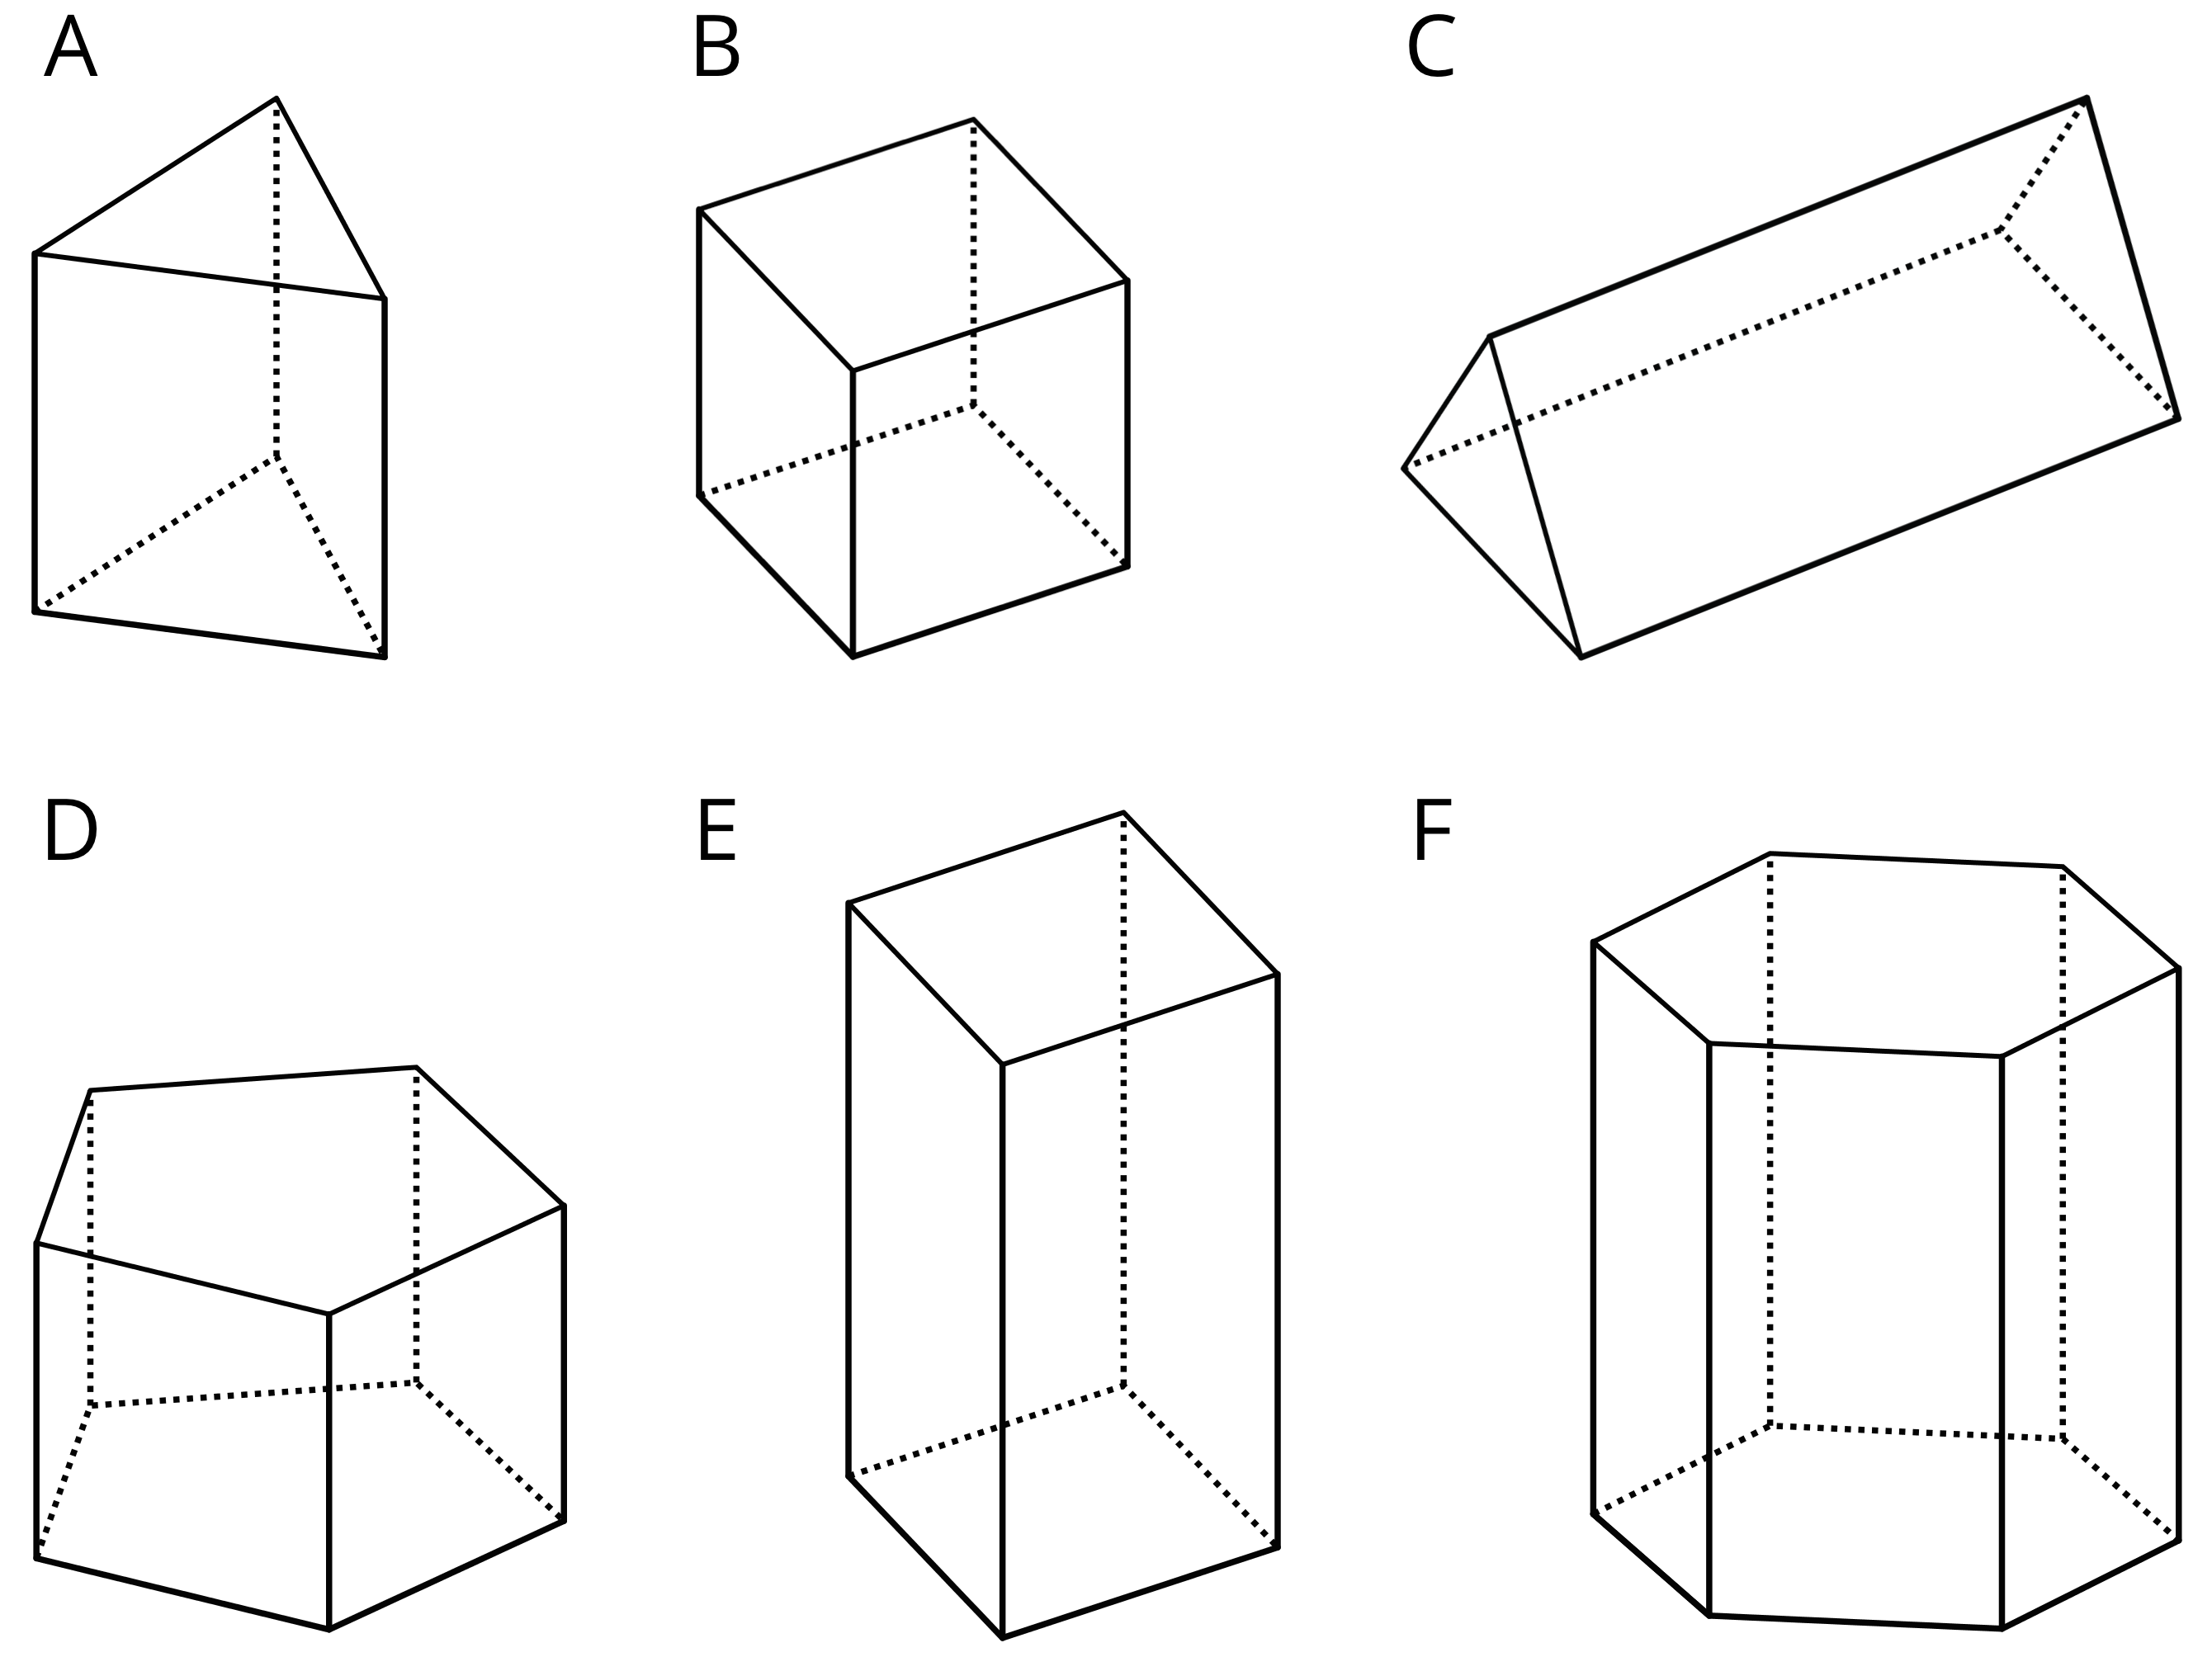
- Tell students that Polyhedra A–F are all prisms and Polyhedra P–S are all pyramids. (Display and pass around the prisms and pyramids in the task statement, if available.)
- Give students 2–3 minutes of quiet time for the first question and 2–3 minutes to discuss their observations in their groups. Ask them to pause for a class discussion before moving on.
- Solicit students' ideas about features that distinguish prisms and pyramids. Record students' responses in a two columns—one for prisms and the other for pyramids. It is not important that the lists are complete at this point.
Next, tell students that we are going to use nets to better understand prisms and pyramids. Explain that a net is a two-dimensional representation of a polyhedron.
Display a cube assembled from the net provided in the blackline master for the warm-up, as well as a cutout of an unfolded net (consider removing the flaps). Demonstrate how the net with squares could be folded and assembled into a cube, or use this book of digital applets, https://ggbm.at/rcu3Ka3j, created in GeoGebra by the GeoGebra DocuTeam. Point out how the number and the shape of the faces on the cube correspond to the number and the shape of the polygons in the net.
For the second question:
- Give groups a minute of quiet think time and a minute to discuss their response.
- To verify their answer, give each group one of the three nets from the first page of the blackline master. Ask them to try to assemble a triangular pyramid from their net.
- Invite groups to share with the class whether it can be done. Discuss why net 3 cannot be assembled into Pyramid P (two of the triangles would overlap).
For the last question, tell students that they will create a net of another prism or pyramid:
- Assign each group a prism or a pyramid from the task statement (except for Prism B and Pyramid P).
- Give each group a set of pre-cut polygons from the last two pages of the blackline master.
- Tell students to choose the right kind and number of polygons that make up their polyhedron. Then, arrange the polygons so that, when taped and folded, the arrangement is a net and could be assembled into their prism or pyramid. Encourage them to think of more than one net, if possible.
Supports accessibility for: Visual-spatial processing; Conceptual processing
Design Principle(s): Support sense-making
Student Facing
- Here are some polyhedra called prisms.
Here are some polyhedra called pyramids.

- Look at the prisms. What are their characteristics or features?
- Look at the pyramids. What are their characteristics or features?
- Which of these nets can be folded into Pyramid P? Select all that apply.

-
Your teacher will give your group a set of polygons and assign a polyhedron.
- Decide which polygons are needed to compose your assigned polyhedron. List the polygons and how many of each are needed.
-
Arrange the cut-outs into a net that, if taped and folded, can be assembled into the polyhedron. Sketch the net. If possible, find more than one way to arrange the polygons (show a different net for the same polyhedron).
Student Response
For access, consult one of our IM Certified Partners.
Student Facing
Are you ready for more?
What is the smallest number of faces a polyhedron can possibly have? Explain how you know.
Student Response
For access, consult one of our IM Certified Partners.
Activity Synthesis
Select groups to share their arrangements of polygons. If time permits and if possible, have students tape their polygons and fold the net to verify that it could be assembled into the intended polyhedron. Discuss:
- “What do the nets of prisms have in common?” (They all have rectangles. They have a pair of polygons that may not be rectangles.)
- “What do the nets of pyramids have in common?” (They all have triangles. They have one polygon that may not be a triangle.)
- “Is there only one possible net for a prism or a pyramid?” (No, the polygons can be arranged in different ways and still be assembled into the same prism or pyramid.)
Explain the following points about prisms and pyramids:
- A prism has two parallel, identical faces called bases and a set of rectangles connecting the bases.
- Prisms are named for the shape of the bases. For example, if the base of a prism is a pentagon, then the prism is called a “pentagonal prism.”
- A pyramid has one face called the base that can be any polygon and a set of faces that are all triangles. Each edge of the base is shared with an edge of a triangle. All of these triangles meet at a single vertex.
- Pyramids are named for the shape of their base. For example, if the base of a pyramid is a square, then the pyramid is called a “square pyramid.”
13.3: Assembling Polyhedra (20 minutes)
Optional activity
This optional activity gives students the experience of assembling polyhedra from nets. Counting the vertices, edges, and faces of a polyhedra helps to reinforce their understanding of the vocabulary. You will need the same blackline master as the one provided for the warm-up.
Students are likely to need assistance in assembling their polyhedra. Circulate and support students as needed.
Launch
Tell the class that they are going to assemble polyhedra from nets. Point out that the net has shaded and unshaded polygons. Display an example and explain that only the shaded polygons in the nets will show once the net is assembled. The unshaded polygons are "flaps" to make it easier to glue or tape the polygons together; they will get tucked behind the shaded polygons and are not really part of the polyhedron. Tell students that creasing along all of the lines first will make it easier to fold the net up and attach the various polygons together. A straightedge can be very helpful for making the creases.
Give each student two copies of a net so they can compare the assembled version with the unfolded net. Provide access to geometry toolkits and glue or tape. Ask students to build their figures and complete the question, and then to discuss their responses with another student with the same polyhedron.
Student Facing
-
Your teacher will give you the net of a polyhedron. Cut out the net, and fold it along the edges to assemble a polyhedron. Tape or glue the flaps so that there are no unjoined edges.
- How many vertices, edges, and faces are in your polyhedron?
Student Response
For access, consult one of our IM Certified Partners.
Anticipated Misconceptions
Students may have trouble getting an accurate count of faces, edges, and vertices. Suggest that they set the figure on the table and then separately count the amount on the top, bottom, and lateral sides of the figure. Or recommend that they label each face with a number or a name and keep track of the parts associated with each face, taking care not to double count edges and vertices.
Activity Synthesis
After students have conferred with another student and agreed on the number of vertices, edges, and faces of their polyhedron, tell the class they will now share their completed polyhedra and the unfolded version of the net with the class. Consider either asking students to pass their two items around, or to leave their the polyhedra and nets displayed while students circulate around the room to view others' work.
Supports accessibility for: Conceptual processing; Language; Memory
Lesson Synthesis
Lesson Synthesis
Review the features of prisms and pyramids by selecting 1–2 polyhedra used in the warm-up. Ask students to explain (using the terminology they learned, if possible) why each one is or is not a prism or a pyramid. If it is a prism or pyramid, ask students to name it.
Revisit the working definition of polyhedra generated earlier in the lesson and ask students to see if or how it might be refined. Ask if there is anything they should add, remove, or adjust given their work with prisms, pyramids, and nets.
Highlight the following points about polyhedra. Ask students to illustrate each point using a figure or a net.
-
A polyhedron is a three-dimensional figure built from filled-in polygons. We call the polygons faces. (The plural of polyhedron is polyhedra.)
-
All edges of polygons meet another polygon along a complete edge.
-
Each polygon meets one and only one polygon on each of the edges.
-
The polygons enclose a three-dimensional region.
Consider displaying in a visible place the key ideas from students' list and from this discussion so that they can serve as a reference later.
13.4: Cool-down - Three-Dimensional Shapes (5 minutes)
Cool-Down
For access, consult one of our IM Certified Partners.
Student Lesson Summary
Student Facing
A polyhedron is a three-dimensional figure composed of faces. Each face is a filled-in polygon and meets only one other face along a complete edge. The ends of the edges meet at points that are called vertices.

A polyhedron always encloses a three-dimensional region.
The plural of polyhedron is polyhedra. Here are some drawings of polyhedra:

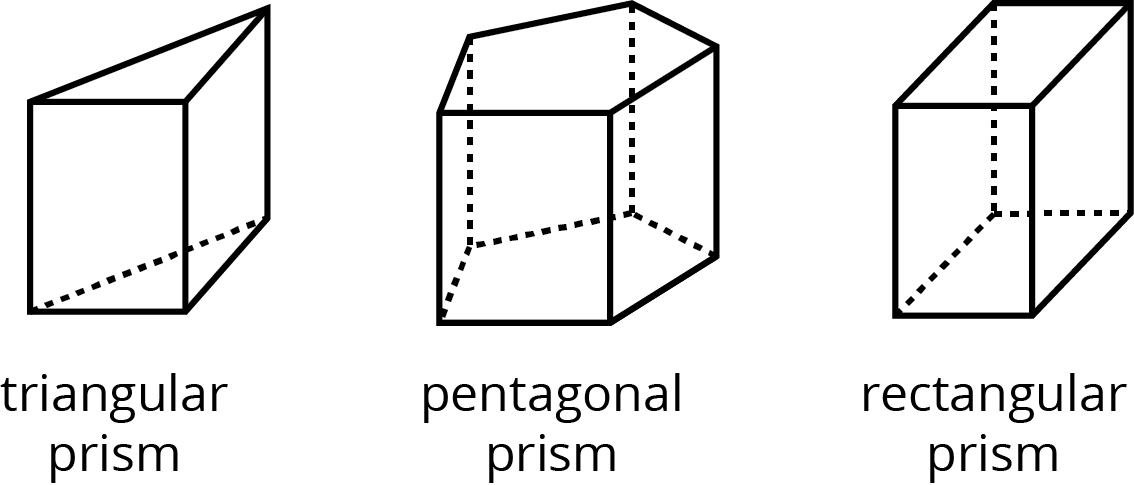
A prism is a type of polyhedron with two identical faces that are parallel to each other and that are called bases. The bases are connected by a set of rectangles (or sometimes parallelograms).
A prism is named for the shape of its bases. For example, if the base is a pentagon, then it is called a “pentagonal prism.”
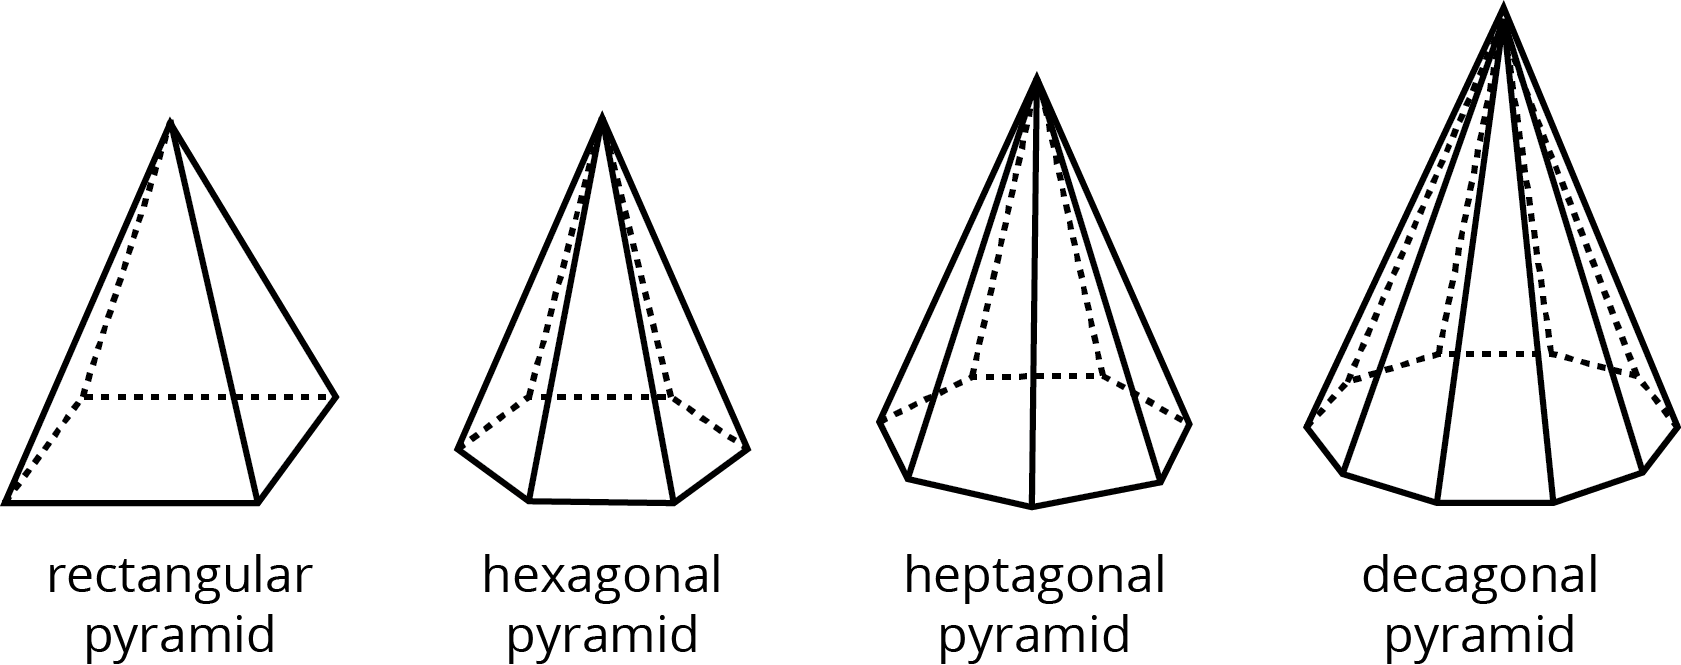
A pyramid is a type of polyhedron that has one special face called the base. All of the other faces are triangles that all meet at a single vertex.
A pyramid is named for the shape of its base. For example, if the base is a pentagon, then it is called a “pentagonal pyramid.”
A net is a two-dimensional representation of a polyhedron. It is composed of polygons that form the faces of a polyhedron.
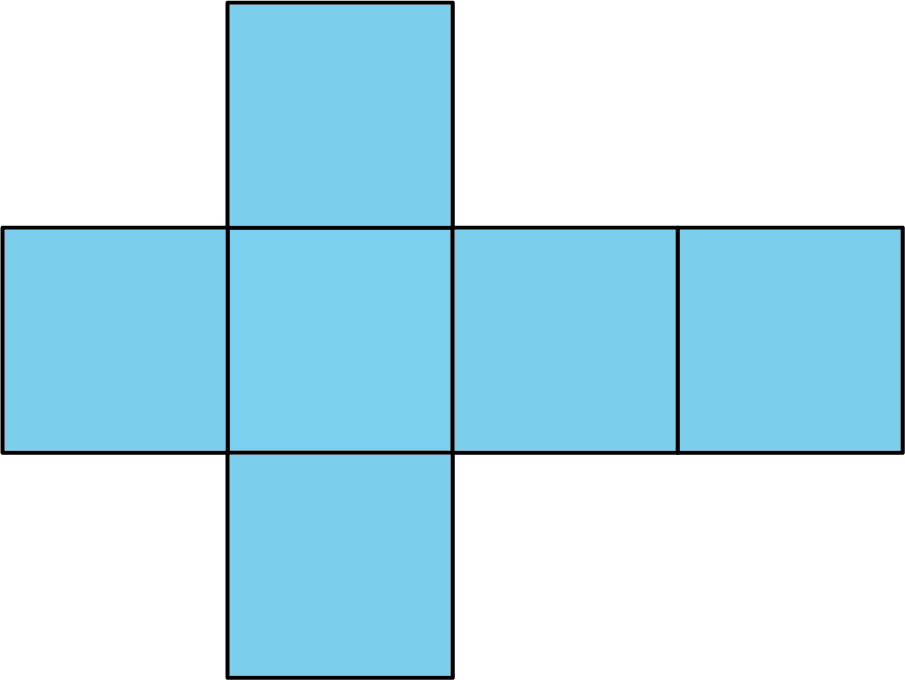
A cube has 6 square faces, so its net is composed of six squares, as shown here.
A net can be cut out and folded to make a model of the polyhedron.
In a cube, every face shares its edges with 4 other squares. In a net of a cube, not all edges of the squares are joined with another edge. When the net is folded, however, each of these open edges will join another edge.
It takes practice to visualize the final polyhedron by just looking at a net.