Lesson 6
Area of Parallelograms
6.1: Missing Dots (5 minutes)
Warm-up
In this warm-up, students determine the number of dots in an image without counting and explain how they arrive at that answer. The activity also gives students a chance use decomposition and structure to quantify something, in a setting that is slightly different than what they have seen in this unit. To arrive at the total number of dots, students need to visualize and articulate how the dots can be decomposed, and use what they know about arrays, multiplication, and area to arrive at the number of interest. To encourage students to refer to the image in their explanation, ask students how they saw the dots instead of how they found the number of dots.
As in an earlier warm-up, consider establishing a small, discreet hand signal that students can display to indicate that they have an answer they can support with reasoning. This signal could be a thumbs-up, a certain number of fingers that tells the number of responses they have, or another subtle signal. This is a quick way to see if the students have had enough time to think about the problem. It also keeps students from being distracted or rushed by hands being raised around the class.
Launch
Give students 1–2 minutes of quiet think time and ask them to give a signal showing how many solutions they have. Encourage students who have found one way of seeing the dots to think about another way while they wait.
Student Facing

How many dots are in the image?
How do you see them?
Student Response
For access, consult one of our IM Certified Partners.
Activity Synthesis
Ask students to share how many dots they saw and how they saw them. Record and display student explanations for all to see. To involve more students in the conversation, consider asking some of the following questions:
- “Who can restate the way ___ saw the dots in different words?”
- “Did anyone see the dots the same way but would explain it differently?”
- “Does anyone want to add an observation to the way ____ saw the dots?”
- “Do you agree or disagree? Why?”
6.2: More Areas of Parallelograms (25 minutes)
Activity
This activity allows students to practice finding and reasoning about the area of various parallelograms—on and off a grid. Students need to make sense of the measurements and relationships in the given figures, identify an appropriate pair of base-height measurements to use, and recognize that two parallelograms with the same base-height measurements (or with different base-height measurements but the same product) have the same area.
As they work individually, notice how students determine base-height pairs to use. As they work in groups, listen to their discussions and identify those who can clearly explain how they found the area of each of the parallelograms.
Launch
Arrange students in groups of 4. Give each student access to their geometry toolkits and 5 minutes of quiet time to find the areas of the parallelograms in the first question. Then, assign each student one parallelogram (A, B, C or D). Ask each student to explain to the group, one at a time, how they found the area of the assigned parallelogram. After each student shares, check for agreement or disagreement from the rest of the group. Discuss any disagreement and come to a consensus on the correct answer before moving to the next parallelogram.
Afterwards, give students another 5–7 minutes of quiet work time to complete the rest of the activity.
For classrooms using the digital activity, arrange students in groups of 2. Ask each student to explain to their partner how they found the area of each parallelogram. When using the second applet, each student should each find one pair of quadrilaterals with equal area.
Supports accessibility for: Visual-spatial processing; Conceptual processing
Student Facing
-
-
Calculate the area of the given figure in the applet. Then, check if your area calculation is correct by clicking the Show Area checkbox.
- Uncheck the Area checkbox. Move one of the vertices of the parallelogram to create a new parallelogram. When you get a parallelogram that you like, sketch it and calculate the area. Then, check if your calculation is correct by using the Show Area button again.
- Repeat this process two more times. Draw and label each parallelogram with its measurements and the area you calculated.
-
- Here is Parallelogram B. What is the corresponding height for the base that is 10 cm long? Explain or show your reasoning.
-
Here are two different parallelograms with the same area.
- Explain why their areas are equal.
- Drag points to create two new parallelograms that are not identical copies of each other but that have the same area as each other. Sketch your parallelograms and explain or show how you know their areas are equal. Then, click on the Check button to see if the two areas are indeed equal.
Student Response
For access, consult one of our IM Certified Partners.
Launch
Arrange students in groups of 4. Give each student access to their geometry toolkits and 5 minutes of quiet time to find the areas of the parallelograms in the first question. Then, assign each student one parallelogram (A, B, C or D). Ask each student to explain to the group, one at a time, how they found the area of the assigned parallelogram. After each student shares, check for agreement or disagreement from the rest of the group. Discuss any disagreement and come to a consensus on the correct answer before moving to the next parallelogram.
Afterwards, give students another 5–7 minutes of quiet work time to complete the rest of the activity.
For classrooms using the digital activity, arrange students in groups of 2. Ask each student to explain to their partner how they found the area of each parallelogram. When using the second applet, each student should each find one pair of quadrilaterals with equal area.
Supports accessibility for: Visual-spatial processing; Conceptual processing
Student Facing
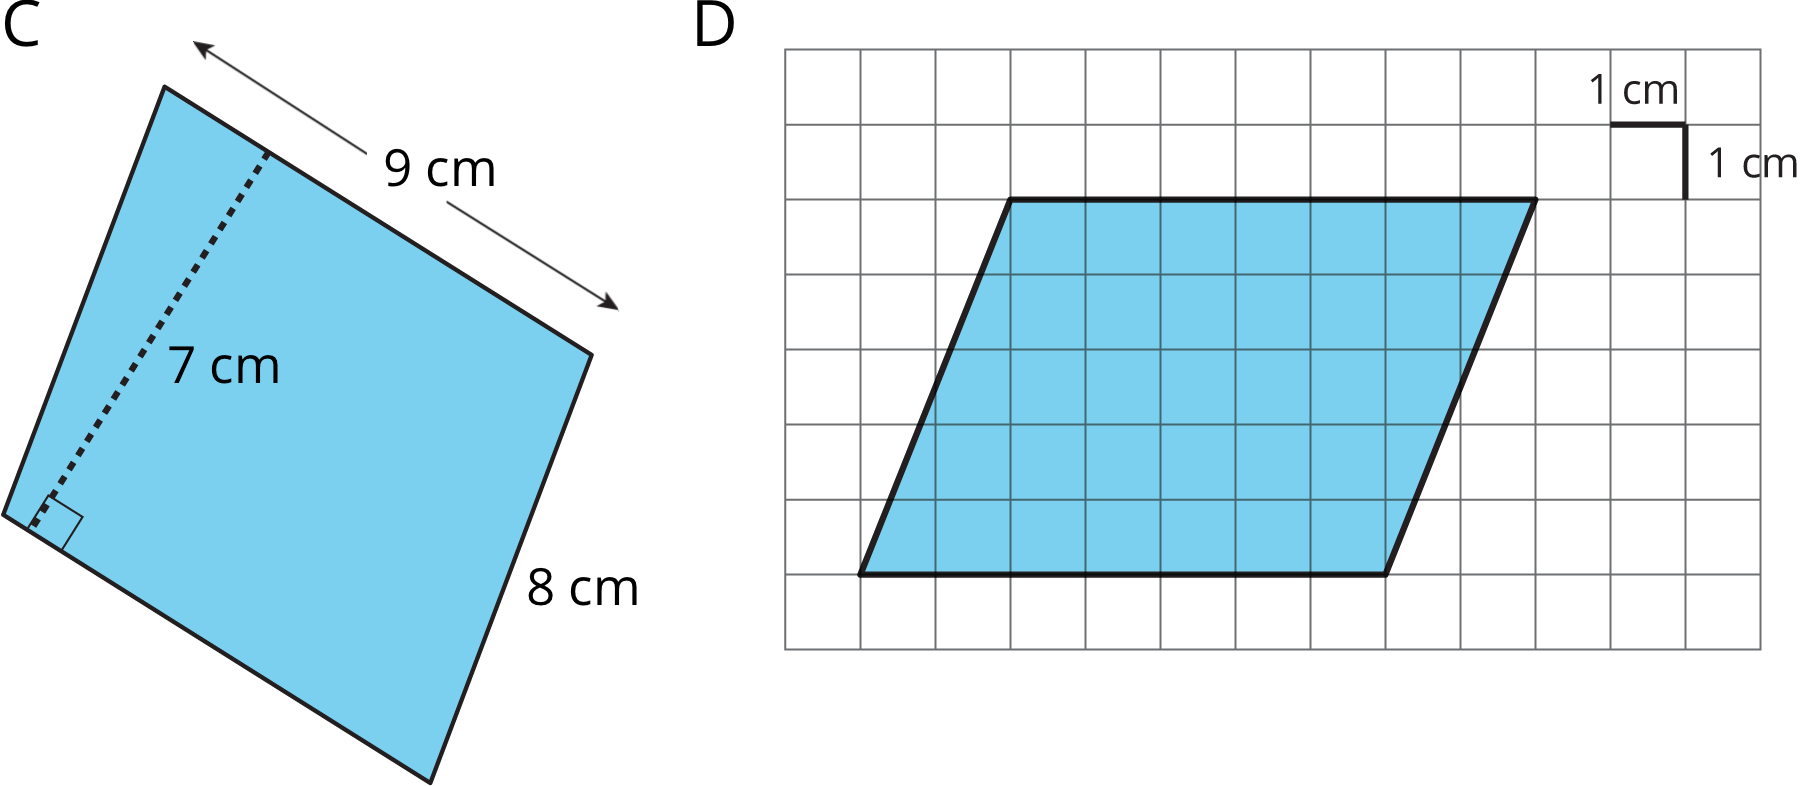
- Find the area of each parallelogram. Show your reasoning.
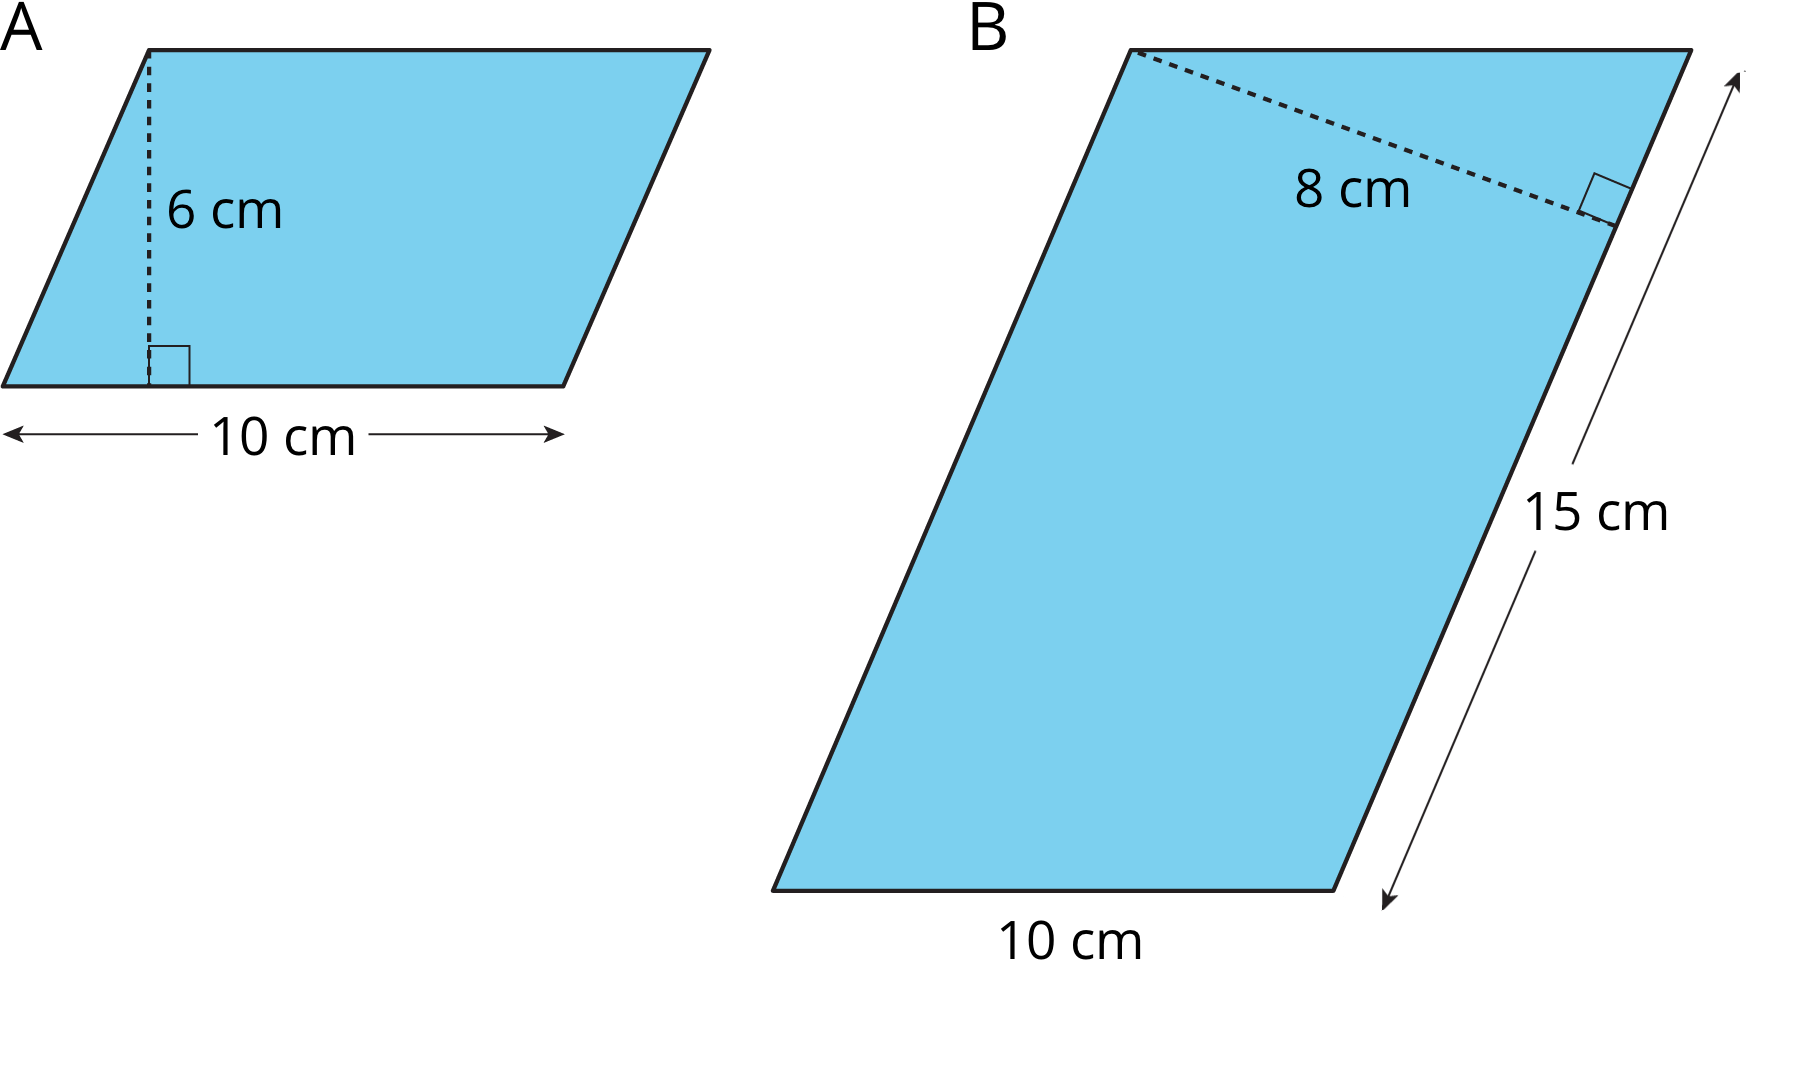
- In Parallelogram B, what is the corresponding height for the base that is 10 cm long? Explain or show your reasoning.
-
Two different parallelograms P and Q both have an area of 20 square units. Neither of the parallelograms are rectangles.
On the grid, draw two parallelograms that could be P and Q.

Student Response
For access, consult one of our IM Certified Partners.
Student Facing
Are you ready for more?
Here is a parallelogram composed of smaller parallelograms. The shaded region is composed of four identical parallelograms. All lengths are in inches.
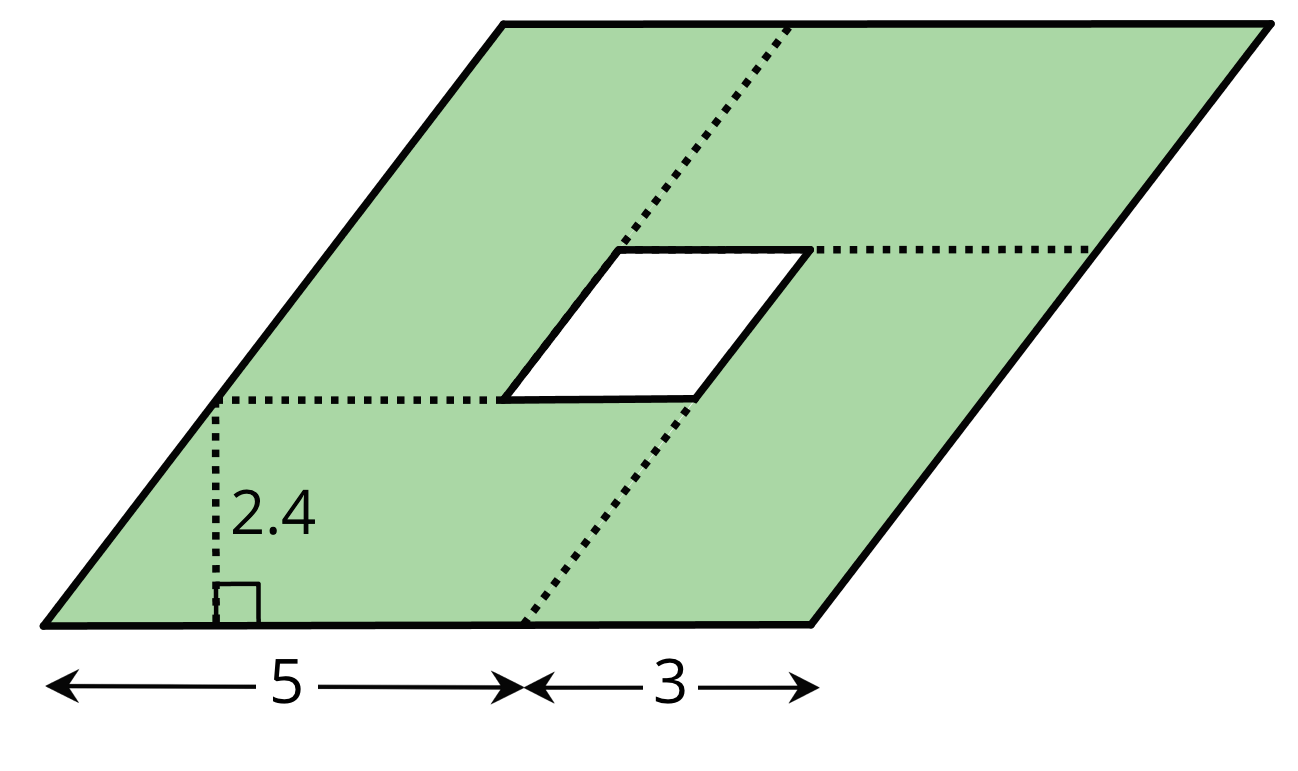
What is the area of the unshaded parallelogram in the middle? Explain or show your reasoning.
Student Response
For access, consult one of our IM Certified Partners.
Anticipated Misconceptions
Some students may continue to use visual reasoning strategies (decomposition, rearranging, enclosing, and subtracting) to find the area of parallelograms. This is fine at this stage, but to help them gradually transition toward abstract reasoning, encourage them to try solving one problem both ways—using visual reasoning and their generalization about bases and heights from an earlier lesson. They can start with one method and use the other to check their work.
Activity Synthesis
Use whole-class discussion to draw out three important points:
- We need base and height information to help us calculate the area of a parallelogram, so we generally look for the length of one side and the length of a perpendicular segment that connects the base to the opposite side. Other measurements may not be as useful.
- A parallelogram generally has two pairs of base and height. Both pairs produce the same area (it's the same parallelogram), so the product of pair of numbers should equal the product of the other pair.
- Two parallelograms with different pairs of base and height can have the same area, as long as their products are equal. So a 3-by-6 rectangle and a parallelogram with base 1 and height 18 will have the same area because \(3 \boldcdot 6 = 1 \boldcdot 18\).
To highlight the first point, ask how students decided which measurements to use when calculating area.
- “When multiple measurements are shown, how did you know which of the measurements would help you find area?”
- “Which pieces of information in parallelograms B and C were not needed? Why not?”
To highlight the second point, select 1–2 previously identified students to share how they went about finding the missing height in the second question. Emphasize that the product \(8 \boldcdot 15\) and that of 10 and the unknown \(h\) must be equal because both give us the area of the same parallelogram.
To highlight the last point, invite a few students to share their pair of parallelograms with equal area and an explanation of how they know the areas are equal. If not made explicit in students' explanations, stress that the base-height pairs must have the same product.
Design Principle(s): Support sense-making; Maximize meta-awareness
Lesson Synthesis
Lesson Synthesis
We used the formula for area to practice finding the area of various parallelograms.
- “When a parallelogram is on a grid, how do we know which side to choose for a base? Can we use any side?” (It is helpful to use a horizontal or a vertical side as a base; it would be easier to tell the length of that side and of its corresponding height.)
- “Off a grid, how do we know which measurements can help us find the area of a parallelogram?” (We need the length of one side of the parallelogram and of a perpendicular segment that connects that side to the opposite side.)
- “Do parallelograms that have the same area always look the same?” (No.) “Can you show an example?”
- “Do parallelograms that have the same base and height always look the same?” (No.) “Can you show an example?”
- “How can we draw two different parallelograms with the same area?” (We can find any two pairs of base-height lengths that have the same product. We can also use the same pair of numbers by draw the parallelograms differently.)
6.3: Cool-down - One More Parallelogram (5 minutes)
Cool-Down
For access, consult one of our IM Certified Partners.
Student Lesson Summary
Student Facing
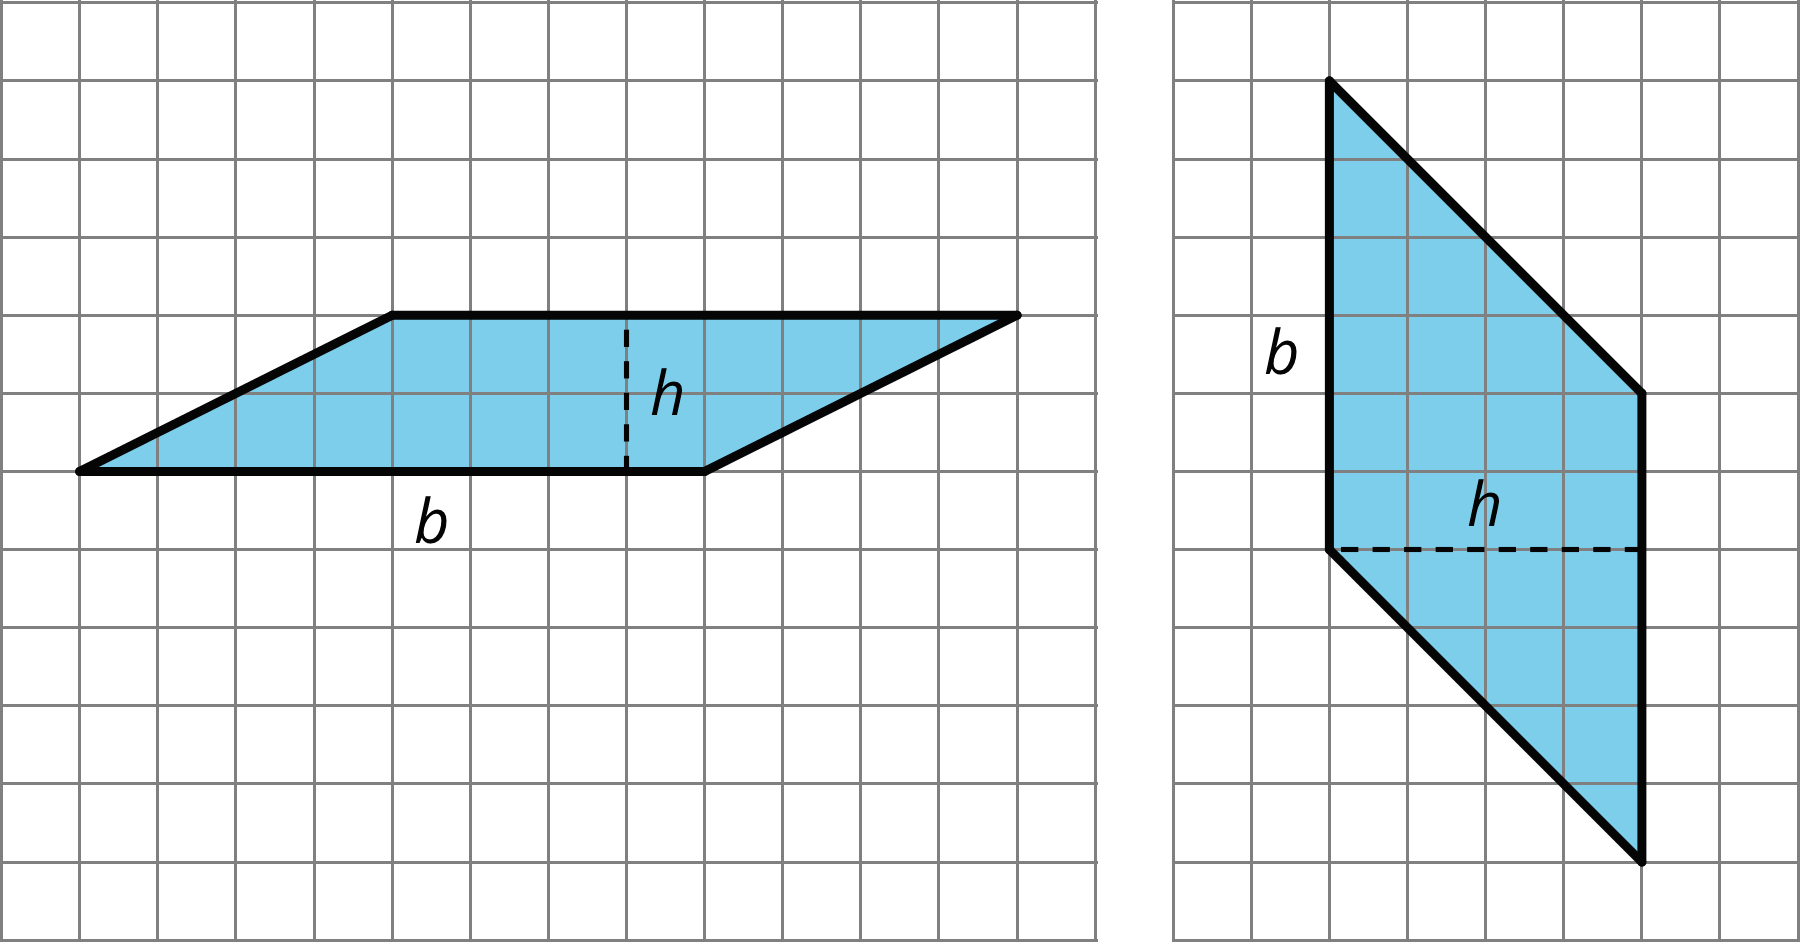
Any pair of base and corresponding height can help us find the area of a parallelogram, but some base-height pairs are more easily identified than others.
When a parallelogram is drawn on a grid and has horizontal sides, we can use a horizontal side as the base. When it has vertical sides, we can use a vertical side as the base. The grid can help us find (or estimate) the lengths of the base and of the corresponding height.
When a parallelogram is not drawn on a grid, we can still find its area if a base and a corresponding height are known.
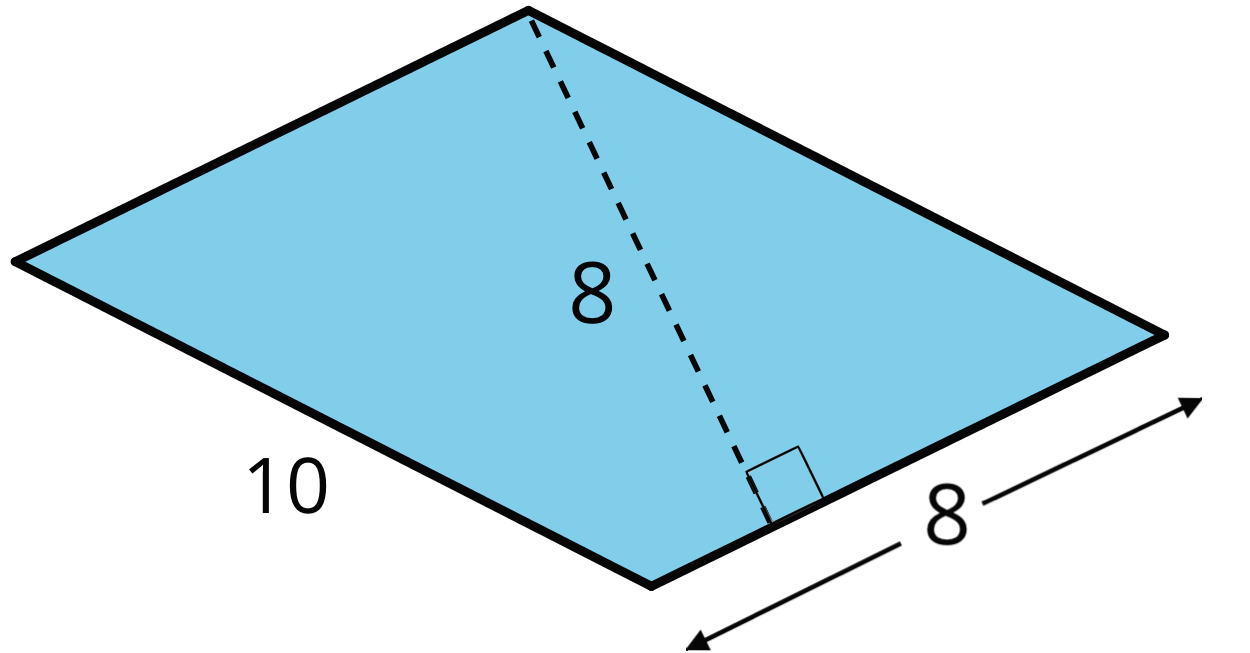
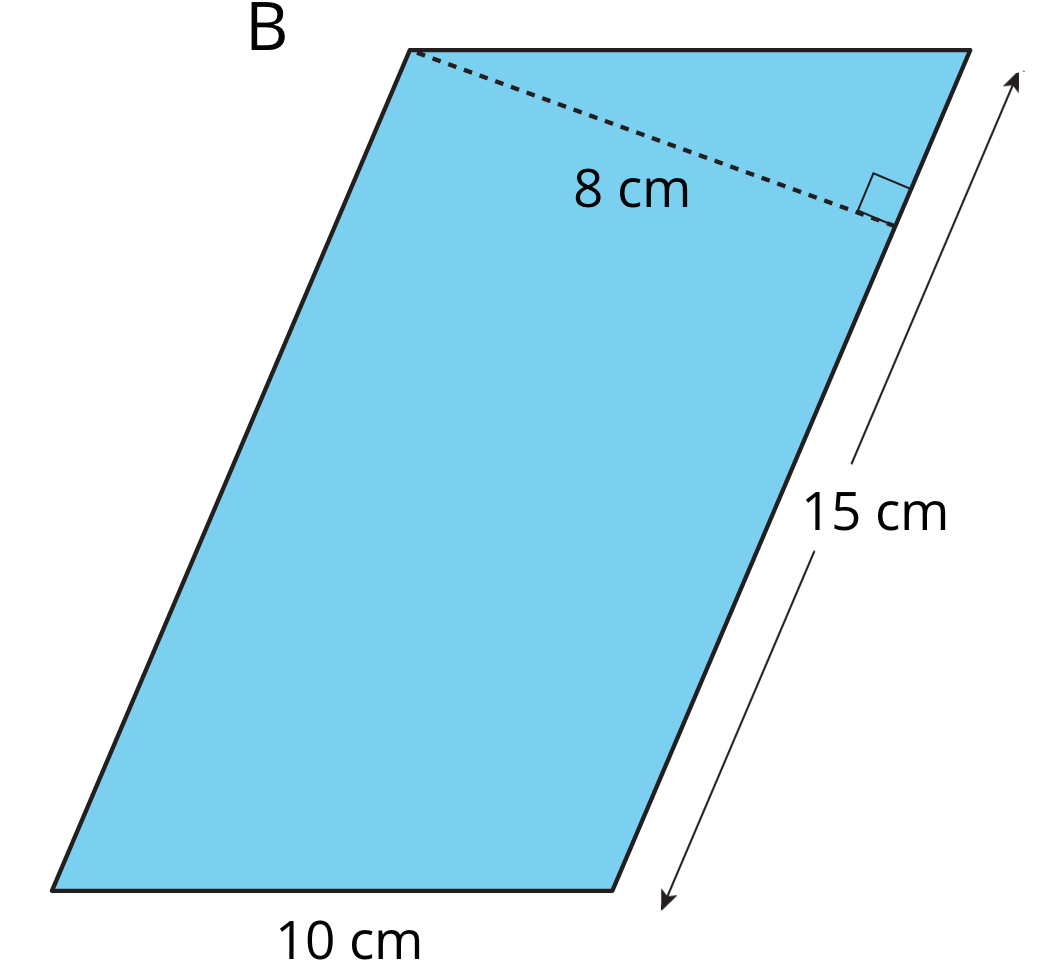
In this parallelogram, the corresponding height for the side that is 10 units long is not given, but the height for the side that is 8 units long is given. This base-height pair can help us find the area.
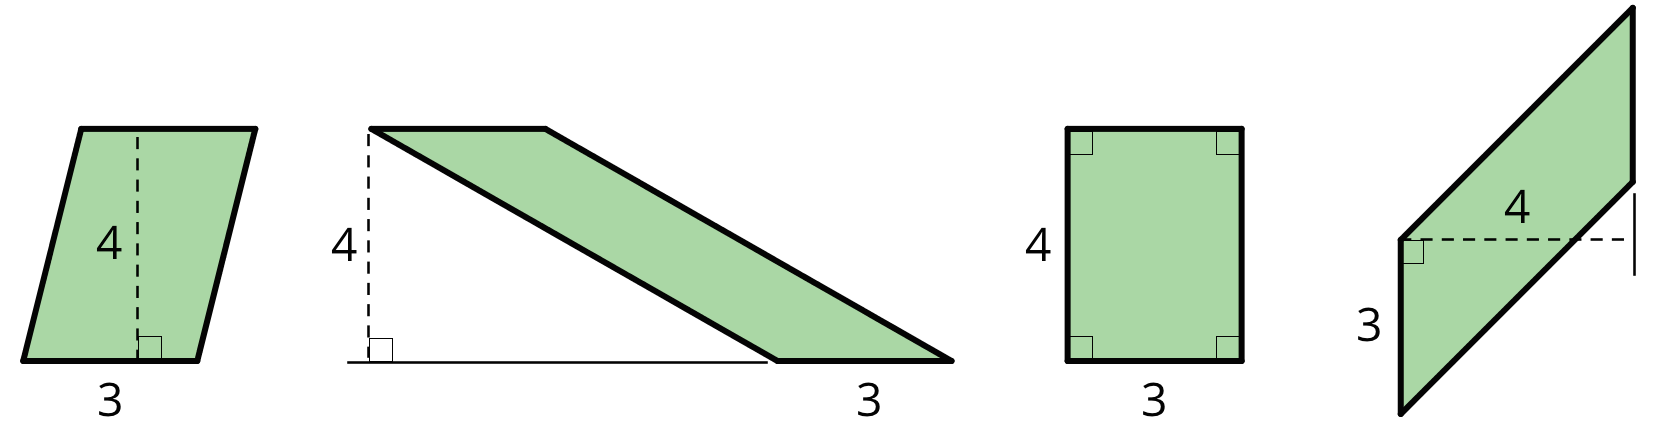
Regardless of their shape, parallelograms that have the same base and the same height will have the same area; the product of the base and height will be equal. Here are some parallelograms with the same pair of base-height measurements.