Lesson 11
Polygons
11.1: Which One Doesn’t Belong: Bases and Heights (5 minutes)
Warm-up
This warm-up prompts students to consolidate what they learned in the past few lessons and make careful observations about triangles.
Expect students to describe the differences in the triangles in terms of:
- angles (acute, right, or obtuse)
- orientation of sides (vertical, horizontal)
- the side likely to be chosen as a base
- length of base or height
Launch
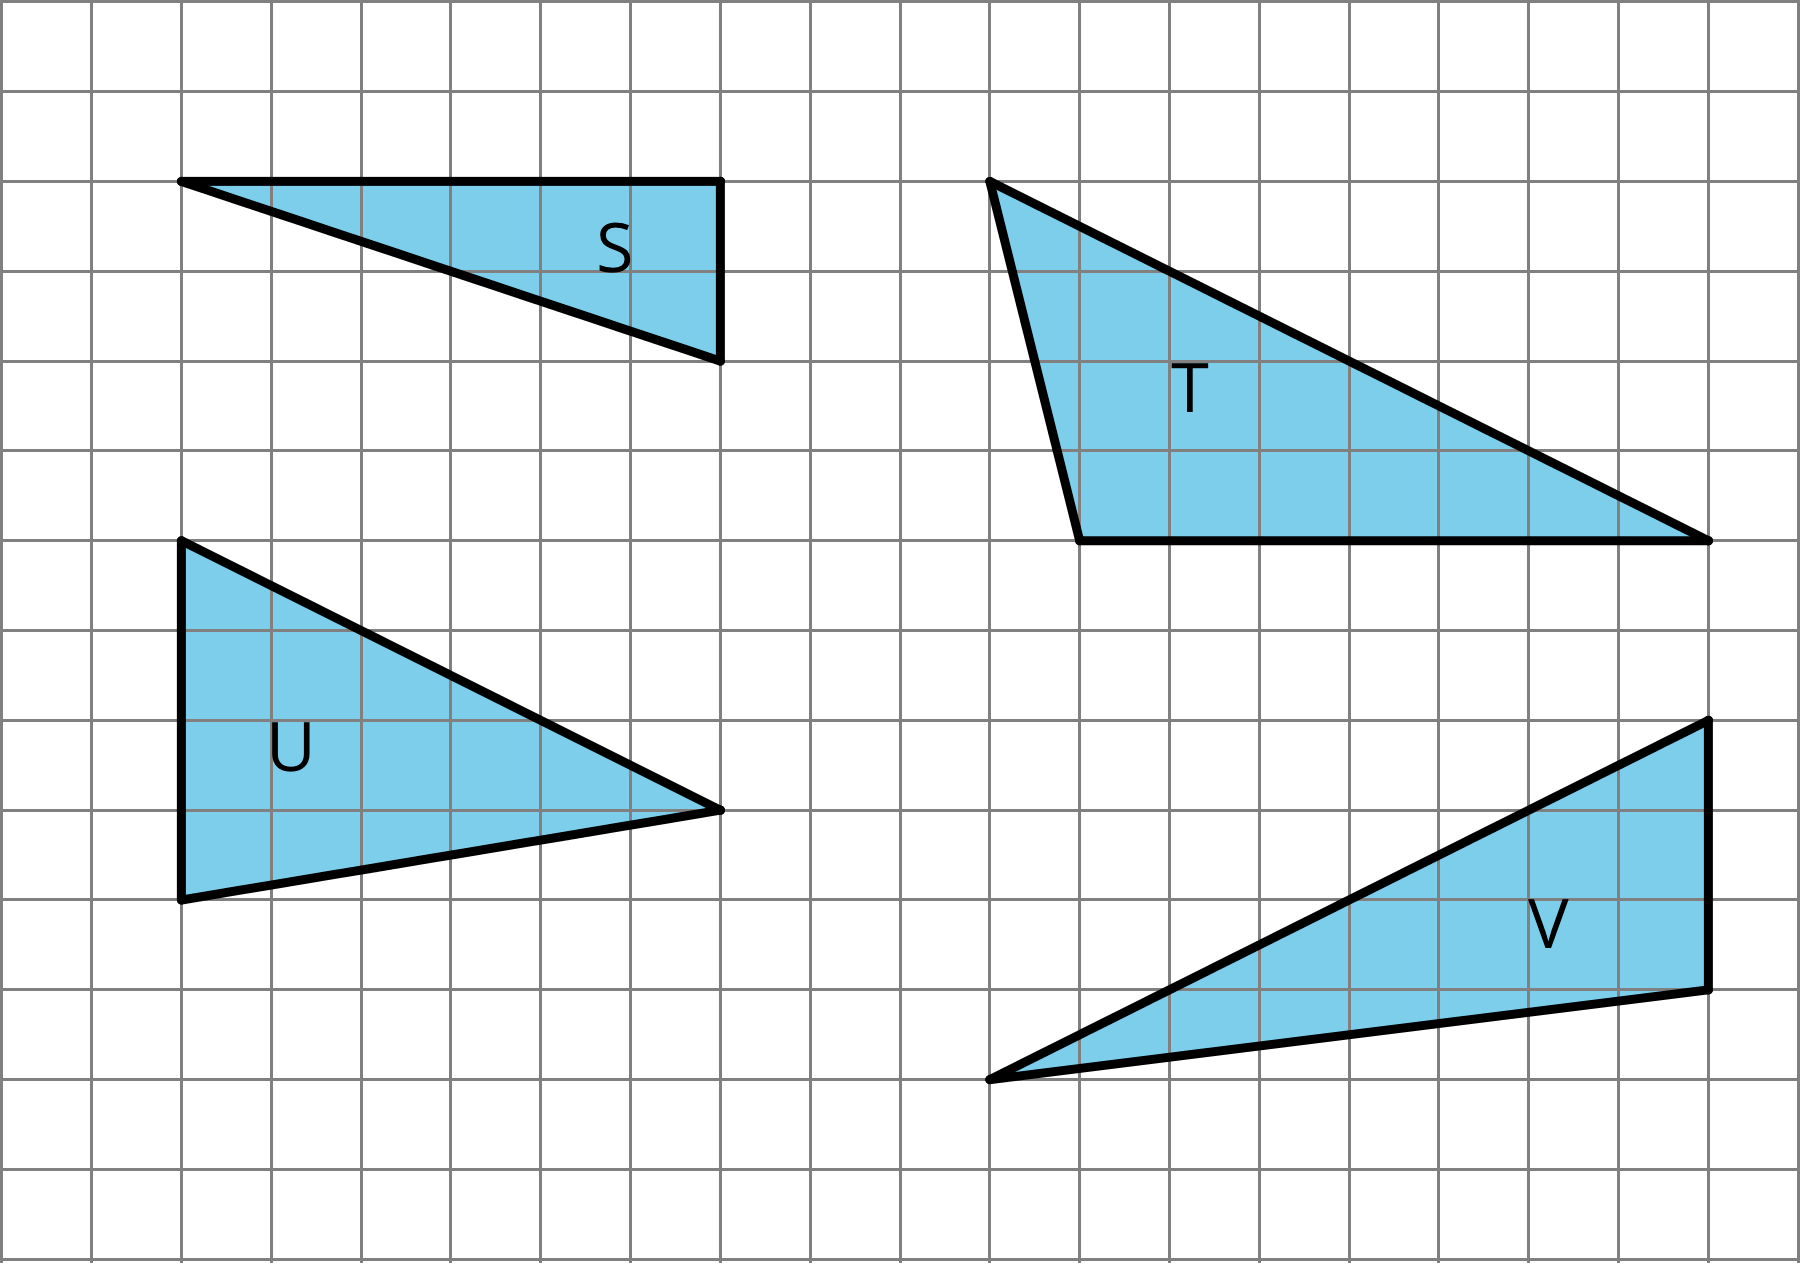
Arrange students in groups of 2–4. Display the image of triangles for all to see. Give students 1 minute of quiet think time and ask them to indicate when they have noticed one triangle that does not belong and can explain why. Encourage them to think of more than one possibility.
When the minute is up, give students 2 minutes to share their response with their group, and then together find at least one reason, if possible, that each triangle doesn't belong.
Student Facing
Which one doesn't belong?
Student Response
For access, consult one of our IM Certified Partners.
Activity Synthesis
After students shared their observations in groups, invite each group to share one reason why a particular triangle might not belong. Record and display the responses for all to see. After each response, poll the rest of the class to see if others made the same observation.
Since there is no single correct answer to the question of which pattern does not belong, attend to students’ explanations and ensure the reasons given are correct. Prompt students to explain the meaning of any terminology they use (parts of triangles, types of angles, etc.) and to substantiate their claims.
11.2: What Are Polygons? (20 minutes)
Activity
Developing a useful and complete definition of a polygon is harder than it seems. A formal definition is often very wordy or hard to parse. Polygons are often referred to as “closed” figures, but if used, this term needs to be defined, as the everyday meaning of “closed” is different than its meaning in a geometric context.
This activity prompts students to develop a working definition of polygon that makes sense to them, but that also captures all of the necessary aspects that makes a figure a polygon (MP6). Here are some important characteristics of a polygon.
- It is composed of line segments. Line segments are always straight.
- Each line segment meets one and only one other line segment at each end.
- The line segments never cross each other except at the end points.
- It is two-dimensional.
One consequence of the definition of a polygon is that there are always as many vertices as edges. Students may observe this and want to include it in their definition, although technically it is a result of the definition rather than a defining feature.
As students work, monitor for both correct and incorrect definitions of a polygon. Listen for clear and correct descriptions as well as common but inaccurate descriptions (so they can be discussed and refined later). Notice students with accurate explanations so they could share later.
Launch
Arrange students in groups of 2–4. Give students 3–4 minutes of quiet think time. Afterwards, ask them to share their responses with their group and complete the second question together. If there is a disagreement about whether a figure is a polygon, ask them to discuss each point of view and try to come to an agreement. Follow with a whole-class discussion.
Design Principle(s): Support sense-making; Maximize meta-awareness
Student Facing
Here are five polygons:

Here are six figures that are not polygons:

-
Circle the figures that are polygons.

-
What do the figures you circled have in common? What characteristics helped you decide whether a figure was a polygon?
Student Response
For access, consult one of our IM Certified Partners.
Anticipated Misconceptions
Students may think that Figures C and I are polygons because they can see several triangles or quadrilaterals in each figure. Ask students to look closely at the examples and non-examples and see there is a figure composed of multiple triangles or quadrilaterals, and if so, to see in which group it belongs.
Activity Synthesis
Display the figures in the first question for all to see. For each figure, ask at least one student to explain why they think it is or is not a polygon. (It is fine if students' explanations are not precise at this point.) Then, circle the figures that are polygons on the visual display.
Next, ask students to share their ideas about the characteristics of polygons. Record them for all to see. For each one, ask the class if they agree or disagree. If they generally agree, ask if there is anything they would add or elaborate on to make the description clearer or more precise. If they disagree, ask for an explanation.
If a key characteristic listed in the Activity Narrative is not mentioned by students, bring it up and revisit it at the end of the lesson.
Tell students we call the line segments in a polygon the edges or sides, and we call the points where the edges meet the vertices. Point to the sides and vertices in a few of the identified polygons.
Point out that polygons always enclose a region, but the region is not technically part of the polygon. When we talk about finding the area of a polygon, we are in fact finding the area of the region it encloses. So “the area of a triangle,” for example, is really shorthand for “area of the region enclosed by the triangle.”
Supports accessibility for: Language; Conceptual processing
11.3: Quadrilateral Strategies (15 minutes)
Activity
This activity has several aims. It prompts students to apply what they learned to find the area of quadrilaterals that are not parallelograms, encourages them to plan before jumping into a problem, and urges them to reflect on the merits of different methods.
Students begin by thinking about the moves they would make to find the area of a quadrilateral and explaining their preference to their partners. They then consider and discuss the different strategies taken by other students. Along the way, they may notice that some strategies are more direct or efficient than others. Students reflect on these strategies and use their insights to plan the work of finding the area of polygons in this activity and beyond.
Note that it is unnecessary for students to take the most efficient path. It is more important that they choose an approach that makes sense to them but have the chance to see the pros and cons of various paths.
Launch
Ask students to recall the definition of quadrilateral from earlier grades, or tell students that a quadrilateral is a polygon with 4 sides. Tell students that we will now think about how to find the area of quadrilaterals.
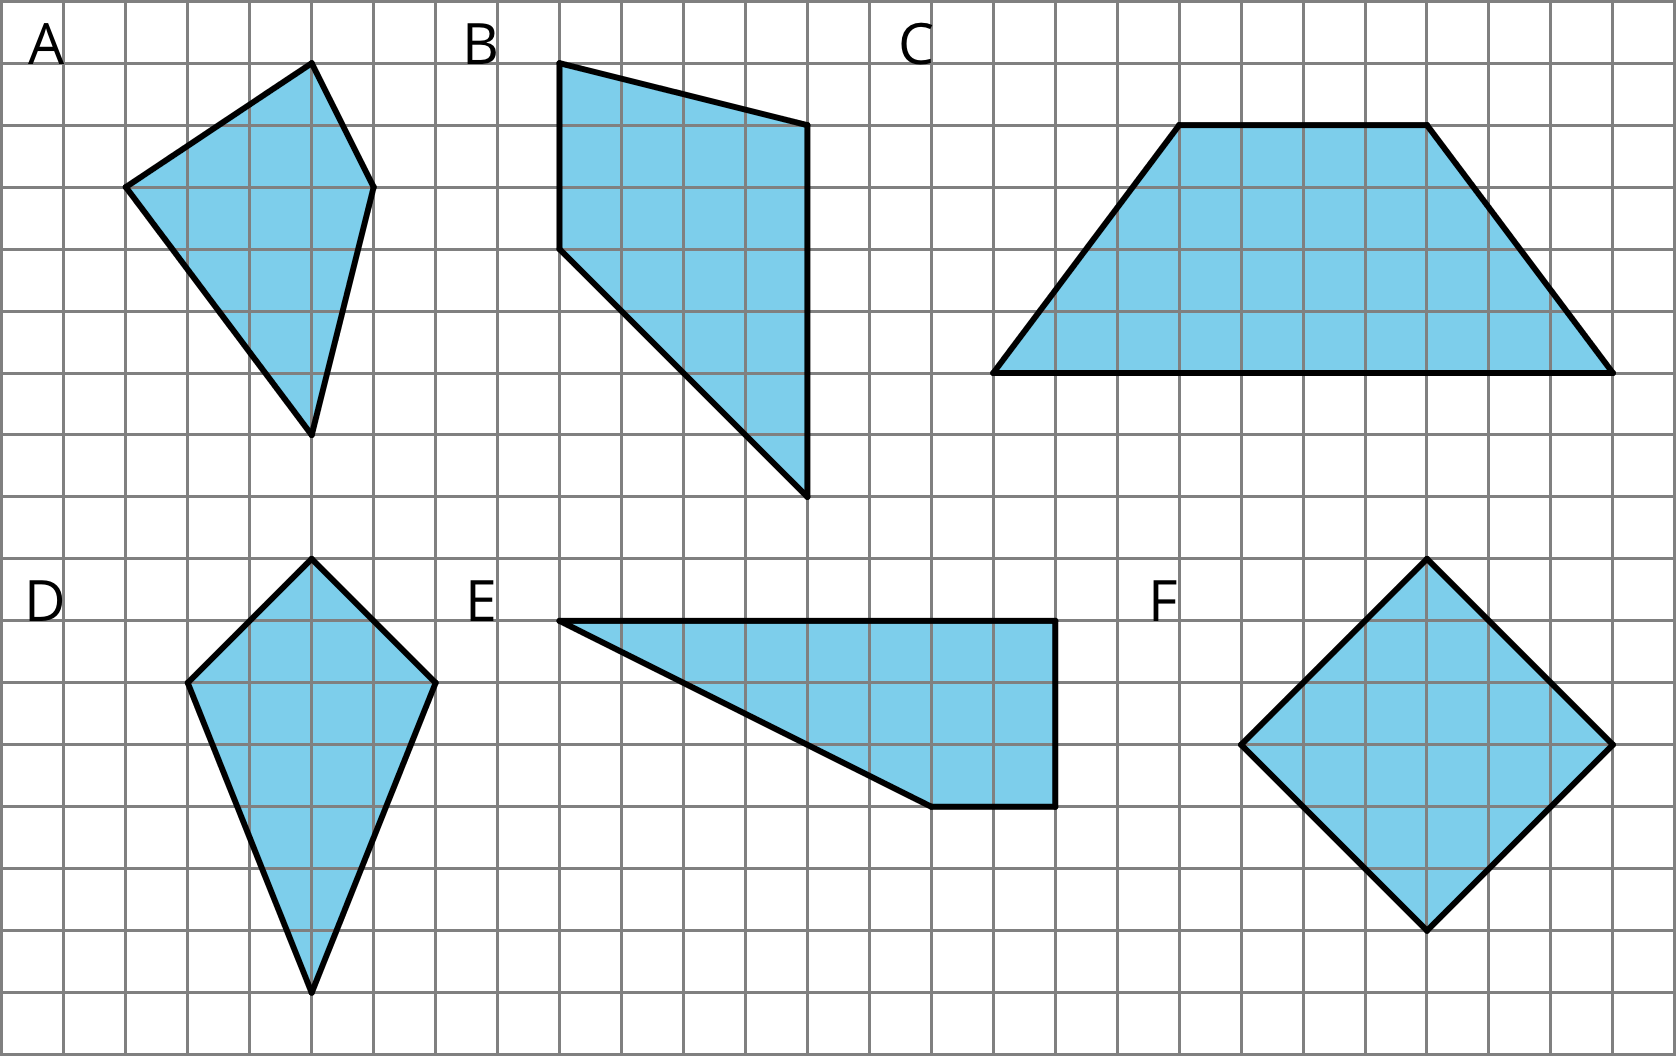
Arrange students in groups of 4. Display the image of quadrilaterals A–F for all to see. Direct their attention to Quadrilateral D.
Give students a minute of quiet time to think about the first 2–3 moves they would make to find the area of D. Offer some sentence starters: "First, I would . . . Next I would . . ., and then I would . . ." Encourage them to show their moves on the diagram in their material. Emphasize that we are interested only in the plan for finding area and not in the area itself, so no calculation is expected. Then, give them 1–2 minutes to share their moves with their group.
Ask students to indicate what their first move was. Did their very first involve:
- decomposing the quadrilateral?
- enclosing the quadrilateral?
- another move?
Ask the students whose first move is to decompose the figure:
- “How many pieces resulted from the decomposition? 2 pieces? 3 pieces? 4 pieces? More?”
- “What is the next move? Rearrange? Duplicate a piece? Calculate the area of a piece? Something else?”
Ask the students whose first move is to enclose the figure:
- “How many rectangles did you create? 1 rectangle? 2 rectangle? More?”
- “What is the next move? Rearrange the extra pieces? Calculate the area of an extra piece? Something else?”
For each sequence that students mentioned, draw a quick diagram to illustrate it for all to see.
Once students have a chance to see a variety of approaches, ask students to revisit their sequence of moves. Give students 1–2 minutes to think about the pros and cons of their original plan, and if there was another strategy that they found productive. Invite a few students to share their reflections.
Then, give students quiet time to complete the activity and access to their geometry toolkits. Ask students to keep in mind the merits of the different strategies they have seen as they plan their work.
Student Facing
Find the area of two quadrilaterals of your choice. Show your reasoning.
Student Response
For access, consult one of our IM Certified Partners.
Student Facing
Are you ready for more?
Here is a trapezoid. \(a\) and \(b\) represent the lengths of its bottom and top sides. The segment labeled \(h\) represents its height; it is perpendicular to both the top and bottom sides.
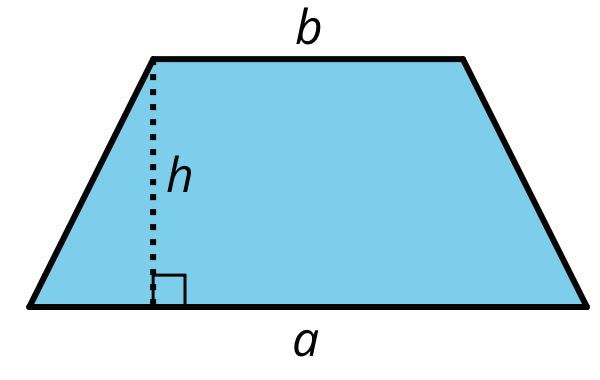
Apply area-reasoning strategies—decomposing, rearranging, duplicating, etc.—on the trapezoid so that you have one or more shapes with areas that you already know how to find. Use the shapes to help you write a formula for the area of a trapezoid. Show your reasoning.
Student Response
For access, consult one of our IM Certified Partners.
Activity Synthesis
To conclude the activity, ask students to choose one quadrilateral they worked on (other than D) and tell their group the first couple of moves they made for finding its area and why. Encourage other group members to listen carefully, check that the reasoning is valid, and offer feedback.
Students may have noticed that all the approaches involved decomposing one or more regions into triangles, rectangles, or both. If not mentioned by students, point this out. Emphasize that we can decompose any polygon into triangles and rectangles to find its area.
Design Principle(s): Optimize output (for explanation); Maximize meta-awareness
11.4: Pinwheel (30 minutes)
Optional activity
In this activity, students determine the area of an unfamiliar polygon and think about various ways for doing so. The task prepares students to find the areas of other unfamiliar shapes in real-world contexts. It also reinforces the practice of sense-making, planning, and persevering when solving a problem (MP1). Students reason independently before discussing and recording their strategies in groups.
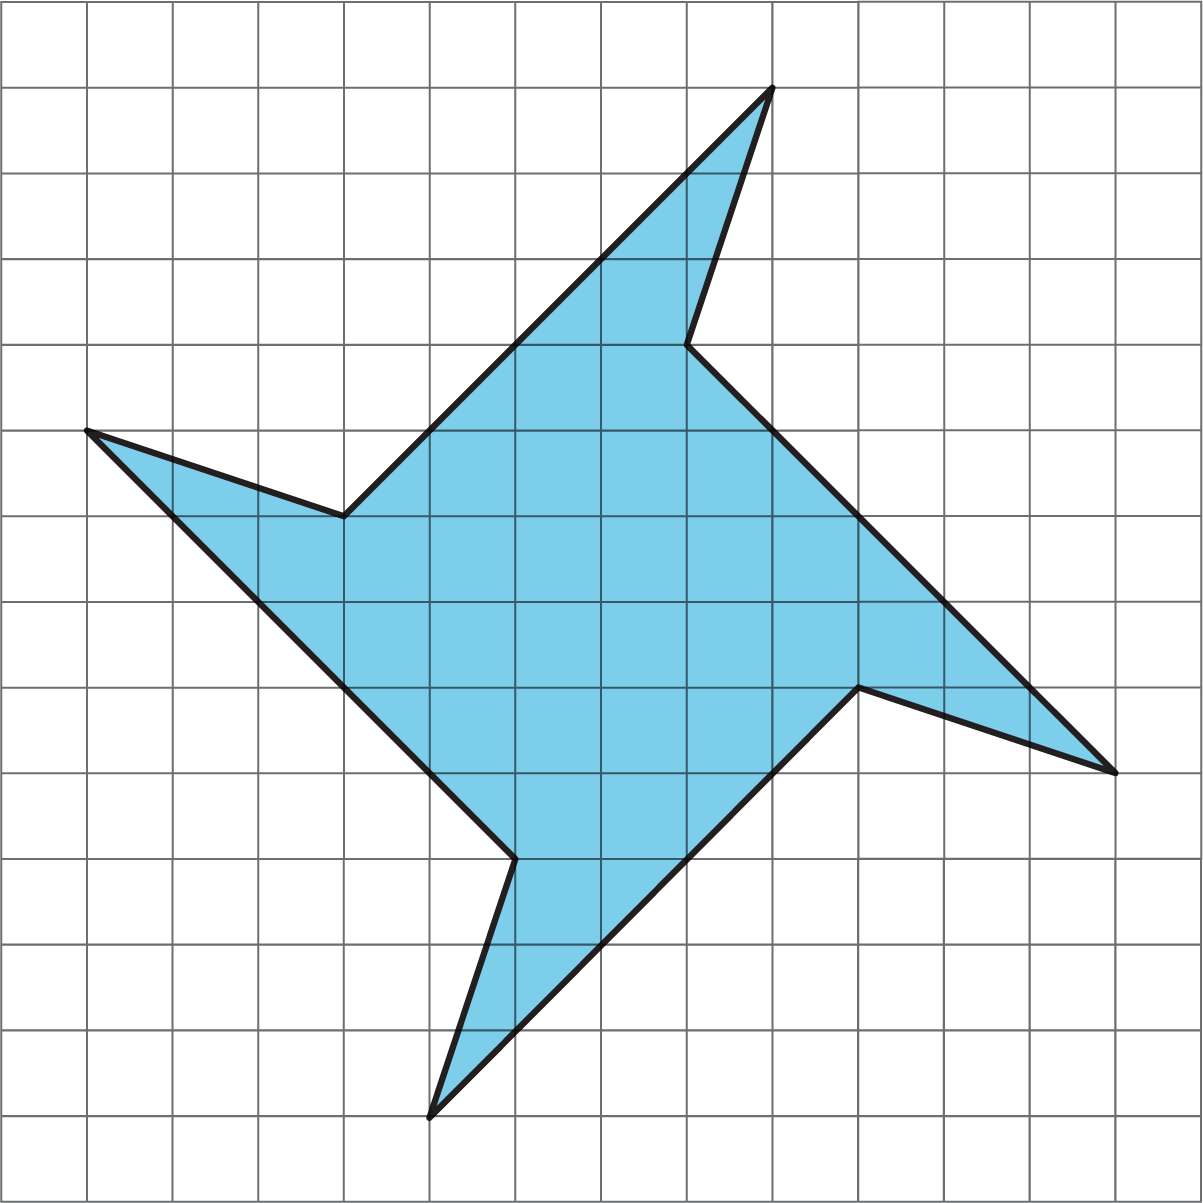
Because the shape of the polygon is more complex than what students may have seen so far, expect students to experiment with one or more strategies. Consider preparing extra copies of the diagram for students to use, if needed.
As students work, monitor the paths taken by different groups and make note of the variations and complexities. If there is limited variation in strategies, look for groups who recorded the same strategy in different ways. Also check whether students make use of the structure of the pinwheel in their reasoning (MP7). Do they notice it could be decomposed into four identical pieces (or sets of pieces)? Or, if enclosing the pinwheel with a square, do they make use the fact that the extra regions are identical?
Launch
Arrange students in groups of 4. Give students access to their geometry toolkits and 5 minutes of quiet time to plan an approach for finding the area of the pinwheel. Then, ask them to share their plan with their group.
The group then decides on one or more strategies to pursue, works together to find the area, and creates a visual display of the strategy (or strategies) used. Give each group one or more copies of the blackline master for the visual display.
Supports accessibility for: Social-emotional skills; Conceptual processing
Student Facing
Find the area of the shaded region in square units. Show your reasoning.
Student Response
For access, consult one of our IM Certified Partners.
Anticipated Misconceptions
Students who overlay a rotated square over the figure such that the four pins are shown as four right triangles may use incorrect side lengths for the triangles (e.g. assuming that one of the side lengths are 2 units instead of \(2\sqrt2\) units) or the square. Help them see that the diagonals of the unit squares are longer than the side length by measuring them.
If students struggle, suggest they use one or more of the tools in their toolkits to assist with solving the problem.
Activity Synthesis
Ask the groups to visit one another’s visual display and discuss the following questions as they observe others' work:
- Did this group arrive at the same area as our group? If not, why?
- How is their strategy like our strategy?
- How is their strategy different than ours?
After the gallery walk, ask a few students to comment on how their group’s strategy compares to that of another group. Highlight similarities in students’ work in broader terms. For example, all groups have likely used one of the following approaches:
- decomposed the pinwheel into triangles and used the formula to find the area of the triangles
- decomposed the pinwheel into triangles and rectangles, rearranged the pieces into rectangles or parallelograms, and found the areas of those regions
- enclosed the pinwheel with a square, decomposed the extra regions into triangles and rectangles, found their area of the extra regions, and subtracted them from that of the square
Reinforce that all approaches involve decomposing a polygon into triangles and rectangles to find area.
Design Principle(s): Support sense-making
Lesson Synthesis
Lesson Synthesis
To review the defining characteristics of a polygon, return to the image in the first activity (What are Polygons?) and display the list of defining features students generated in that activity.
Revisit each figure that is not a polygon and ask students to explain why it is not a polygon. Encourage students to use their list to support their explanations, as well as to suggest revisions to their working definition.
Here is a polygon with 5 sides.

Ask students:
-
“How do we know this figure is a polygon?” (It is composed of line segments. Each segment meets only one other segment at each end. The segments do not cross one another. It is two-dimensional.)
-
“What does it mean to find the area of this polygon?” (It means finding the area of the region inside it.)
-
“How can we find the area of this polygon?” (We can decompose the region inside it into triangles and rectangles.)
11.5: Cool-down - Triangulation (5 minutes)
Cool-Down
For access, consult one of our IM Certified Partners.
Student Lesson Summary
Student Facing
A polygon is a two-dimensional figure composed of straight line segments.
- Each end of a line segment connects to one other line segment. The point where two segments connect is a vertex. The plural of vertex is vertices.
- The segments are called the edges or sides of the polygon. The sides never cross each other. There are always an equal number of vertices and sides.
Here is a polygon with 5 sides. The vertices are labeled \(A, B, C, D\), and \(E\).
A polygon encloses a region. To find the area of a polygon is to find the area of the region inside it.
We can find the area of a polygon by decomposing the region inside it into triangles and rectangles.
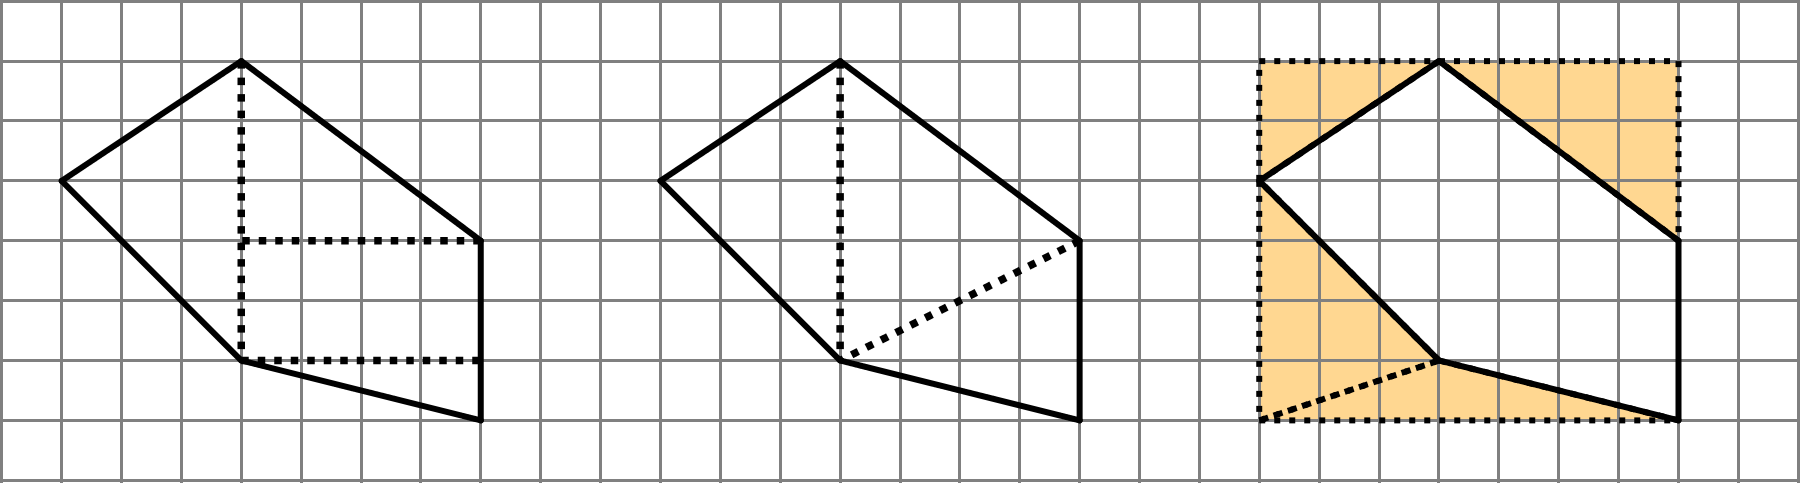
The first two diagrams show the polygon decomposed into triangles and rectangles; the sum of their areas is the area of the polygon. The last diagram shows the polygon enclosed with a rectangle; subtracting the areas of the triangles from the area of the rectangle gives us the area of the polygon.