Lesson 2
Circular Grid
2.1: Notice and Wonder: Concentric Circles (5 minutes)
Warm-up
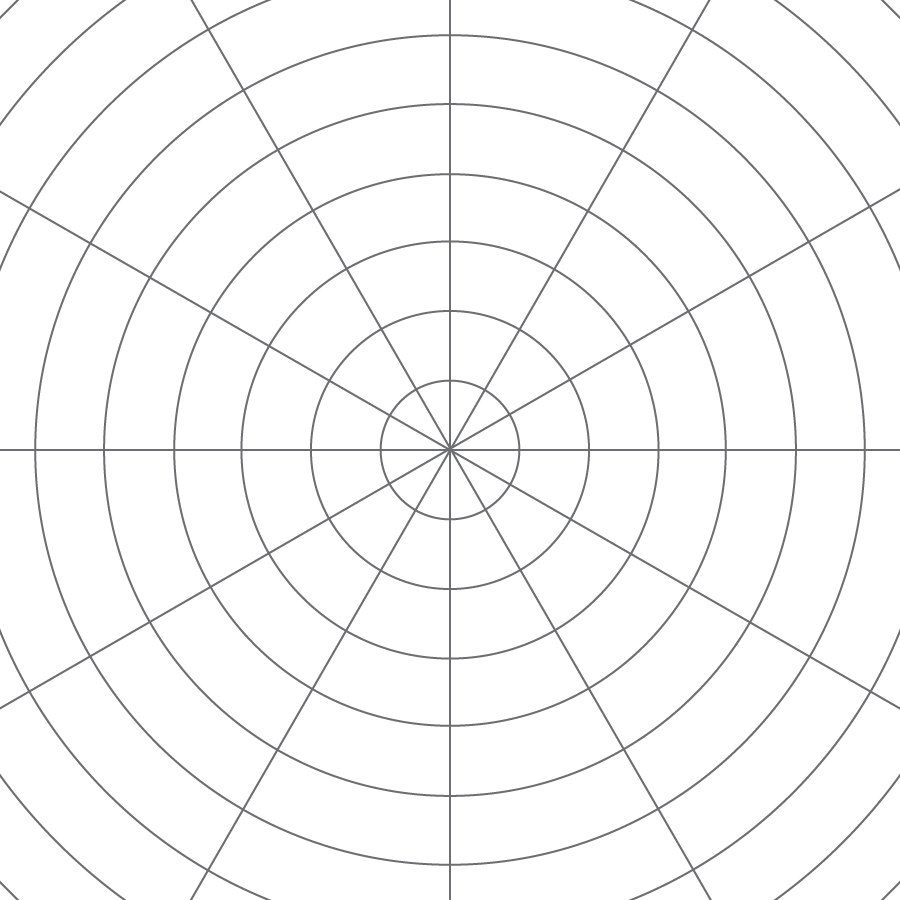
The goal of this warm-up is to introduce the circular grid which students will examine in greater detail throughout this unit. The circles in the grid all have the same center and the distance between consecutive circles is the same. The circular grid is particularly useful for showing dilations where the center of dilation is the center of the grid.
Students engage in MP7 as they look for structure and relationships between the circles and lines in the picture.
Launch
Arrange students in groups of 2. Tell students that they will look at an image, and their job is to think of at least one thing they notice and at least one thing they wonder. Display the image for all to see. Ask students to give a signal when they have noticed or wondered about something. Give students 1 minute of quiet think time, and then 1 minute to discuss the things they notice with their partner, followed by a whole-class discussion.
Student Facing
What do you notice? What do you wonder?
Student Response
For access, consult one of our IM Certified Partners.
Activity Synthesis
Ask students to share their responses, highlighting these features of the picture:
- The circles share the same center
- The center of the circles is the point where the lines meet
- The distance from one circle to the next is always the same (the radius of each successive circle is one unit more than its predecessor)
Students may also notice that the angle made by successive rays from the center is always 30 degrees. Some things students may wonder include
- When is this grid useful?
- Why are the circles equally spaced?
- Why are the lines there?
2.2: A Droplet on the Surface (15 minutes)
Activity
The purpose of this activity is to begin to think of a dilation with a scale factor as a rule or operation on points in the plane. Students work on a circular grid with center of dilation at the center of the grid. They examine what happens to different points on a given circle when the dilation is applied and observe that these points all map to another circle whose radius is scaled by the scale factor of the dilation. For example, if the scale factor is 3 and the points lie on a circle whose radius is 2 grid units, then the dilated points will all lie on a circle whose radius is 6 units. Students need to explain their reasoning for finding the scale factor (MP3).
Students discover that the circular grid is a powerful tool for representing dilations and they will continue to use the circular grid as they study what happens when dilations are applied to shapes other than grid circles.
In the digital activity, students encounter some new tools and the circular grid.
Launch
Ask students if they have ever seen a pebble dropped in a still pond, and select students to describe what happens. (The pebble becomes the center of a sequence of circular ripples.) Display the image from the task statement, and ask students to think about how it is like a pebble dropped in a still pond. Demonstrate that distance on the circular grid is measured by counting units along one of the rays that start at the center, \(P\). Use MLR 8 (Discussion Supports) to draw students’ attention to a few important words in the task:
- “When we say ‘on the circle,’ we mean on the curve or on the edge. (We do not mean the circle’s interior.)”
- “Remember that a ray starts at a point and goes forever in one direction. Their rays should start at \(P\) and be drawn to the edge of the grid.”
If using the digital activity, you may want to demonstrate dilating a point before having students begin the task.
Supports accessibility for: Conceptual processing; Language
Student Facing
The larger Circle d is a dilation of the smaller Circle c. \(P\) is the center of dilation.
-
Draw four points on the smaller circle using the Point on Object tool.

-
Draw the rays from \(P\) through each of those four points. Select the Ray tool, then point \(P\), and then the second point.

-
Mark the intersection points of the rays and Circle d by selecting the Intersect tool and clicking on the point of intersection.

-
Complete the table. In the row labeled S, write the distance between \(P\) and the point on the smaller circle in grid units. In the row labeled L, write the distance between \(P\) and the corresponding point on the larger circle in grid units. Measure the distances between pairs of points by selecting the Distance tool, and then clicking on the two points.

\(A\) \(B\) \(C\) \(D\) S L - The center of dilation is point \(P\). What is the scale factor that takes the smaller circle to the larger circle? Explain your reasoning.
Student Response
For access, consult one of our IM Certified Partners.
Launch
Ask students if they have ever seen a pebble dropped in a still pond, and select students to describe what happens. (The pebble becomes the center of a sequence of circular ripples.) Display the image from the task statement, and ask students to think about how it is like a pebble dropped in a still pond. Demonstrate that distance on the circular grid is measured by counting units along one of the rays that start at the center, \(P\). Use MLR 8 (Discussion Supports) to draw students’ attention to a few important words in the task:
- “When we say ‘on the circle,’ we mean on the curve or on the edge. (We do not mean the circle’s interior.)”
- “Remember that a ray starts at a point and goes forever in one direction. Their rays should start at \(P\) and be drawn to the edge of the grid.”
If using the digital activity, you may want to demonstrate dilating a point before having students begin the task.
Supports accessibility for: Conceptual processing; Language
Student Facing
The larger Circle d is a dilation of the smaller Circle c. \(P\) is the center of dilation.
- Draw four points on the smaller circle (not inside the circle!), and label them \(E\), \(F\), \(G\), and \(H\).
- Draw the rays from \(P\) through each of those four points.
- Label the points where the rays meet the larger circle \(E’\), \(F’\), \(G’\), and \(H’\).
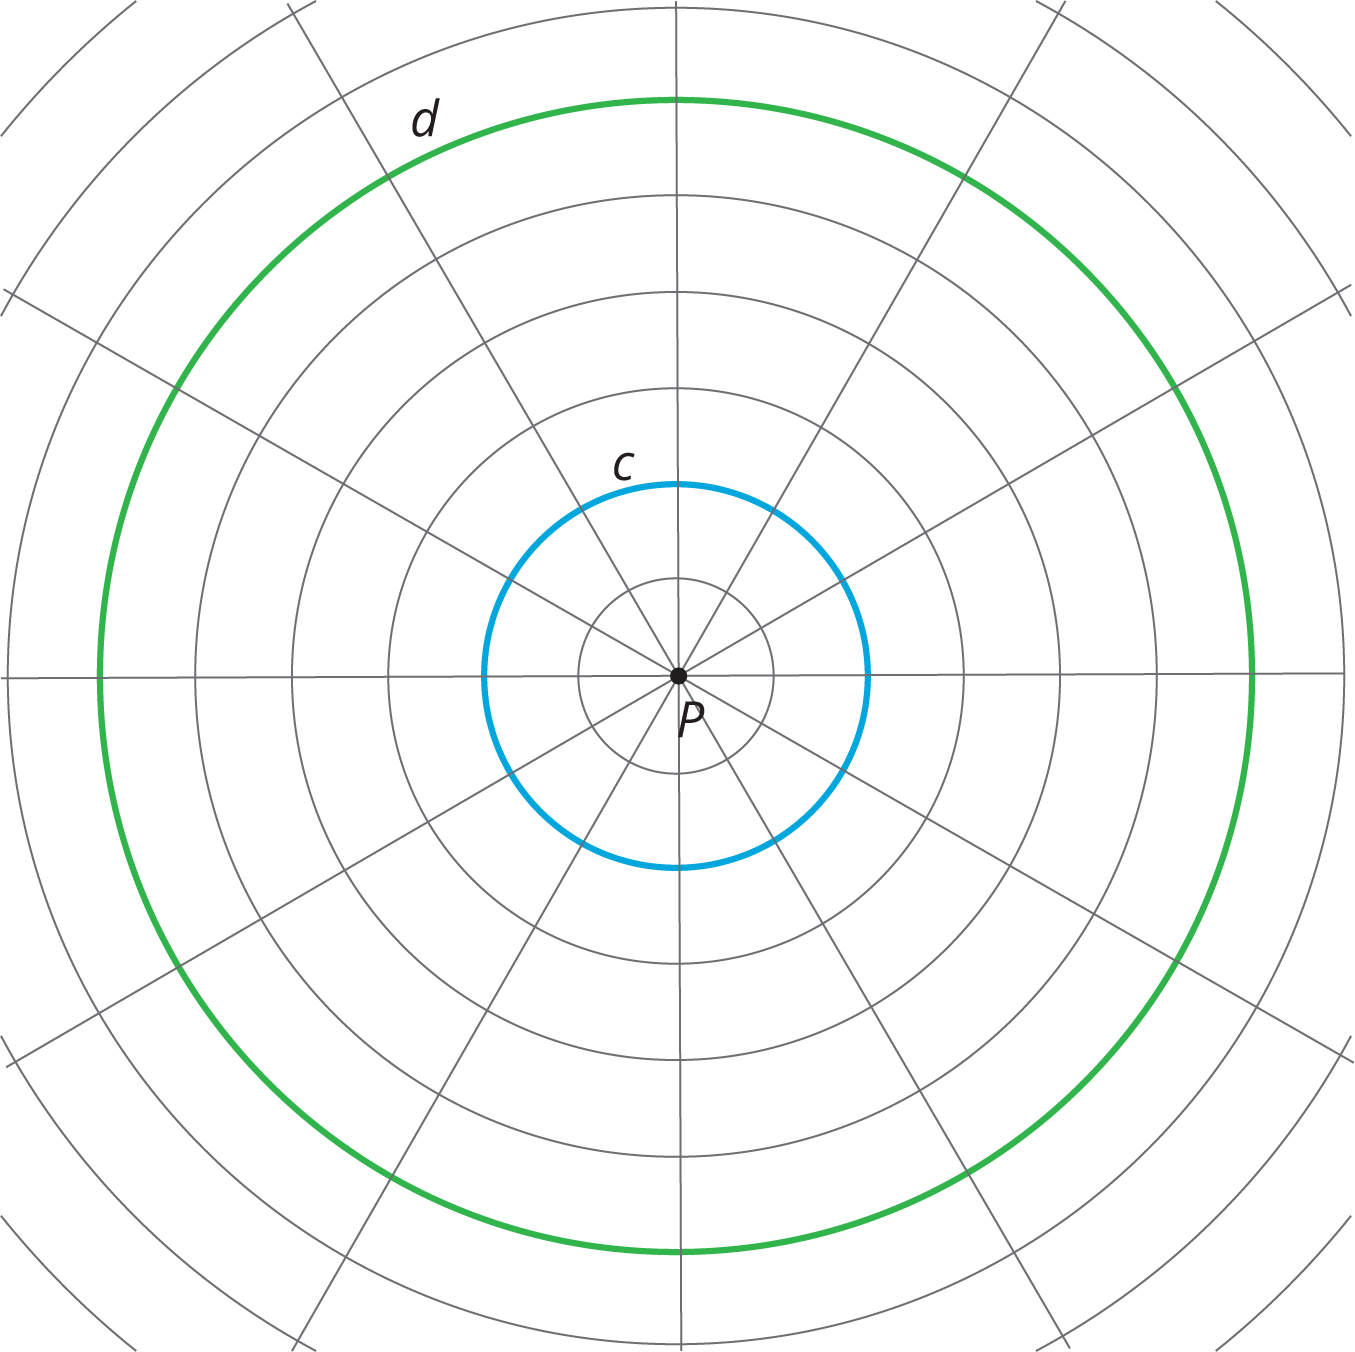
4. Complete the table. In the row labeled c, write the distance between \(P\) and the point on the smaller circle in grid units. In the row labeled d, write the distance between \(P\) and the corresponding point on the larger circle in grid units.
| \(E\) | \(F\) | \(G\) | \(H\) | |
|---|---|---|---|---|
| c | ||||
| d |
5. The center of dilation is point \(P\). What is the scale factor that takes the smaller circle to the larger circle? Explain your reasoning.
Student Response
For access, consult one of our IM Certified Partners.
Anticipated Misconceptions
For question 5, students might think the scale factor is 4, because the distance between the smaller and larger circle for each point increases by 4. If this happens, ask students how many grid units circle \(c\) is from the center (2) and how many grid units circle \(d\) is from the center (6). Then remind them that scale factor means a number you multiply by.
Activity Synthesis
Ask students if they made a strategic choice of points, such as points that lie on the grid lines coming from the center point \(P\). Why are these points good choices for dilating?
Ask students what they think would happen if a circle were dilated about its center with a scale factor of 2 or 4. (The result would be a circle with twice the radius and 4 times the radius, respectfully, all sharing the same center.)
Two important observations coming from the lesson are:
- The scale factor for this dilation is 3 so distances from the center of the circles triple when the dilation is applied.
- The large circle is the dilation of the small circle, that is each point on the circle with radius 6 units is the dilated image of a point on the circle of radius 2 units. (To find which one, draw the line from the point to the center and see where it intersects the circle of radius 2 units.)
Design Principle(s): Support sense-making
2.3: Quadrilateral on a Circular Grid (15 minutes)
Activity
This activity continues studying dilations on a circular grid, this time focusing on what happens to points lying on a polygon. Students first dilate the vertices of a polygon as in the previous activity. Then they examine what happens to points on the sides of the polygon. They discover that when these points are dilated, they all lie on a side of another polygon. Just as the image of a grid circle is another circle, so the dilation of a polygon is another polygon. Moreover the dilated polygon is a scaled copy of the original polygon. These important properties of dilations are not apparent in the definition.
Monitor for students who notice that the sides of the scaled polygon \(A'B'C'D'\) are parallel to the sides of \(ABCD\) and that \(A'B'C'D'\) is a scaled copy of \(ABCD\) with scale factor 2. Also monitor for students who notice the same structure for \(EFGH\) except this time the scale factor is \(\frac{1}{2}\). Invite these students to share during the discussion.
Launch
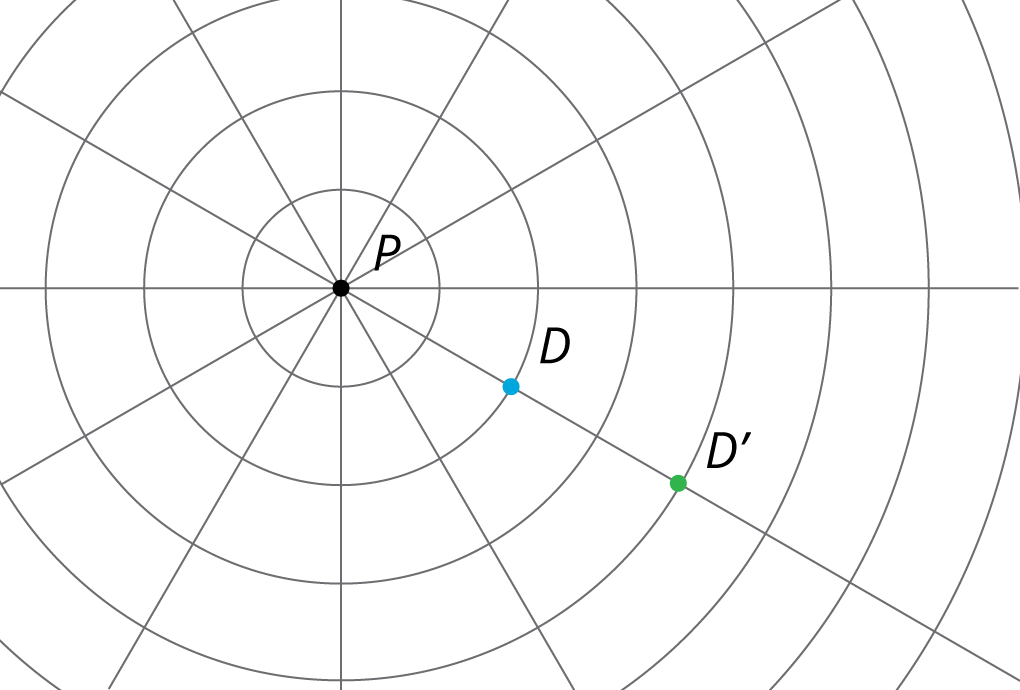
Provide access to geometry toolkits. Tell students that they are going to dilate some points. Before they begin, demonstrate the mechanics of dilating a point using a center of dilation and a scale factor. Tell students, “In the previous activity, each point was dilated to its image using a scale factor of 3. The dilated point was three times as far from the center as the original point. When we dilate point \(D\) using \(P\) as the center of dilation and a scale factor of 2, that means we’re going to take the distance from \(P\) to \(D\) and place a new point on the ray \(PD\) twice as far away from \(P\).” Display for all to see:
If using the digital activity, demonstrate the mechanics of dilating using the applet. You can also use the measurement tool to confirm.
Supports accessibility for: Conceptual processing; Visual-spatial processing
Design Principle(s): Support sense-making; Maximize meta-awareness
Student Facing
Here is a polygon \(ABCD\)
-
Dilate each vertex of polygon \(ABCD\) using \(P\) as the center of dilation and a scale factor of 2.
- Draw segments between the dilated points to create a new polygon.
-
What are some things you notice about the new polygon?
-
Choose a few more points on the sides of the original polygon and transform them using the same dilation. What do you notice?
-
Dilate each vertex of polygon \(ABCD\) using \(P\) as the center of dilation and a scale factor of \(\frac{1}{2}\).
-
What do you notice about this new polygon?
Student Response
For access, consult one of our IM Certified Partners.
Launch
Provide access to geometry toolkits. Tell students that they are going to dilate some points. Before they begin, demonstrate the mechanics of dilating a point using a center of dilation and a scale factor. Tell students, “In the previous activity, each point was dilated to its image using a scale factor of 3. The dilated point was three times as far from the center as the original point. When we dilate point \(D\) using \(P\) as the center of dilation and a scale factor of 2, that means we’re going to take the distance from \(P\) to \(D\) and place a new point on the ray \(PD\) twice as far away from \(P\).” Display for all to see:

If using the digital activity, demonstrate the mechanics of dilating using the applet. You can also use the measurement tool to confirm.
Supports accessibility for: Conceptual processing; Visual-spatial processing
Design Principle(s): Support sense-making; Maximize meta-awareness
Student Facing
Here is a polygon \(ABCD\).
- Dilate each vertex of polygon \(ABCD\) using \(P\) as the center of dilation and a scale factor of 2. Label the image of \(A\) as \(A’\), and label the images of the remaining three vertices as \(B’\), \(C’\), and \(D’\).
- Draw segments between the dilated points to create polygon \(A’B’C’D’\).
-
What are some things you notice about the new polygon?
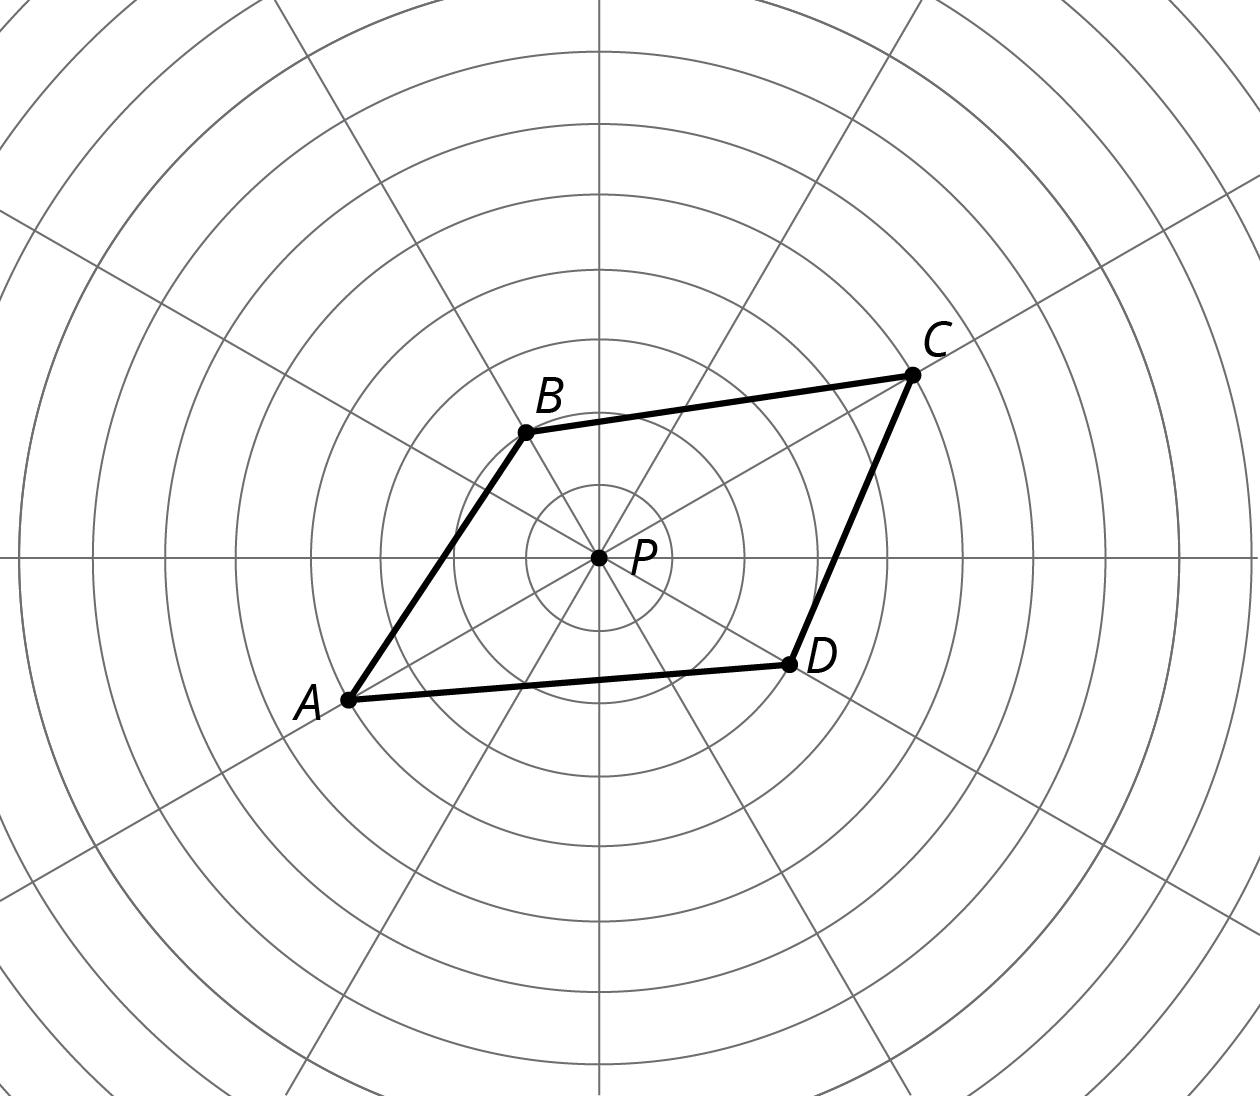
4. Choose a few more points on the sides of the original polygon and transform them using the same dilation. What do you notice?
5. Dilate each vertex of polygon \(ABCD\) using \(P\) as the center of dilation and a scale factor of \(\frac{1}{2}\). Label the image of \(A\) as \(E\), the image of \(B\) as \(F\), the image of \(C\) as \(G\) and the image of \(D\) as \(H\).
6. What do you notice about polygon \(EFGH\)?
Student Response
For access, consult one of our IM Certified Partners.
Student Facing
Are you ready for more?
Suppose \(P\) is a point not on line segment \(\overline{WX}\). Let \(\overline{YZ}\) be the dilation of line segment \(\overline{WX}\) using \(P\) as the center with scale factor 2. Experiment using a circular grid to make predictions about whether each of the following statements must be true, might be true, or must be false.
- \(\overline{YZ}\) is twice as long \(\overline{WX}\).
- \(\overline{YZ}\) is five units longer than \(\overline{WX}\).
- The point \(P\) is on \(\overline{YZ}\).
- \(\overline{YZ}\) and \(\overline{WX}\) intersect.
Student Response
For access, consult one of our IM Certified Partners.
Anticipated Misconceptions
Students may think only grid points can be dilated. In fact, any point can, but they may have to measure or estimate the distances from the center. Grid points are convenient because you can measure by counting.
Activity Synthesis
Display the original figure and its image under dilation with scale factor 2 and center \(P\).
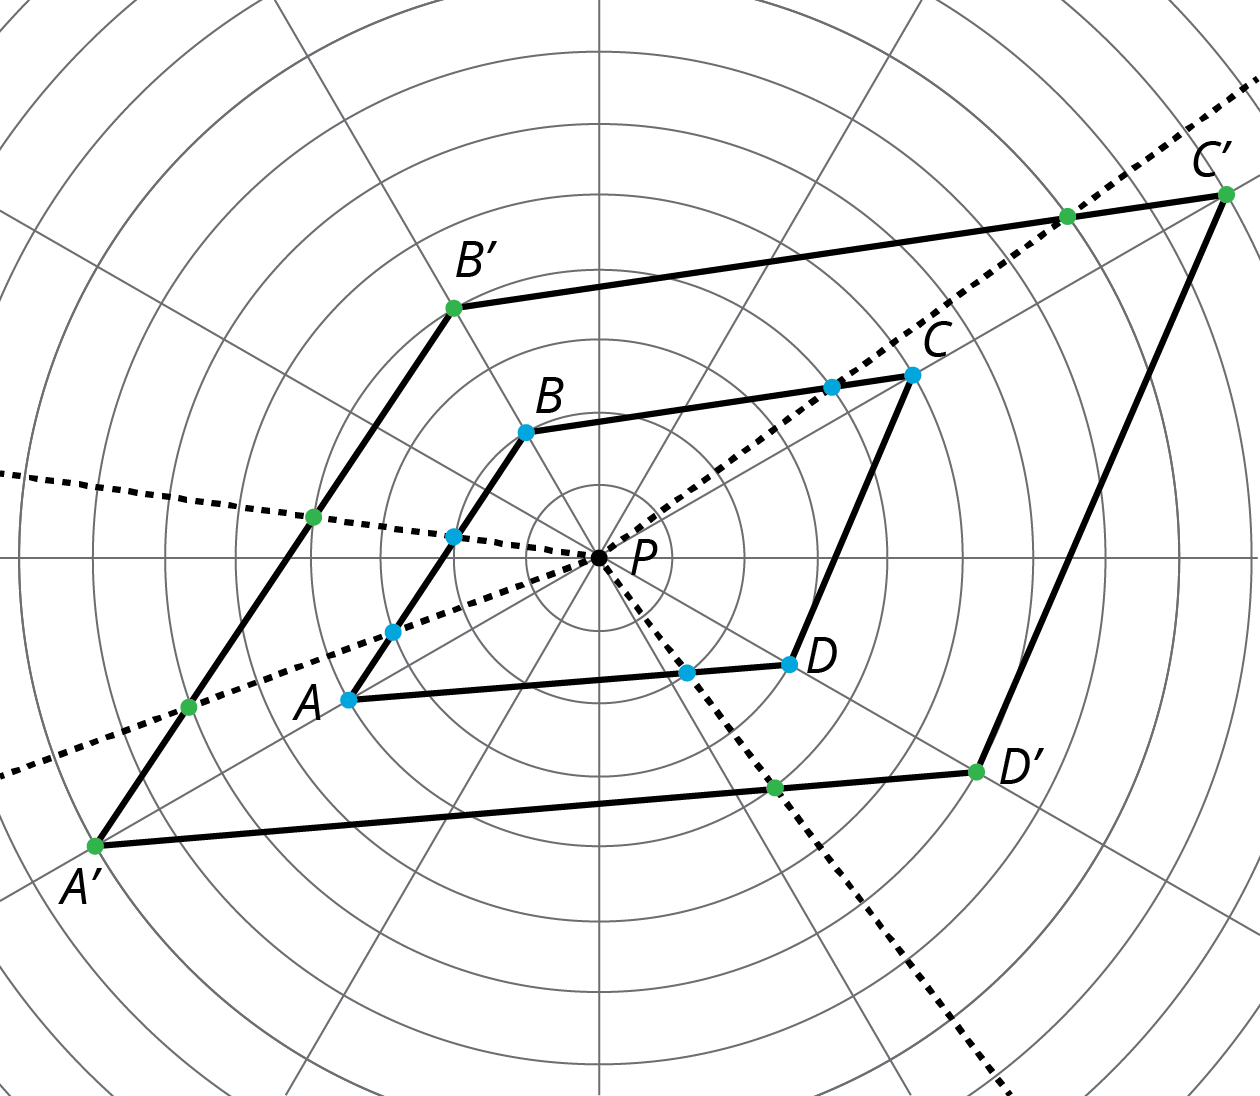
Ask selected students to share what they notice about the new polygon. Ensure that the following observations are made. Encourage students to verify each assertion using geometry tools like tracing paper, a ruler, or a protractor.
- The new figure is a scaled copy of the original figure.
- The sides of the new figure are twice the length of the sides of the original figure.
- The corresponding segments are parallel.
- The corresponding angles are congruent.
Ask students what happened to the additional points they dilated on polygon \(ABCD\). Note that a good strategic choice for these points are points where \(ABCD\) meets one of the circles: in these cases, it is possible to double the distance from that point to the center without measuring. The additional points should have landed on a side of the dilated polygon (because of measurement error, this might not always occur exactly). The important takeaway from this observation is that dilating the polygon’s vertices, and then connecting them, gives the image of the entire polygon under the dilation.
2.4: A Quadrilateral and Concentric Circles (10 minutes)
Optional activity
This activity continues work on dilations of polygons on a circular grid. The new twist in this activity is that the radial lines from the center of the circular grid have been removed. This means that when they dilate each point, students will need to use a ruler or other straightedge to connect that point to the center of the circular grid. If there is extra time, they can experiment dilating points other than the vertices and check that the dilation of a side of the polygon is still a line segment (though there may be small deviations due to measurement error).
Launch
Ask students to quietly read the problem, and then ask them how this problem is alike and different from the previous one. It is alike because it shows a quadrilateral and concentric circles, and we are asked to dilate the quadrilateral using the center of the circles as the center of dilation. It is different because there is only one radial line through the center, because the scale factor is now \(\frac13\), and because one of the points is already dilated.
Tell students to study how the location of \(F’\) was determined, and then to dilate the remaining points.
Student Facing
-
Dilate polygon \(EFGH\) using \(Q\) as the center of dilation and a scale factor of \(\frac13\). The image of \(F\) is already shown on the diagram. (You may need to draw more rays from \(Q\) in order to find the images of other points.)
Student Response
For access, consult one of our IM Certified Partners.
Launch
Ask students to quietly read the problem, and then ask them how this problem is alike and different from the previous one. It is alike because it shows a quadrilateral and concentric circles, and we are asked to dilate the quadrilateral using the center of the circles as the center of dilation. It is different because there is only one radial line through the center, because the scale factor is now \(\frac13\), and because one of the points is already dilated.
Tell students to study how the location of \(F’\) was determined, and then to dilate the remaining points.
Student Facing
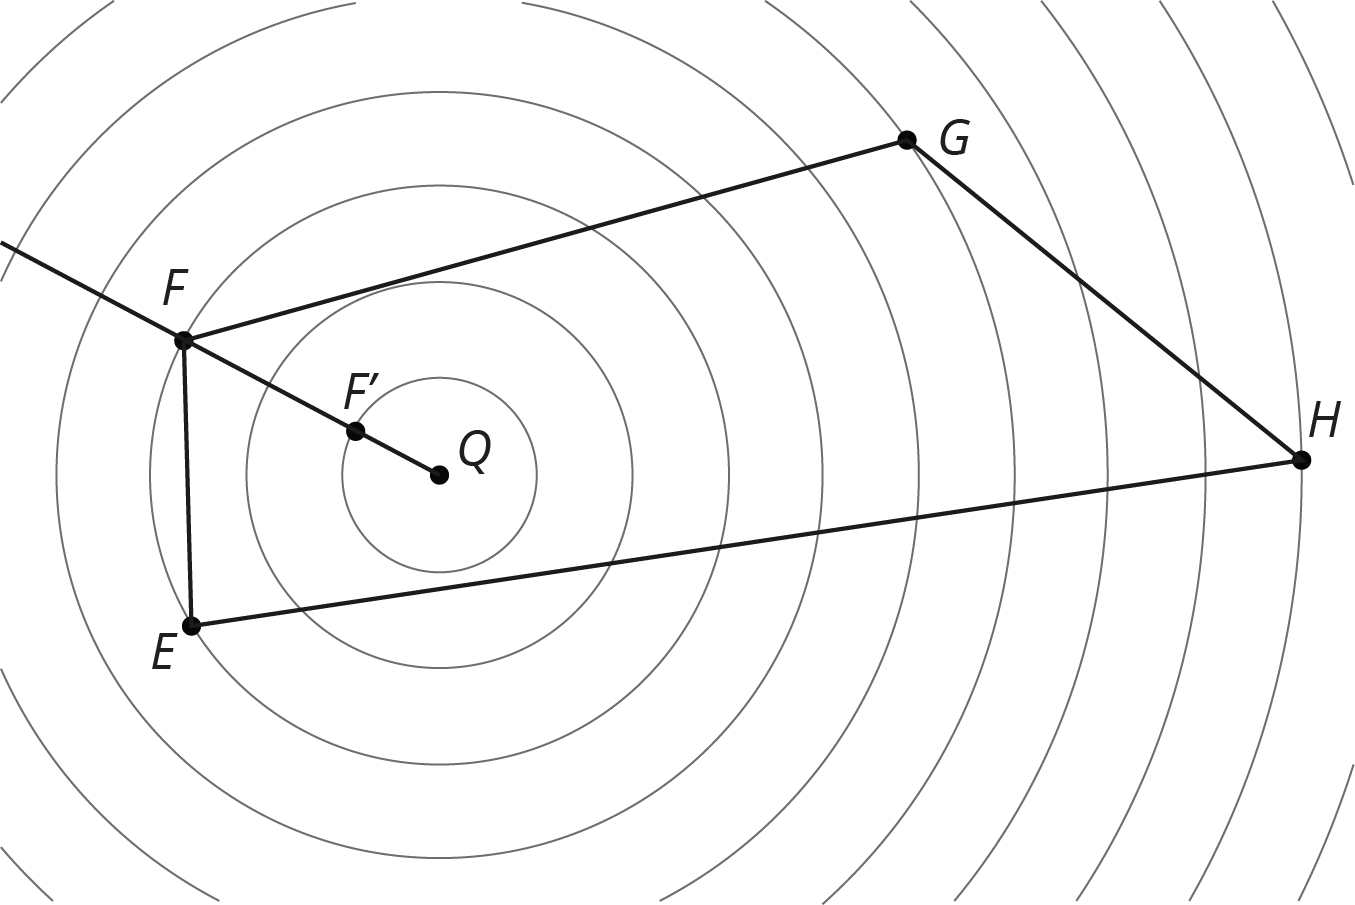
Dilate polygon \(EFGH\) using \(Q\) as the center of dilation and a scale factor of \(\frac13\). The image of \(F\) is already shown on the diagram. (You may need to draw more rays from \(Q\) in order to find the images of other points.)
Student Response
For access, consult one of our IM Certified Partners.
Anticipated Misconceptions
Students may be bothered because the dilated quadrilateral looks off-center and the distance between corresponding sides of the quadrilaterals depends on the side. Ensure them that the image is correct and ask them to focus on the parallel corresponding sides of the shapes or ask them if the dilated quadrilateral appears to be a scaled copy of the original (it does).
Activity Synthesis
Highlight the need to add line segments joining \(E, F, G, H\) to the center in order to find the image of those points under the dilation. Also highlight that the scale factor of \(\frac13\) resulted in an image that was smaller than the original figure instead of larger. You might ask students what scale factor would result in no change? That is, for what scale factor would the image land right on top of the original figure? They can likely name “1” as the scale factor that would accomplish this. So, scale factors that are greater than 1 result in an image larger than the original, and scale factors less than 1 result in an image smaller than the original.
Lesson Synthesis
Lesson Synthesis
- “What are some important properties of the circular grid?”
- “How does it help to perform dilations?”
Highlight the fact that the circular grid is mainly useful when the center of dilation is the center of the grid. When the scale factor is 3, for example, the circle with radius 1 grid unit maps to the circle with radius 3 grid units. More generally, each grid circle maps to a grid circle whose radius is three times as large.
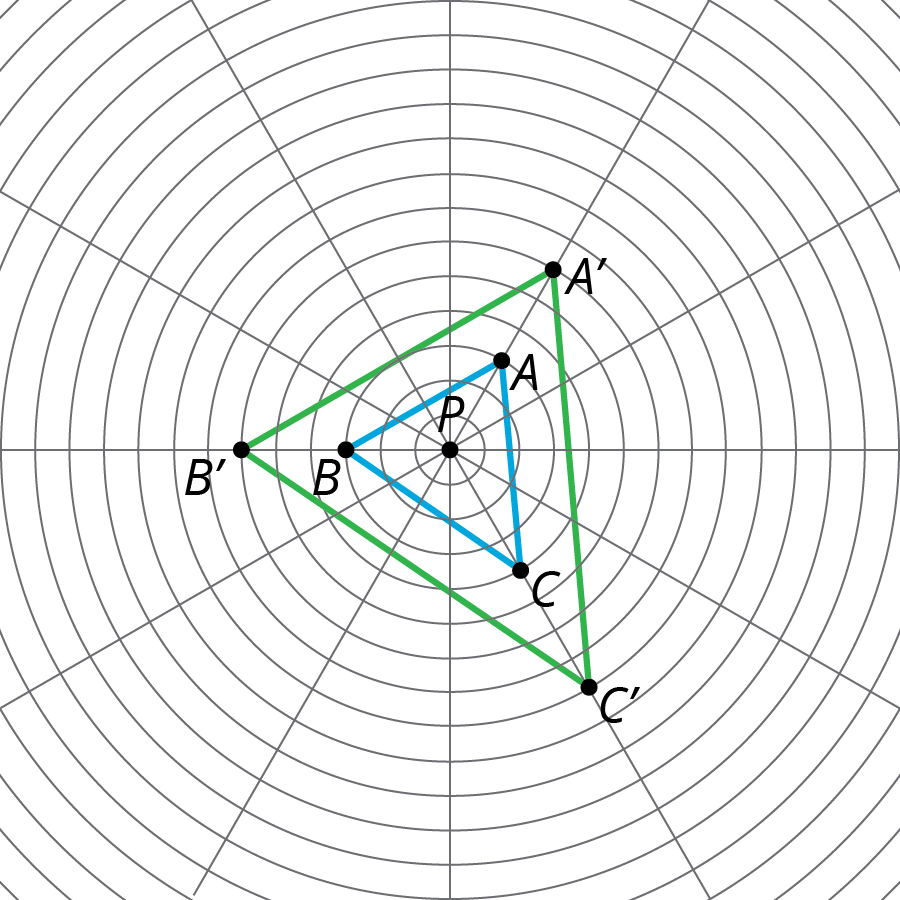
2.5: Cool-down - Dilating points on a circular grid (5 minutes)
Cool-Down
For access, consult one of our IM Certified Partners.
Student Lesson Summary
Student Facing
A circular grid like this one can be helpful for performing dilations.
The radius of the smallest circle is one unit, and the radius of each successive circle is one unit more than the previous one.
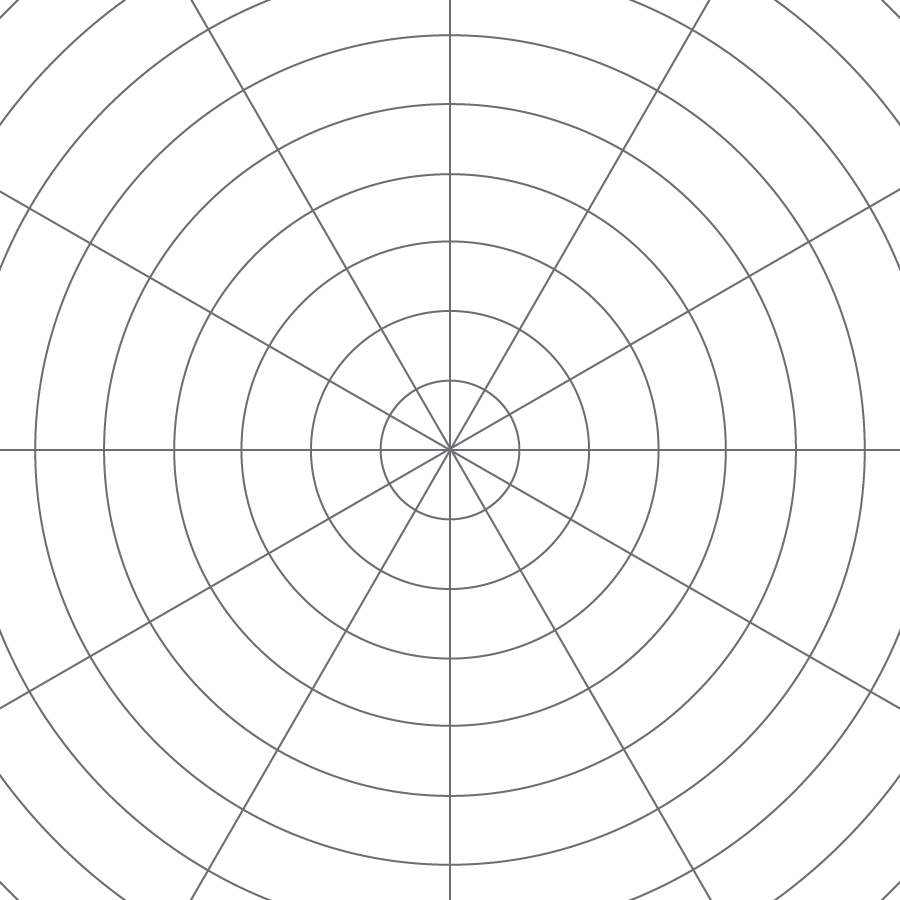
To perform a dilation, we need a center of dilation, a scale factor, and a point to dilate. In the picture, \(P\) is the center of dilation. With a scale factor of 2, each point stays on the same ray from \(P\), but its distance from \(P\) doubles:

Since the circles on the grid are the same distance apart, segment \(PA'\) has twice the length of segment \(PA\), and the same holds for the other points.