Lesson 3
Grid Moves
3.1: Notice and Wonder: The Isometric Grid (10 minutes)
Warm-up
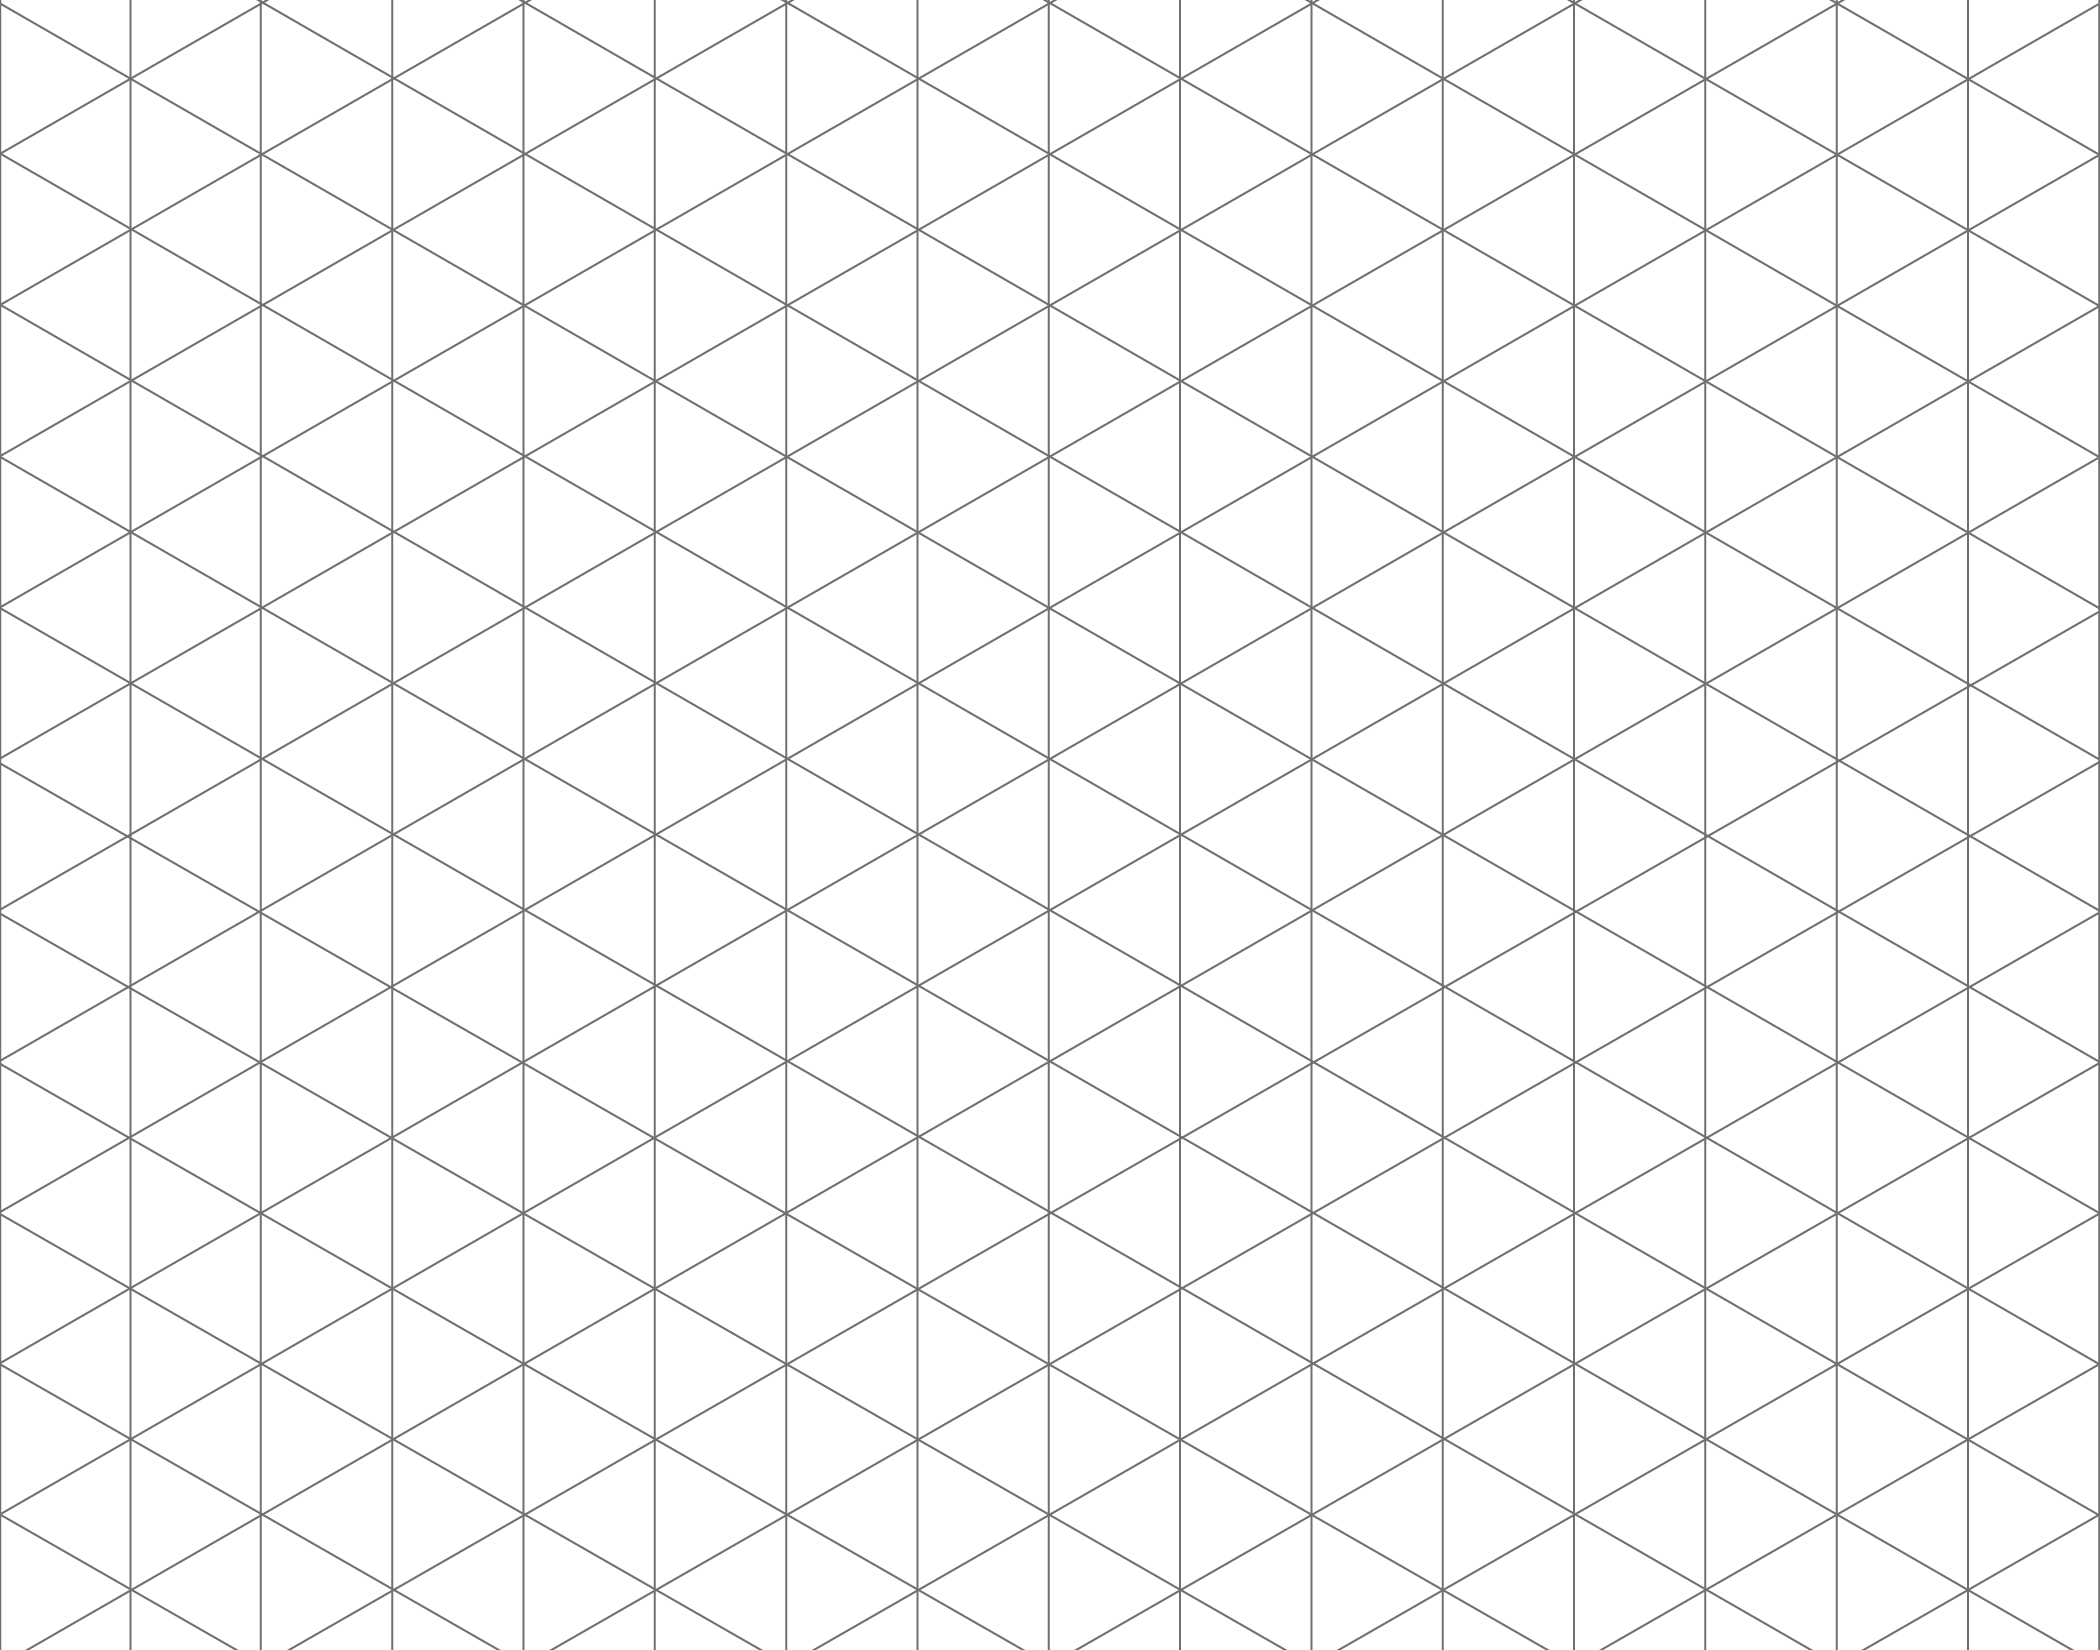
The purpose of this warm-up is to familiarize students with an isometric grid. While students may notice and wonder many things, characteristics such as the measures of the angles in the grid and the diagonal parallel lines will be important properties for students to notice in their future work performing transformations on the isometric grid. Students are not expected to know each angle in an equilateral triangle is 60 degrees, but after previous experience with supplementary angles, circles and rotations, they may be able to explain why each smaller angle is 60 degrees. Many things they notice may be in comparison to the square grid paper which is likely more familiar.
Launch
Arrange students in groups of 2. Tell students that they will look at an image. Their job is to think of at least one thing they notice and at least one thing they wonder. Display the image for all to see. Ask students to give a signal when they have noticed or wondered about something. Give students 1 minute of quiet think time, and then 1 minute to discuss the things they notice with their partner, followed by a whole-class discussion.
Student Facing
What do you notice? What do you wonder?
Student Response
For access, consult one of our IM Certified Partners.
Activity Synthesis
Ask students to share the things they noticed and wondered. Record and display their responses for all to see. If possible, record the relevant reasoning on or near the image, and show where each of the features students notice is located on the actual grid itself, such as triangles, angles, and line segments. After each response, ask the class if they agree or disagree and to explain alternative ways of thinking, referring back to the images each time. If angle measures do not come up during the conversation, ask them to think about how they could figure out the measure of each angle. Some may measure with a protractor, and some may argue that since 6 angles share a vertex where each angle is identical, each angle measures \(60^\circ\) because \(360 \div 6 = 60.\) Establish that each angle measures \(60^\circ\).
3.2: Transformation Information (25 minutes)
Activity
The purpose of this activity is for students to interpret the information needed to perform a transformation and draw an image resulting from the transformation.
For digital classrooms, an additional purpose of this activity is for students to learn how to use the transformation tools available in geogebra. These tools will be used throughout the unit. As they become familiar with the dynamic tools, they see that geogebra places the image of a figure based on the instructions given by the user.
Through hands-on experience with transformations, students prepare for the more precise definitions they will learn in later grades. This activity is the first time students start to use \(A’\), \(B’\), etc. to denote points in the image that correspond to \(A\), \(B\), etc. in the original figure. This is also a good activity to use the word "image" to describe the transformed figure—this can happen before, as, or after students work.
If students exploit the mathematical properties of the grid lines to draw transformed figures, they are making use of structure (MP7). In order to draw the transformed figures correctly, students must attend to the details of the given information (MP6).
Watch for students who use tracing paper and those who use properties of the grids to help decide where to place the transformed figures. Tracing paper may be particularly useful for the isometric grid which may be unfamiliar to some students.
Launch
Point out \(A’\) in the first question. Tell students we call point \(A’\) "A prime" and that, after a transformation, it corresponds to \(A\) in the original.
For students using print materials: Optionally, before students start working, demonstrate the mechanics of performing each type of transformation using tracing paper. Distribute about 10 small sheets of tracing paper to each student (or ensure they can find it in their geometry toolkits). Give students about 10 minutes of quiet work time followed by whole-class discussion.
For students using digital materials: Depending on the needs of your class, either demonstrate how each transformation tool works in the applet, or instruct students to read and follow the instructions for working the applets. It would work well to demonstrate the first, third, and fourth items and allow students to complete the other items independently.
Supports accessibility for: Conceptual processing; Visual-spatial processing
Design Principle(s): Maximize meta-awareness
Student Facing
Follow the directions below each statement to tell GeoGebra how you want the figure to move. It is important to notice that GeoGebra uses vectors to show translations. A vector is a quantity that has magnitude (size) and direction. It is usually represented by an arrow.
These applets are sensitive to clicks. Be sure to make one quick click, otherwise it may count a double-click.
After each example, click the reset button, and then move the slider over for the next question.
- Translate triangle \(ABC\) so that \(A\) goes to \(A’\).
- Select the Vector tool.

- Click on the original point \(A\) and then the new point \(A’\). You should see a vector.
- Select the Translate by Vector tool.

- Click on the figure to translate, and then click on the vector.
- Select the Vector tool.
-
Translate triangle \(ABC\) so that \(C\) goes to \(C’\).
- Rotate triangle \(ABC\) \(90^\circ\) counterclockwise using center \(O\).
- Select the Rotate around Point tool.

- Click on the figure to rotate, and then click on the center point.
- A dialog box will open; type the angle by which to rotate and select the direction of rotation.
- Click on ok.
- Select the Rotate around Point tool.
- Reflect triangle \(ABC\) using line \(\ell\).
- Select the Reflect about Line tool.

- Click on the figure to reflect, and then click on the line of reflection.
- Select the Reflect about Line tool.
-
Rotate quadrilateral \(ABCD\) \(60^\circ\) counterclockwise using center \(B\).
-
Rotate quadrilateral \(ABCD\) \(60^\circ\) clockwise using center \(C\).
-
Reflect quadrilateral \(ABCD\) using line \(\ell\).
-
Translate quadrilateral \(ABCD\) so that \(A\) goes to \(C\).
Student Response
For access, consult one of our IM Certified Partners.
Student Facing
Are you ready for more?
Try your own translations, reflections, and rotations.
- Make your own polygon to transform, and choose a transformation.
- Predict what will happen when you transform the image. Try it - were you right?
- Challenge your partner! Right click on any vectors or lines and uncheck Show Object. Can they guess what transformation you used?
Visit ggbm.at/eFeE2Veu for the applet.
Student Response
For access, consult one of our IM Certified Partners.
Launch
Point out \(A’\) in the first question. Tell students we call point \(A’\) "A prime" and that, after a transformation, it corresponds to \(A\) in the original.
For students using print materials: Optionally, before students start working, demonstrate the mechanics of performing each type of transformation using tracing paper. Distribute about 10 small sheets of tracing paper to each student (or ensure they can find it in their geometry toolkits). Give students about 10 minutes of quiet work time followed by whole-class discussion.
For students using digital materials: Depending on the needs of your class, either demonstrate how each transformation tool works in the applet, or instruct students to read and follow the instructions for working the applets. It would work well to demonstrate the first, third, and fourth items and allow students to complete the other items independently.
Supports accessibility for: Conceptual processing; Visual-spatial processing
Design Principle(s): Maximize meta-awareness
Student Facing
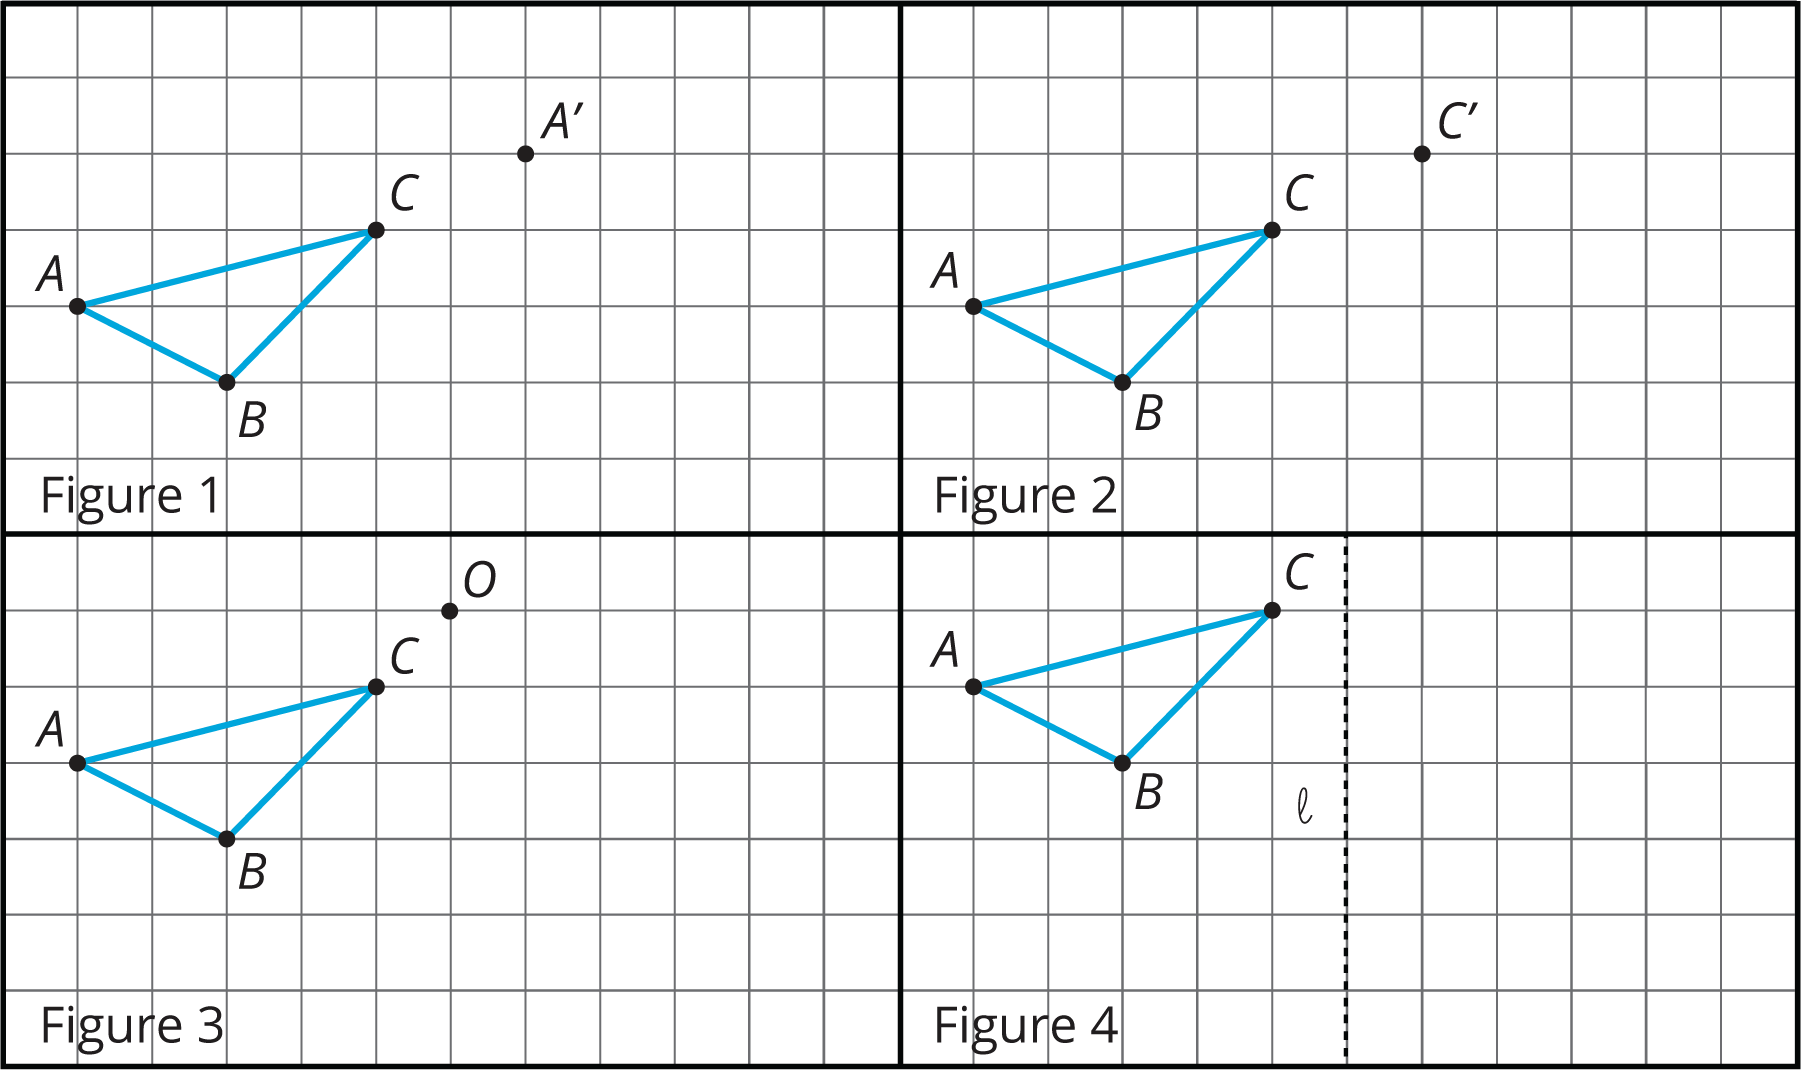
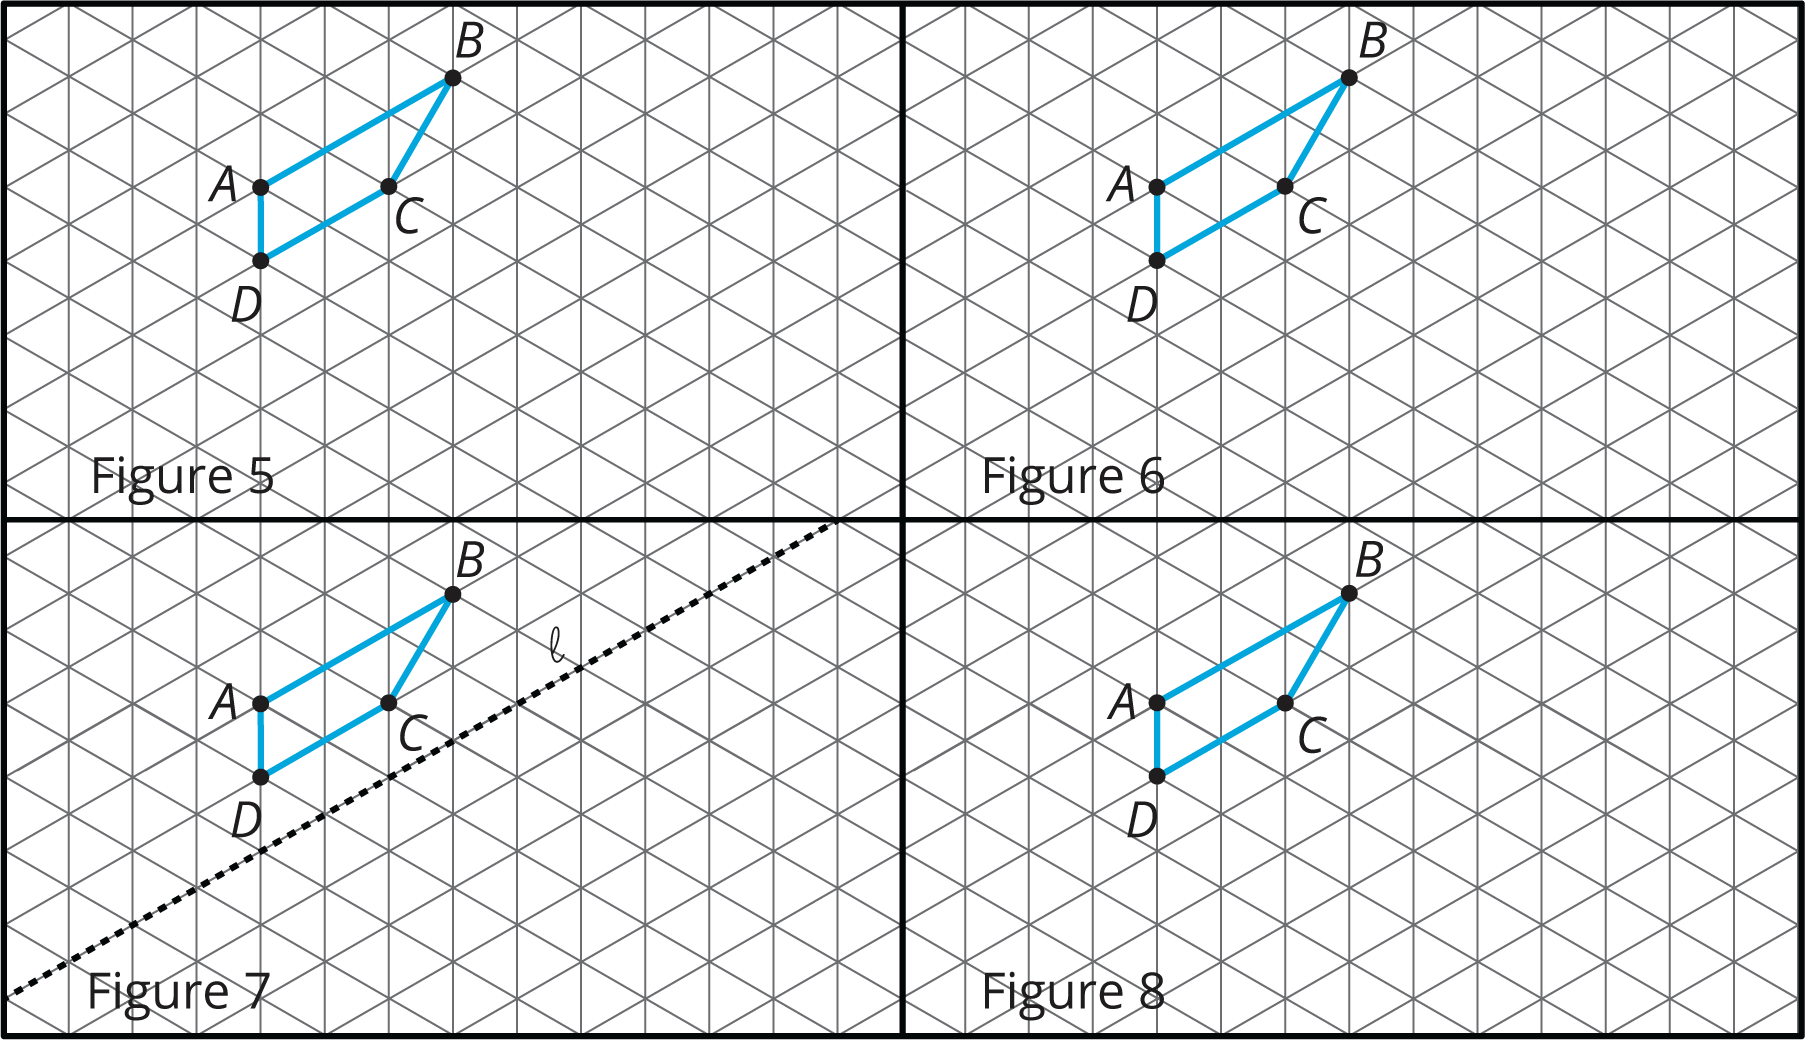
Your teacher will give you tracing paper to carry out the moves specified. Use \(A’\), \(B’\), \(C’\), and \(D’\) to indicate vertices in the new figure that correspond to the points \(A\), \(B\), \(C\), and \(D\) in the original figure.
-
In Figure 1, translate triangle \(ABC\) so that \(A\) goes to \(A’\).
-
In Figure 2, translate triangle \(ABC\) so that \(C\) goes to \(C’\).
-
In Figure 3, rotate triangle \(ABC\) \(90^\circ\) counterclockwise using center \(O\).
-
In Figure 4, reflect triangle \(ABC\) using line \(\ell\).
-
In Figure 5, rotate quadrilateral \(ABCD\) \(60^\circ\) counterclockwise using center \(B\).
-
In Figure 6, rotate quadrilateral \(ABCD\) \(60^\circ\) clockwise using center \(C\).
-
In Figure 7, reflect quadrilateral \(ABCD\) using line \(\ell\).
-
In Figure 8, translate quadrilateral \(ABCD\) so that \(A\) goes to \(C\).
Student Response
For access, consult one of our IM Certified Partners.
Student Facing
Are you ready for more?
The effects of each move can be “undone” by using another move. For example, to undo the effect of translating 3 units to the right, we could translate 3 units to the left. What move undoes each of the following moves?
- Translate 3 units up
- Translate 1 unit up and 1 unit to the left
- Rotate 30 degrees clockwise around a point \(P\)
-
Reflect across a line \(\ell\)
Student Response
For access, consult one of our IM Certified Partners.
Anticipated Misconceptions
Students may struggle to understand the descriptions of the transformations to carry out. For these students, explain the transformations using the words they used in earlier activities, such as “slide,” “turn,” and “mirror image” to help them get started. Students may also struggle with reflections that are not over horizontal or vertical lines.
Some students may need to see an actual mirror to understand what reflections do, and the role of the reflection line. If you have access to rectangular plastic mirrors, you may want to have students check their work by placing the mirror along the proposed mirror line.
Working with the isometric grid may be challenging, especially rotations and reflections across lines that are not horizontal or vertical. For the rotations, you may want to ask students what they know about the angle measures in an equilateral triangle. For reflections, the approach of using a mirror can work or students can look at individual triangles in the grid, especially those with a side on the line of reflection, and see what happens to them. After checking several triangles, they develop a sense of how these reflections behave.
Activity Synthesis
Ask students to share how they found the images, and highlight the information they needed in each to perform the transformation. Invite students who used tracing paper to share how they found the images and also ask students what mathematical patterns they found. For example, for the reflection in Figure 4, ask where some intersections of grid lines go (they stay on the same horizontal line and go to the other side of \(\ell\), the same distance away). How can this be used to identify the image of \(\triangle ABC\)?
Ask students how working on the isometric grid is similar to working on a regular grid and how it is different. Possible responses include:
- Translations work the same way, identifying how far and in which direction to move the shape
- Rotations also work the same way but the isometric grid works well for multiples of 60 degrees (with center at a grid point), while the regular grid works well for multiples of 90 degrees (also with center at a grid point).
- Reflections on the isometric grid require looking carefully at the triangular pattern to place the reflection in the right place. Like for the regular grid, these reflections are difficult to visualize if the line of reflection is not a grid line.
Lesson Synthesis
Lesson Synthesis
Display one example each of a translation, a rotation, and a reflection. Choose one of each from the activity, or create new examples. Ask students:
- “What are important things to keep in mind when we want to do a [translation, rotation, reflection]?”
- “What is something new that you learned today about [translations, rotations, reflections]?”
- “Describe the two different kinds of grids we saw. What was the same and what was different about them?”
3.3: Cool-down - Some are Translations and Some Aren’t (5 minutes)
Cool-Down
For access, consult one of our IM Certified Partners.
Student Lesson Summary
Student Facing
When a figure is on a grid, we can use the grid to describe a transformation. For example, here is a figure and an image of the figure after a move.
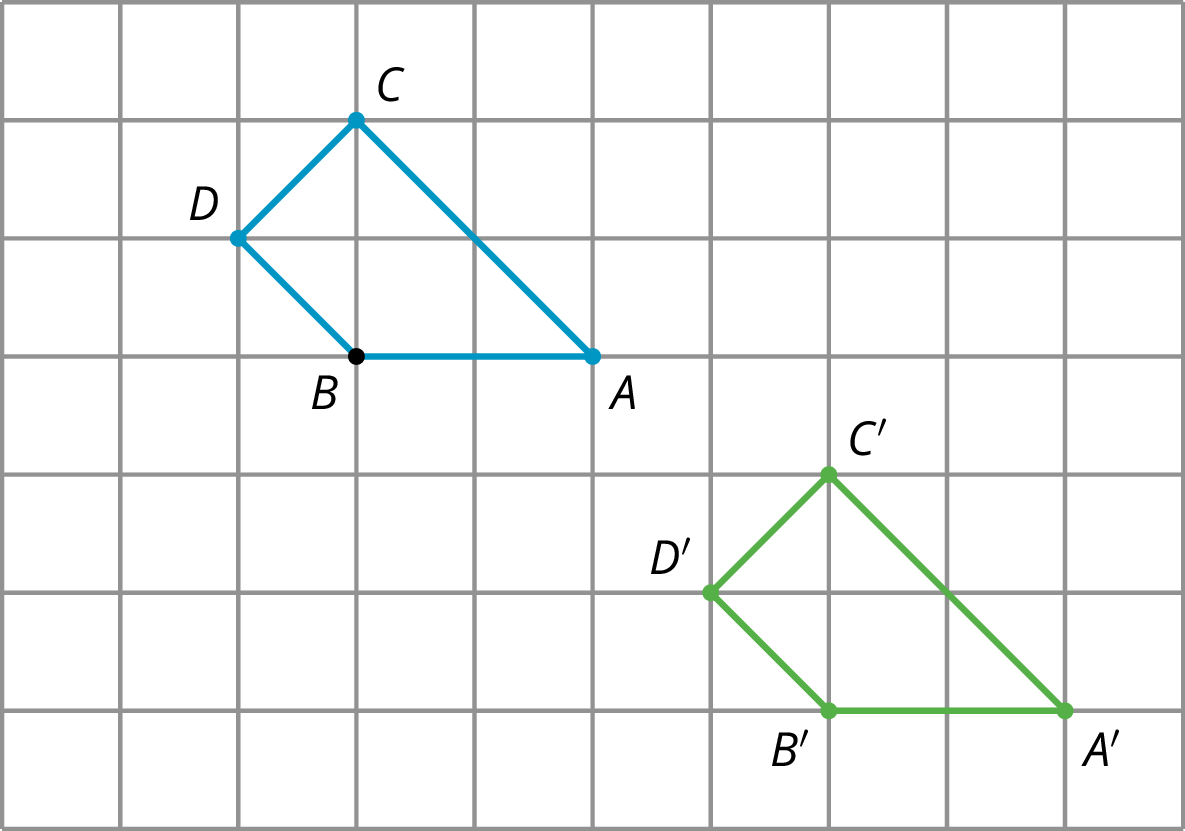
Quadrilateral \(ABCD\) is translated 4 units to the right and 3 units down to the position of quadrilateral \(A'B'C'D'\).
A second type of grid is called an isometric grid. The isometric grid is made up of equilateral triangles. The angles in the triangles all measure 60 degrees, making the isometric grid convenient for showing rotations of 60 degrees.
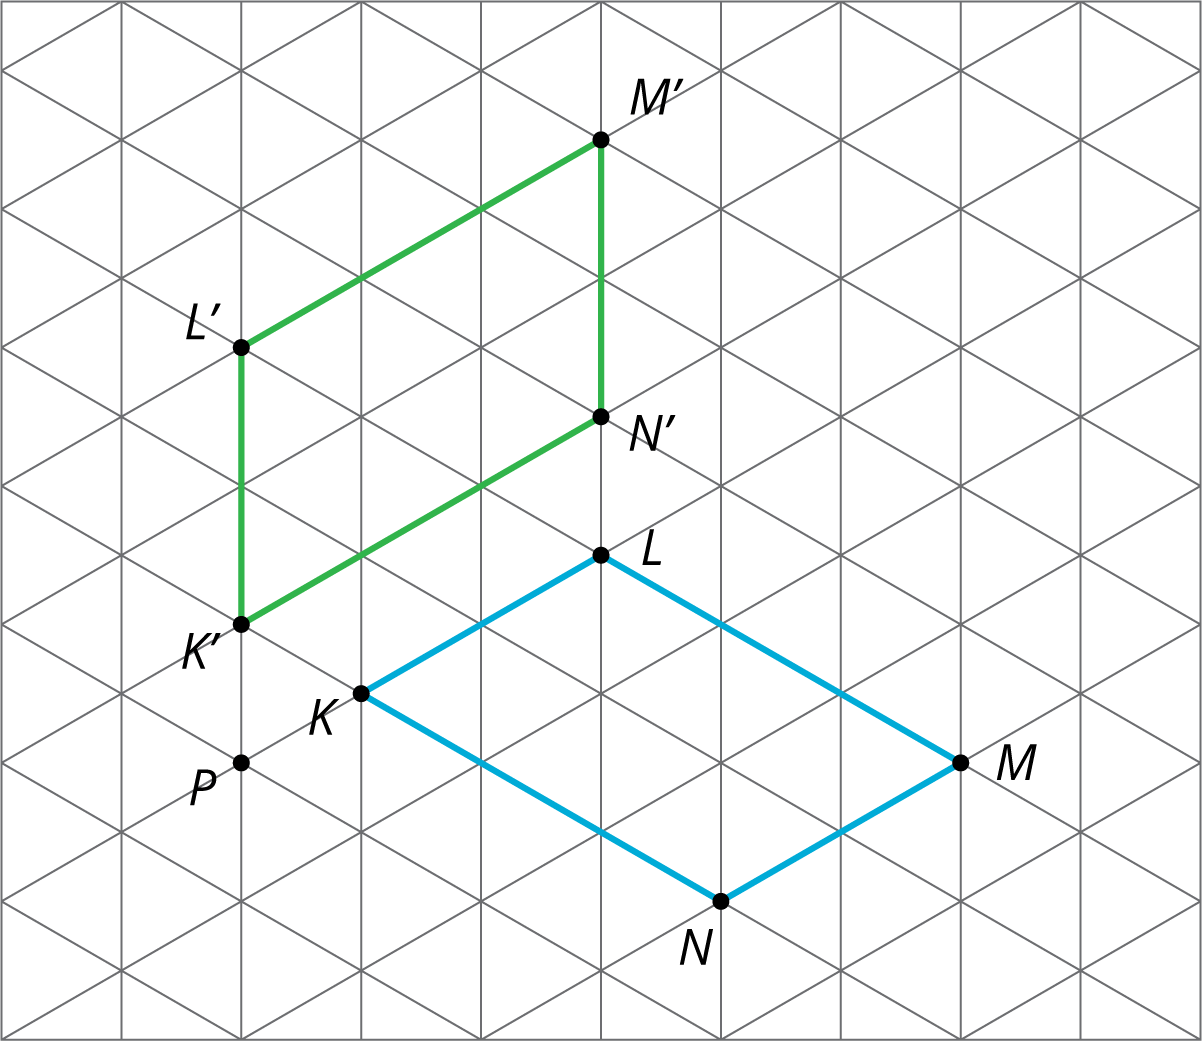
Here is quadrilateral \(KLMN\) and its image \(K'L'M'N'\) after a 60-degree counterclockwise rotation around a point \(P\).