Lesson 8
Rotation Patterns
8.1: Building a Quadrilateral (5 minutes)
Warm-up
Students rotate a copy of a right isosceles triangle four times to build a quadrilateral. It turns out that the quadrilateral is a square. Students are not asked or expected to justify this but it can be addressed in the discussion. The fourth question about rotational symmetry of the quadrilateral will help students conclude that it is a square.
There are many more opportunities to build figures using rigid transformations in other lessons.
Launch
Provide access to geometry toolkits, particularly tracing paper.
Student Facing
Here is a right isosceles triangle:

- Rotate triangle \(ABC\) 90 degrees clockwise around \(B\).
- Rotate triangle \(ABC\) 180 degrees clockwise round \(B\).
- Rotate triangle \(ABC\) 270 degrees clockwise around \(B\).
-
What would it look like when you rotate the four triangles 90 degrees clockwise around \(B\)? 180 degrees? 270 degrees clockwise?
Student Response
For access, consult one of our IM Certified Partners.
Activity Synthesis
Ask students what they notice and wonder about the quadrilateral that they have built. Likely responses include:
- It looks like a square.
- Rotating it 90 degrees clockwise or counterclockwise interchanges the 4 copies of triangle \(ABC\).
- Continuing the pattern of rotations, the next one will put \(ABC\) back in its original position.
Ask the students how they know the four triangles fit together without gaps or overlaps to make a quadrilateral. Here the key point is that the triangle is isosceles, so the rotations match up these sides perfectly. The four right angles make a complete 360 degrees, so the shape really is a quadrilateral. The fact that the quadrilateral is a square can be deduced from the fact that it is mapped to itself by a 90 degree rotation, but this does not need to be stressed or addressed.
8.2: Rotating a Segment (15 minutes)
Activity
The purpose of this activity is to allow students to explore special cases of rotating a line segment \(180^\circ\). In general, rotating a segment \(180^\circ\) produces a parallel segment the same length as the original. This activity also treats two special cases:
- When the center of rotation is the midpoint, the rotated segment is the same segment as the original, except the vertices are switched.
- When the center of rotation is an endpoint, the segment together with its image form a segment twice as long as the original.
As students look to make general statements about what happens when a line segment is rotated \(180^\circ\) they engage in MP8. They are experimenting with a particular line segment but the conclusions that they make, especially in the last problem, are for any line segment.
Watch for how students explain that the \(180^\circ\) rotation of segment \(CD\) in the second part of the question is parallel to \(CD\). Some students may say that they “look parallel” while others might try to reason using the structure of the grid. Tell them that they will investigate this further in the next lesson.
Launch
Arrange students in groups of 2. Provide access to geometry toolkits. Give 3 minutes of quiet work time, followed by sharing with a partner and a whole-class discussion.
Supports accessibility for: Conceptual processing; Memory
Student Facing
Create a segment \(AB\) and a point \(C\) that is not on segment \(AB\).
-
Rotate segment \(AB\) \(180^\circ\) around point \(B\).
-
Rotate segment \(AB\) \(180^\circ\) around point \(C\).

-
Rotate segment \(AB\) \(180^\circ\) around its midpoint. What is the image of A?
-
What happens when you rotate a segment \(180^\circ\)?
Student Response
For access, consult one of our IM Certified Partners.
Launch
Arrange students in groups of 2. Provide access to geometry toolkits. Give 3 minutes of quiet work time, followed by sharing with a partner and a whole-class discussion.
Supports accessibility for: Conceptual processing; Memory
Student Facing
-
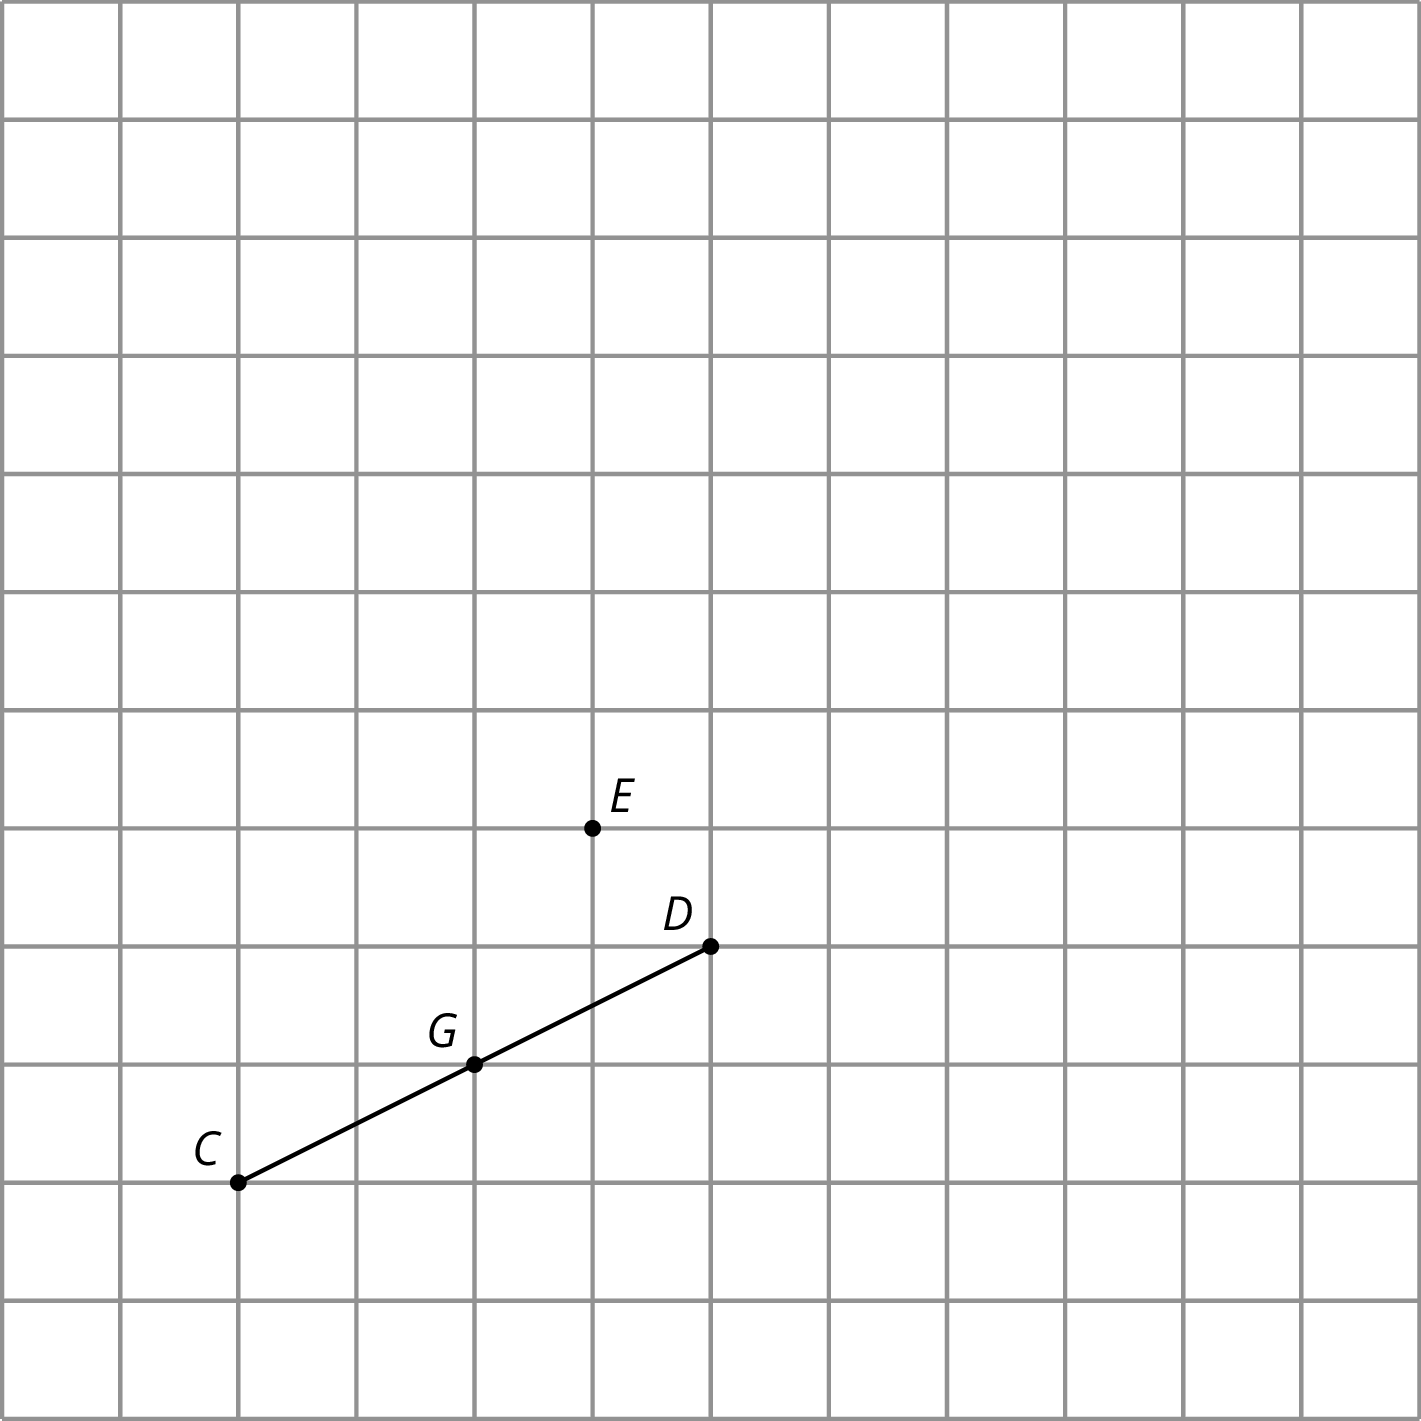
Rotate segment \(CD\) 180 degrees around point \(D\). Draw its image and label the image of \(C\) as \(A.\)
-
Rotate segment \(CD\) 180 degrees around point \(E\). Draw its image and label the image of \(C\) as \(B\) and the image of \(D\) as \(F\).
-
Rotate segment \(CD\) 180 degrees around its midpoint, \(G.\) What is the image of \(C\)?
-
What happens when you rotate a segment 180 degrees around a point?
Student Response
For access, consult one of our IM Certified Partners.
Student Facing
Are you ready for more?
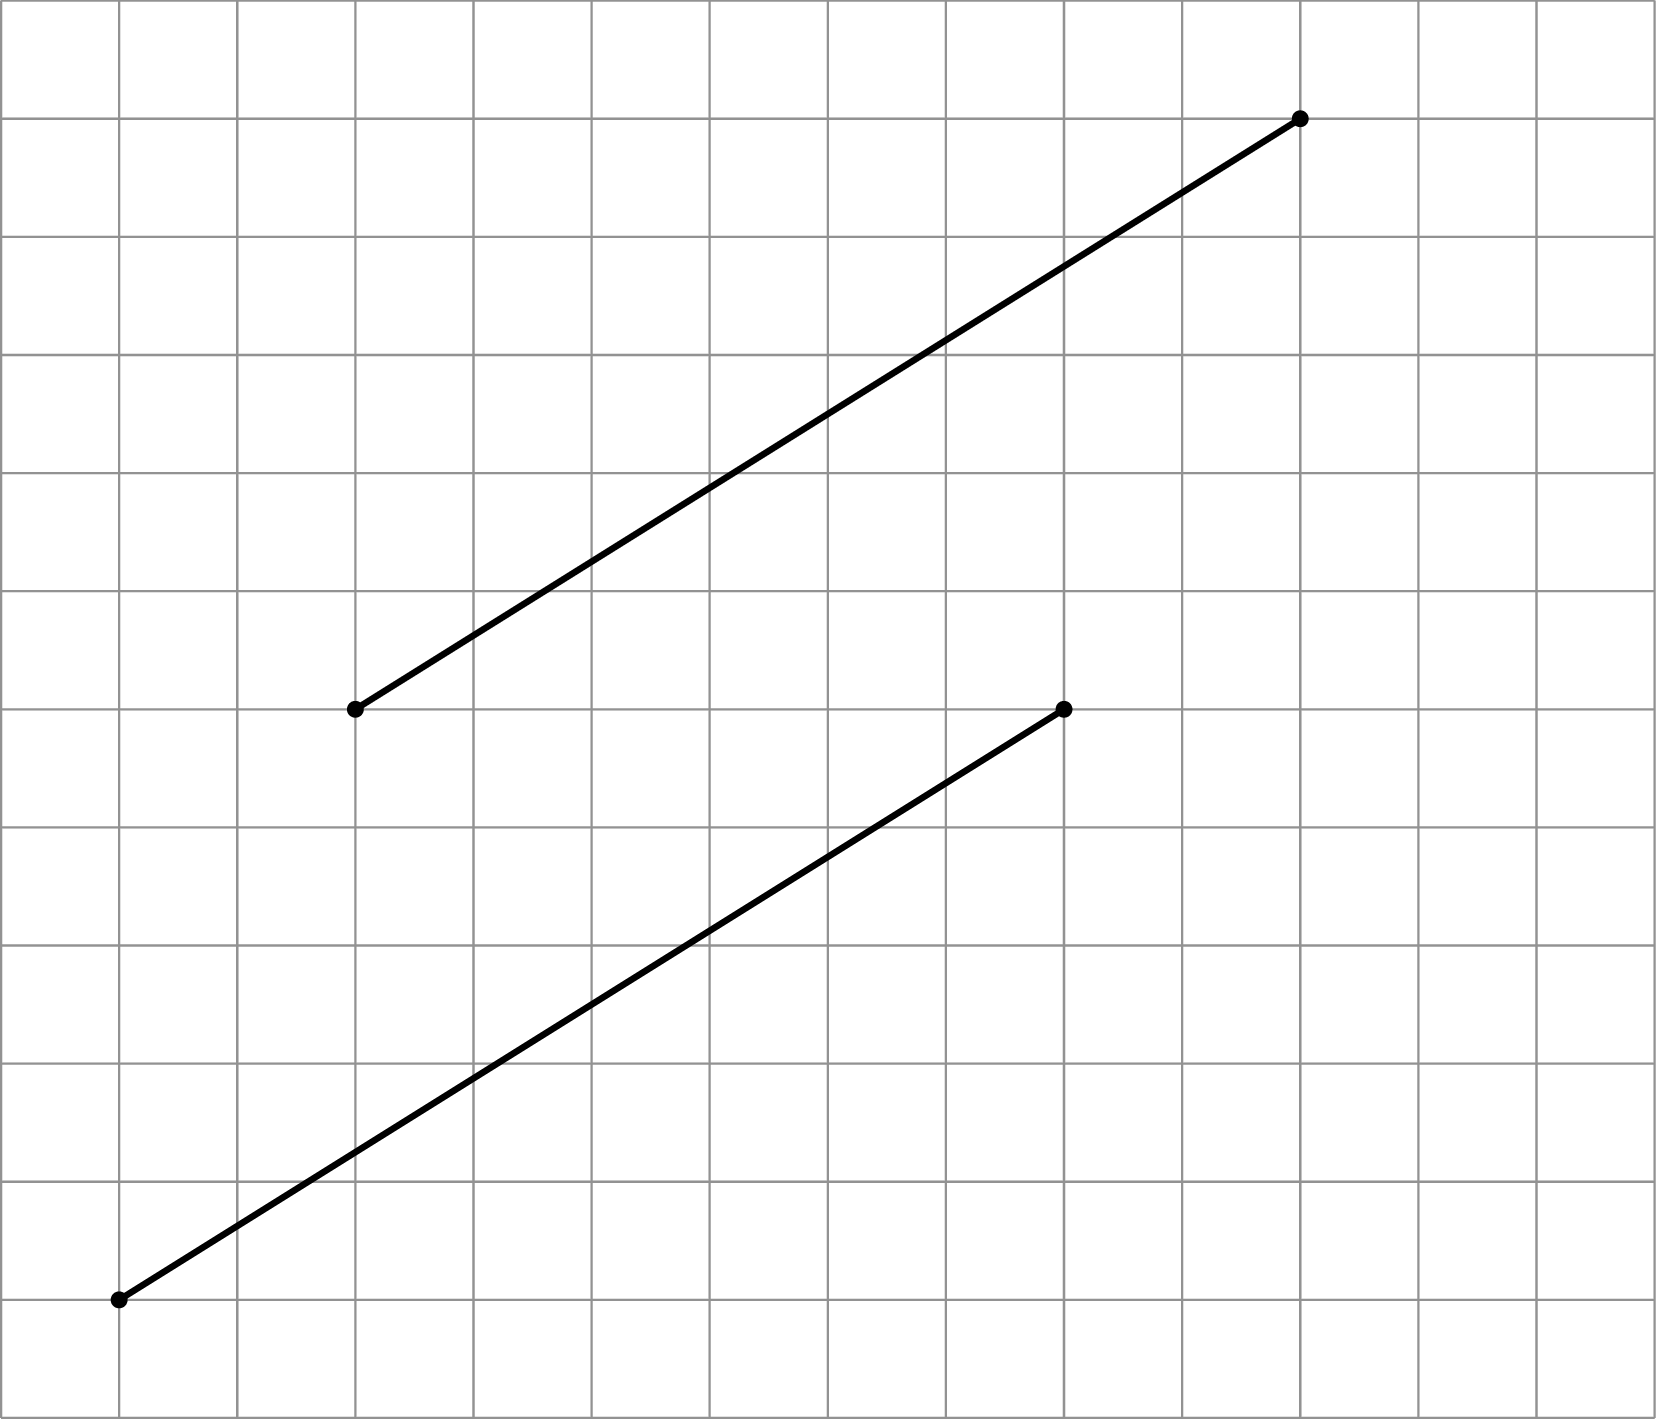
Here are two line segments. Is it possible to rotate one line segment to the other? If so, find the center of such a rotation. If not, explain why not.
Student Response
For access, consult one of our IM Certified Partners.
Anticipated Misconceptions
Students may be confused when rotating around the midpoint because they think the image cannot be the same segment as the original. Assure students this can occur and highlight that point in the discussion.
Activity Synthesis
Ask students why it is not necessary to specify the direction of a 180 degree rotation (because a 180 degree clockwise rotation around point \(P\) has the same effect as a 180 degree counterclockwise rotation around \(P\)). Invite groups to share their responses. Ask the class if they agree or disagree with each response. When there is a disagreement, have students discuss possible reasons for the differences.
Three important ideas that emerge in the discussion are:
- Rotating a segment \(180^\circ\) around a point that is not on the original line segment produces a parallel segment the same length as the original.
- When the center of rotation is the midpoint, the rotated segment is the same segment as the original, except the vertices are switched.
- When the center of rotation is an endpoint, the segment together with its image form a segment twice as long.
If any of the ideas above are not brought up by the students during the class discussion, be sure to make them known.
All of these ideas can be emphasized dynamically by carrying out a specified rotation in the applet and then moving the center of rotation or an endpoint of the original line segment. Even if students are not using the digital version of the activity, you may want to display and demonstrate with the applet.
Design Principle(s): Support sense-making; Maximize meta-awareness
8.3: A Pattern of Four Triangles (10 minutes)
Activity
In this activity, students use rotations to build a pattern of triangles. In the previous lesson, students examined a right triangle and a rigid transformation of the triangle. In this activity, several rigid transformations of the triangle form an interesting pattern.
Triangle \(ABC\) can be mapped to each of the three other triangles in the pattern with a single rotation. As students work on the first three questions, watch for any students who see that a single rotation can take triangle \(ABC\) to \(CDE\). The center for the rotation is not drawn in the diagram: it is the intersection of segment \(AE\) and segment \(CG\). For students who finish early, guide them to look for a single transformation taking \(ABC\) to each of the other triangles.
This pattern will play an important role later when students use this shape to understand a proof of the Pythagorean Theorem.
Identify students who notice that they have already solved the first question in an earlier activity. Watch for students who think that \(CAGE\) is a square and tell them that this will be addressed in a future lesson. However, encourage them to think about what they conclude about \(CAGE\) now. Also watch for students who repeat the same steps to show that \(ABC\) can be mapped to each of the other three triangles.
Launch
Arrange students in groups of 2–4. Provide access to geometry toolkits.
If using the digital activity, give students individual work time before allowing them to converse with a partner.
Supports accessibility for: Visual-spatial processing
Student Facing
Here is a diagram built with three different rigid transformations of triangle \(ABC\).
Use the applet to answer the questions. It may be helpful to reset the image after each question.
- Describe a rigid transformation that takes triangle \(ABC\) to triangle \(CDE\).
- Describe a rigid transformation that takes triangle \(ABC\) to triangle \(EFG\).
- Describe a rigid transformation that takes triangle \(ABC\) to triangle \(GHA\).
- Do segments \(AC\), \(CE\), \(EG\), and \(GA\) all have the same length? Explain your reasoning.
Student Response
For access, consult one of our IM Certified Partners.
Launch
Arrange students in groups of 2–4. Provide access to geometry toolkits.
If using the digital activity, give students individual work time before allowing them to converse with a partner.
Supports accessibility for: Visual-spatial processing
Student Facing

You can use rigid transformations of a figure to make patterns. Here is a diagram built with three different transformations of triangle \(ABC\).
- Describe a rigid transformation that takes triangle \(ABC\) to triangle \(CDE\).
- Describe a rigid transformation that takes triangle \(ABC\) to triangle \(EFG\).
- Describe a rigid transformation that takes triangle \(ABC\) to triangle \(GHA\).
- Do segments \(AC\), \(CE\), \(EG\), and \(GA\) all have the same length? Explain your reasoning.
Student Response
For access, consult one of our IM Certified Partners.
Anticipated Misconceptions
Some students might not recognize how this work is similar to the previous activity. For these students, ask them to step back and consider only triangles \(ABC\) and \(CDE\), perhaps covering the bottom half of the diagram.
Activity Synthesis
Select a student previously identified who noticed how the first question relates to a previous activity to share their observation. Discuss here how previous work can be helpful in new work, since students may not be actively looking for these connections. The next questions are like the first, but the triangles have a different orientation and different transformations are needed.
Discuss rigid transformations. Focus especially on the question about lengths. A key concept in this section is the idea that lengths and angle measures are preserved under rigid transformations.
Some students may claim \(CAGE\) is a square. If this comes up, leave it as an open question for now. This question will be revisited at the end of this unit, once the angle sum in a triangle is known. The last question establishes that \(CAGE\) is a rhombus.
Design Principle(s): Optimize output (for explanation)
Lesson Synthesis
Lesson Synthesis
Ask students to describe the possible outcomes when a line segment \(AB\) is rotated 180 degrees.
- \(AB\) is mapped to itself, when the center of rotation is the midpoint of the segment
- \(AB\) is mapped to another segment collinear with the first, when the center of rotation is \(A\) or \(B\) (or any other point on segment \(AB\))
- \(AB\) is mapped to a parallel segment, when the center of rotation is not on line \(AB\).
8.4: Cool-down - Is it a rotation? (5 minutes)
Cool-Down
For access, consult one of our IM Certified Partners.
Student Lesson Summary
Student Facing
When we apply a 180-degree rotation to a line segment, there are several possible outcomes:
- The segment maps to itself (if the center of rotation is the midpoint of the segment).
- The image of the segment overlaps with the segment and lies on the same line (if the center of rotation is a point on the segment).
- The image of the segment does not overlap with the segment (if the center of rotation is not on the segment).
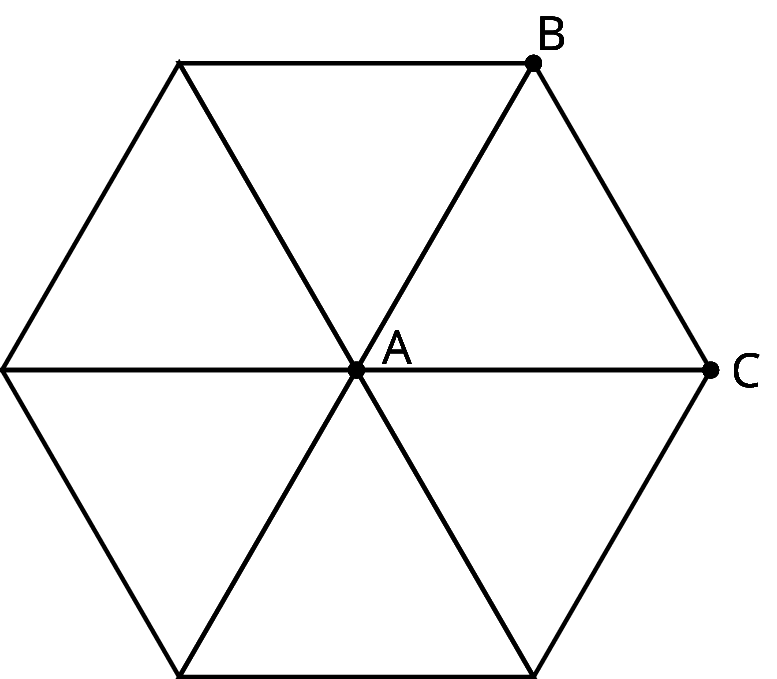
We can also build patterns by rotating a shape. For example, triangle \(ABC\) shown here has \(m(\angle A) = 60\). If we rotate triangle \(ABC\) 60 degrees, 120 degrees, 180 degrees, 240 degrees, and 300 degrees clockwise, we can build a hexagon.