Lesson 3
Two or More Lines
Warm-up: How Many Do You See: A Curious Figure (10 minutes)
Narrative
The purpose of this How Many Do You See is to allow students to use subitizing or grouping strategies to describe the image they see. Listen for the language students use to describe how they count and define the line segments in the image.
Launch
- Groups of 2
- “How many do you see? How do you see them?”
- Display the image.
- 1 minute: quiet think time
Activity
- Display the image.
- “Discuss your thinking with your partner.”
- 1 minute: partner discussion
- Record responses.
Student Facing
How many line segments do you see? How do you see them?

Student Response
For access, consult one of our IM Certified Partners.
Activity Synthesis
- “How many line segments does this image have?” (9)
- “How do we determine where line segments start and end?” (They are between pairs of points or vertices in the figure.)
- Consider asking:
- “Who can restate the way _____ saw the figure in different words?”
- “Did anyone see the figure the same way but would explain it differently?”
- “Does anyone want to add an observation to the way _____ saw the figure?”
Activity 1: Four Lines (15 minutes)
Narrative
The purpose of this activity is to draw students’ attention to intersecting lines and parallel lines. Students may not have had a reason to consider how to describe the characteristics of lines that cross. To motivate them to do so, they are given three intersecting lines and asked to add a fourth one—first to make any quadrilateral, and then to make a rectangle.
Students notice that creating a quadrilateral is not a problem, but creating a rectangle is. They analyze the given lines and consider the attributes of a rectangle that make the second task difficult. Along the way, students are likely to recognize that, to form a rectangle, they would need two pairs of lines where each pair is always pointing in the same direction and never converging, and where the first pair make square corners when they cross the second pair (MP7).
Advances: Conversing
Required Materials
Materials to Gather
Launch
- Groups of 2–4
- Give access to rulers or straightedges.
- “What do you notice about the lines in the first problem?” (There are three of them. They cross each other. Some are straight and some are slanted. The segments make a triangle.)
- “The three lines form a triangle. Describe the line segments that make up the triangle. Where do they start? Where do they end?” (The line segment starts and ends where it crosses the other lines.)
- 1–2 minutes: partner discussion
- Share responses.
- Record student observations and say “lines that cross are intersecting lines.”
- “Where else have you heard the word intersect?” (Streets have intersections or places where they cross each other.)
Activity
- 4–5 minutes: independent work time
- 3 minutes: group discussion
- Monitor for students who notice that:
- the slanted line can’t be a side of a rectangle because it intersects the horizontal and vertical lines, adding another line won’t help
- to make a rectangle, we need two pairs of lines, where the lines in each pair never cross, but the first pair make square corners with the second pair when they cross
Student Facing
-
Three lines on a field of dots intersect (cross), forming a triangle. Can you draw a fourth line so that the four lines form a quadrilateral?
Use the drawing to show your reasoning, or explain why it cannot be done.
-
Here is a copy of the same drawing. Can you draw a fourth line to form a rectangle?
Use the drawing to show your reasoning, or explain why it cannot be done.
- Discuss your drawings with your group. Check if they agree with your conclusions on both questions.
Student Response
For access, consult one of our IM Certified Partners.
Advancing Student Thinking
Students may add a line to the drawing, but not yet identify how it creates (or does not create) a quadrilateral. Consider asking:
- “Where did you add your new line? Where does you new line cross the lines that were there?”
- “What new shapes do you see because of that extra line?“
- “Where else could you draw your line so that it would make a new shape?”
Activity Synthesis
- Display the image on the task statement. Invite students to share their responses and reasoning.
- “What must be true about the four lines for them to form a rectangle?” (Sample responses:
- The lines need to make square corners whenever they cross.
- We need 2 pairs of lines, each pair going in the same direction and never coming together, and where they cross, they need to make square corners.)
- Record examples to match student explanations or invite students to draw examples of their thinking for all to see.
- “Lines that never intersect—like those on opposite sides of a rectangle—are called parallel lines.”
- Display or add to student examples to emphasize lines and line segments:

- If time permits, consider asking, “Can you find a pair of parallel lines here in our classroom?” (Lines on either side of a row of floor tiles, the top and bottom sides of the board, or the left and right sides of the door.)
Activity 2: To Cross or Not to Cross (20 minutes)
Narrative
In this activity, students are prompted to draw intersecting and parallel lines, and to explain how they know a pair of parallel lines would never intersect.
Students are not expected to formally justify that two lines are parallel. They are expected to make a case that goes beyond appearance (such as “it looks like they would never cross”) and notice that the parallel lines maintain the same distance apart (MP3). Students are also introduced to the convention of naming lines with letters to support precision when describing and comparing lines. They are not expected to formally name lines or line segments with letters.
Supports accessibility for: Conceptual Processing, Visual-Spatial Processing, Memory
Required Materials
Launch
- Groups of 2
- Give each student access to a ruler or a straightedge.
- Display a field of dots.
- Select a student to draw a line in the field.
- “Sometimes we label lines to help communicate about different parts of a figure.”
- Demonstrate labeling the line with a letter.
- “We can call this ‘line a’ because we labeled it with an ‘a’.”
Activity
- 5 minutes: independent work time
- 5 minutes: Discuss differences in drawings and make revisions.
Student Facing
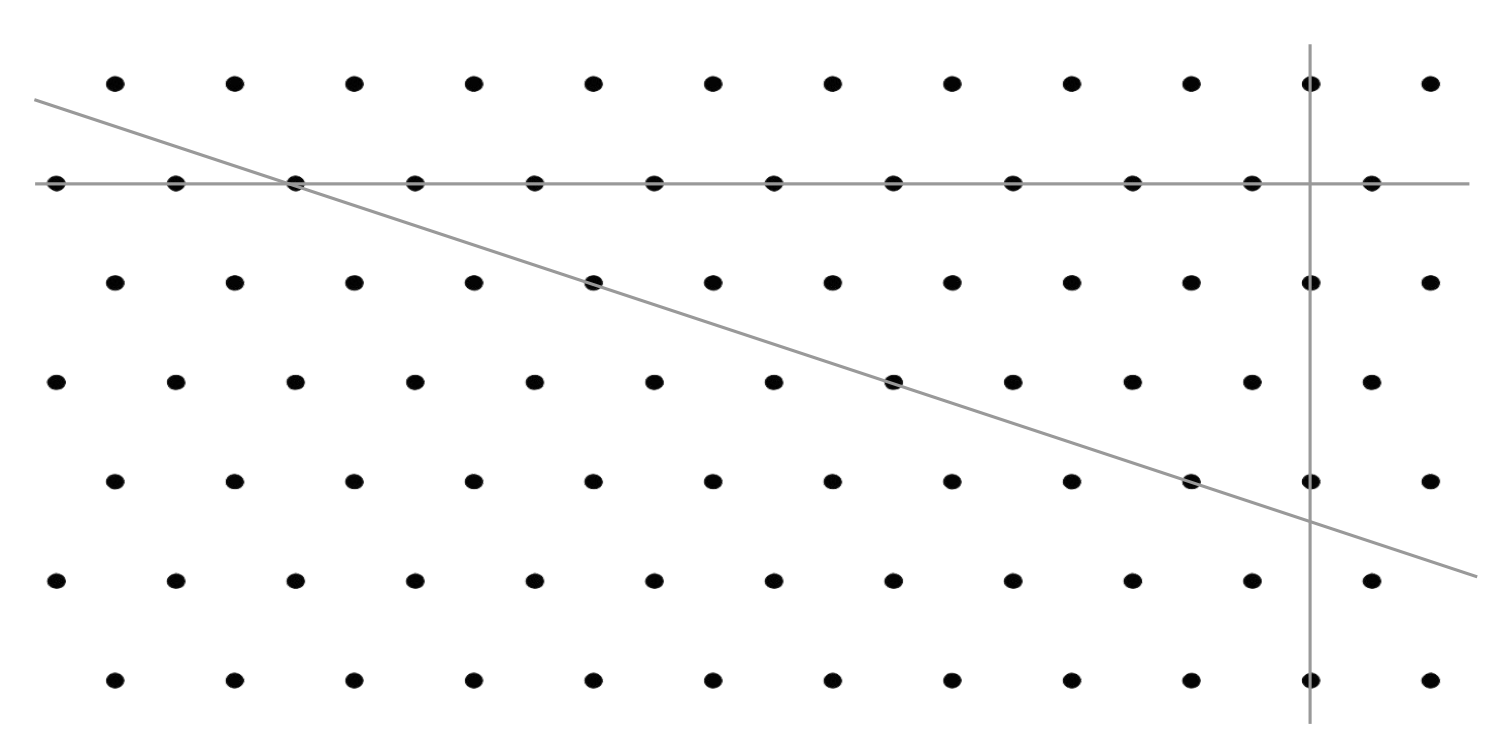
Here is another field of dots. Each dot represents a point.

-
Draw a line through at least 2 points. Label it line \(h\).
- Draw another line that goes through at least 2 points and intersects your first line. Label it line \(g\).
-
Can you draw a new line that you think would never intersect:
- line \(h\)?
- line \(g\)?
If so, draw the line. Be prepared to explain or show how you know the lines would never cross. If not, explain or show why it can’t be done.
-
Here is a trapezoid.
Do you think its top and bottom sides are parallel? What about its left and right sides? Explain or show how you know.

If you have time: Can you draw a new line that you think would never intersect either line \(h\) or line \(g\)? If so, draw the line and be prepared to explain or show how you know the lines would never cross. If not, explain why it can’t be done.
Student Response
For access, consult one of our IM Certified Partners.
Advancing Student Thinking
Students may say that lines are intersecting only if they cross in the field of dots or that they are parallel if they do not cross in the field of dots. Consider asking:
- “Can you show me what your lines would look like if you extended them outside the field of dots?”
- “What do you notice? If you kept extending the lines, would they ever intersect?”
Activity Synthesis
- Discuss the first three questions. Select a few students to show or explain how they know their lines would never cross.
- If students suggested that they extended the lines and the lines didn’t cross, ask if there is a chance that the lines would cross if they continue to be extended.
- “How did you know that your lines would never cross?” (Sample reasoning:
- I lined up one side of a ruler with line \(h\) or line \(g\) and traced the other side of the ruler to make a new line. The two sides of a ruler never cross.
- The distance between the dots is always the same, so if one line is always, for instance, 2 dots away horizontally from the other line, then they would never cross.)
- If students discovered after extending lines that the lines would cross, ask: “What do you notice about the distance between the two lines that would eventually cross?” (They are getting closer.)
- “What do you notice about the distance between two parallel lines?” (The distance doesn’t change.)
- Discuss students’ responses to the last question. Ask students to support their predictions by extending the sides of the trapezoid (or display the image in the student response).
Lesson Synthesis
Lesson Synthesis
“Today we learned about lines that cross—intersecting lines—and lines that never do—parallel lines.”
Display:

Draw extensions to each segment if suggested by students.
“Are these two line segments parallel?” (They appear to be.)
“How do we know for sure?” (We could extend the segments to see if the lines that contain the segments intersect. We could check the distance between them and see if they are the same distance apart.)
Display:

“Are these lines parallel?” (Students will likely be split on the answer.)
“How might we check to see if the lines are parallel or intersecting?” (Extend the lines to see that they will intersect, or check if the distance between them stays the same throughout.)
Display the following image and ask students if they could better tell if the lines are parallel.

“Look around the classroom and find a pair of parallel lines.”
“Explain to a partner how you know those lines are parallel.”
Provide students with a blank graphic organizer (from the blackline master) for creating an illustrated word wall.
“Add the new vocabulary words from the past two lessons to your word wall—one box for each word. Write the definition of each term in your own words, and add a sketch to illustrate its meaning.”
“Take a few minutes to do so now.”
Cool-down: Parallel and Not Quite Parallel (5 minutes)
Cool-Down
For access, consult one of our IM Certified Partners.