Lesson 12
Types of Angles
Warm-up: Number Talk: Fractions of 120 and 360 (10 minutes)
Narrative
This Number Talk elicits strategies that students have for multiplying a fraction by a whole number, and what they know about the size of fractions and equivalent fractions. Students have learned that a fraction \(\frac{a}{b}\) is \(a\) multiples of \(\frac{1}{b}\). They use these insights and properties of operations to find the products of a whole number and a fraction. The work here helps students develop fluency and will be helpful later in the next lesson, when students find angle measurements formed by the hands of a clock.
The progression of expressions encourages students to look for and make use of structure (MP7) in each expression and across expressions. Noticing the connections between the whole-number and fractional factors can help students find each product efficiently.
Launch
- Display one expression.
- “Give me a signal when you have an answer and can explain how you got it.”
- 1 minute: quiet think time
Activity
- Record answers and strategy.
- Keep expressions and work displayed.
- Repeat with each expression.
Student Facing
Find the value of each expression mentally.
- \(12 \times \frac{1}{12}\)
- \(120 \times \frac{1}{12}\)
- \(360 \times \frac{1}{12}\)
- \(360 \times \frac{3}{12}\)
Student Response
For access, consult one of our IM Certified Partners.
Activity Synthesis
- “What connections did you see between the factors in the four expressions?” (The whole numbers are multiples of 12. The fractions are all twelfths. 360 is a multiple of 120.)
- “How did those observations help you find the value of the last expression?”
Activity 1: Sorting Angles (10 minutes)
Narrative
In this activity, students revisit the angles they drew in the preceding lesson and sort them into two groups based on the features of the angles. While there is no single correct way to sort the angles (as long as the categories are reasonable or can be explained), the goal is to highlight classification of angles by their size—as greater or less than a right angle. Students learn the terms acute angles and obtuse angles in the activity synthesis. Consider creating a poster of the graphic organizer from the student activity book in advance to support the lesson synthesis discussion.
When students sort the angles, they look for important features or properties of the angles including their measure but also perhaps looking at the orientation of the rays making the angles (MP7).
This activity uses MLR2 Collect and Display. Advances: Conversing, Reading, Writing.
Supports accessibility for: Language, Memory, Attention
Required Materials
Materials to Gather
Required Preparation
- Students need their angle cards from the previous lesson.
Launch
- Groups of 2 (same partners as in the previous lesson)
- “What types of angles did you and your partner draw in the last lesson? Sort them into two groups and be ready to explain how you categorize the angles.”
Activity
- 2–3 minutes: group work time
- Monitor for the different categories that students use to sort their angles, especially categories based on angle size.
- Circulate, listen for and collect the language and features students use to sort their angles, especially those related to angle size. Listen for descriptions such as “pointy (or wide),” “smaller (or wider) than a right angle,” and “close to a right angle (or straight line).”
- Record students’ words and phrases on a visual display and update it throughout the lesson.
Student Facing
In an earlier lesson, you and your partner drew some angles on cards.
Put the cards together and sort the angles into two groups. Be prepared to explain why you sort them the way you do.
Student Response
For access, consult one of our IM Certified Partners.
Advancing Student Thinking
Activity Synthesis
- Select groups to share their categories, saving the categories that are based on the size of angles (for example “pointy” and “wide”) to the end.
- “Are there any other words or phrases that are important to include on our display?”
- As students share responses, update the display, by adding (or replacing) language, diagrams, or annotations. Refer to relevant visual displays from earlier lessons, if possible.
- Remind students to borrow language from the display as needed.
- Introduce acute angles as angles that are less than \(90^\circ\) and obtuse angles as those greater than \(90^\circ\) and add these words to the vocabulary display from the lesson.
- “Is a \(90^\circ\) angle acute or obtuse?” (Neither. It’s a right angle—a category of its own.)
- “Let’s try to use these words in the next activity as we explain our reasoning.”
Activity 2: What is It, Really? (10 minutes)
Narrative
In this activity, students classify a \(180^\circ\) angle as a straight angle and further develop their understanding of acute and obtuse angles. Given a pair of intersecting segments, they explain why the figure contains both an acute angle and an obtuse angle.
Some students may wish to measure the angles in the letter Y in the second question. Provide access to protractors if requested.
Required Materials
Materials to Gather
Launch
- Provide access to protractors, if requested.
- Remind students to reference the chart of helpful words, phrases, and vocabulary terms, collected in Activity 1.
- “In your own words, how do you explain the difference between acute and obtuse angles?”
Activity
- 5 minutes: independent work time
Student Facing
- Mai and Jada are looking at this drawing. Jada says it is just a line. Mai says it is an angle.

- Tyler and Andre were measuring an angle in a letter Y.

Andre said the angle he measured is obtuse. Tyler said the angle is acute.
Explain why they could both be right.
Student Response
For access, consult one of our IM Certified Partners.
Activity Synthesis
- Invite students to share responses to the first question.
- Highlight that when two rays that meet at the same point extend out in opposite directions, they form a \(180^\circ\) angle and a straight line.
- Introduce straight angle as an angle that is \(180^\circ\).
- Select students to share responses to the second question using the chart from the previous activity as a reference to reinforce acute and obtuse angles.
- Emphasize the idea introduced earlier in the unit—that when two rays share a point, two or more angles are formed.
Activity 3: Small Angles, Large Angles (15 minutes)
Narrative
In this activity, students encounter angles in various forms—in diagrams, descriptions, a construction drawing, and pattern blocks—and practice classifying them by size.
Students should have no trouble distinguishing angles without a protractor, but some students may wish to use a protractor to verify their classification.
The second question prompts students to label the angles in a drawing of a roof structure, which contains many angles. It is not essential that they catch all acute, right, and obtuse angles in the drawing as long as they identify some of each.
For the last question, provide access to pattern blocks if requested.
Required Materials
Materials to Gather
Launch
- Groups of 2–4
- Give students access to protractors and pattern blocks.
Activity
- 7–8 minutes: independent work time
- Make the chart from the first activity visible to all students and invite students to use the chart to support their reasoning.
- 3 minutes: group discussion
Student Facing
-
Identify each angle as acute, right, obtuse, or straight.


- Here is a drawing of the structure of a roof.
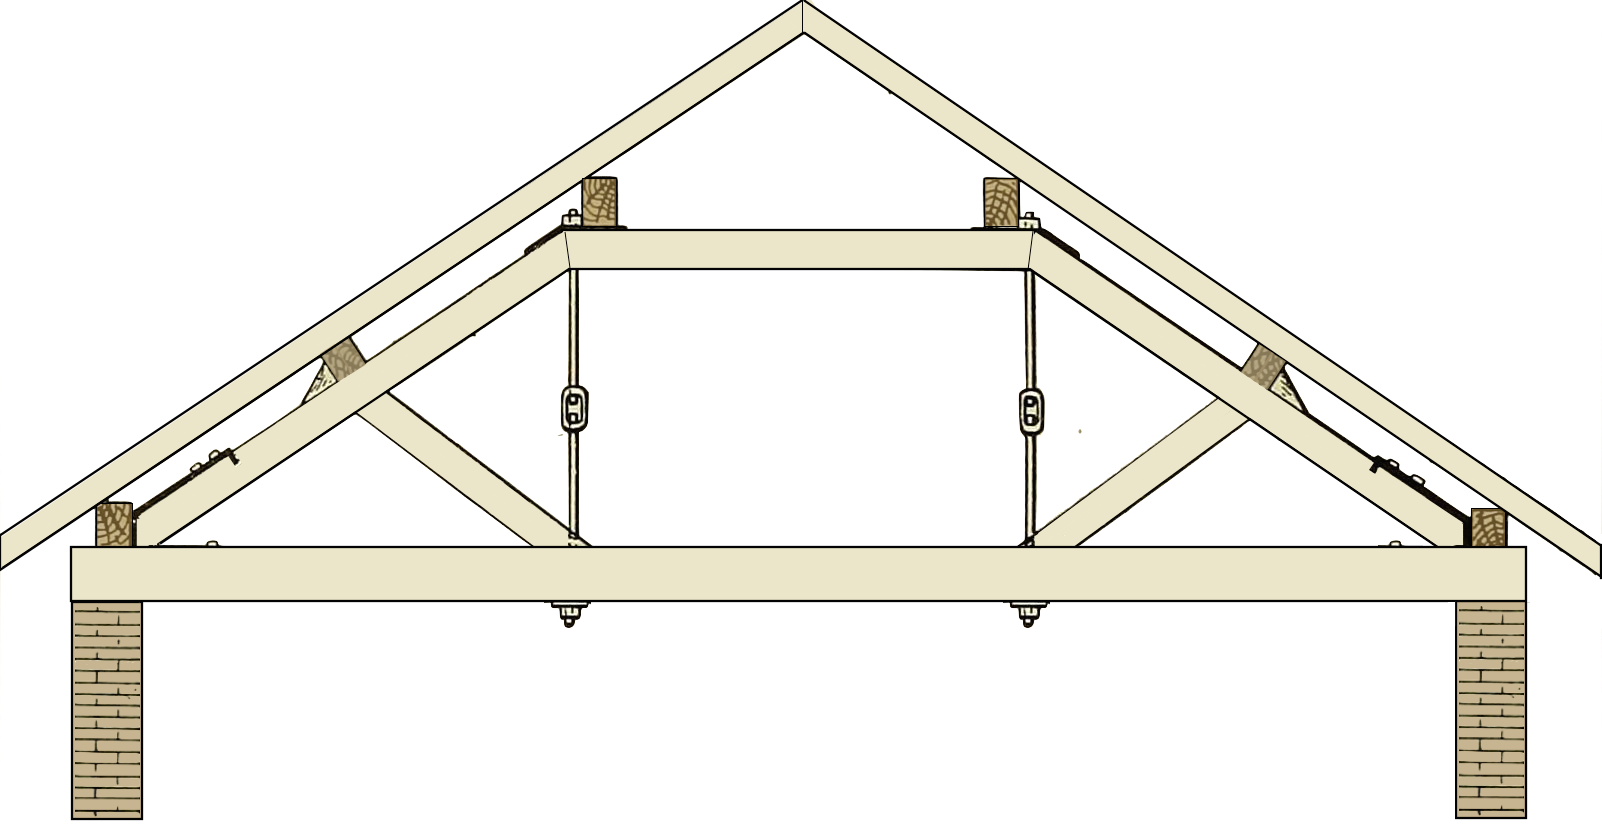
Find as many acute and obtuse angles as you can in the drawing.
Use an “A” to label acute angles, a square (◻) for right angles, and an “O” for obtuse angles.
-

- Diego is holding a pattern block that has 2 acute angles and 2 obtuse angles. Which pattern block could it be?
- He then picks up a pattern block with no obtuse angles. Which pattern block could he be picking up? Explain your reasoning.
Student Response
For access, consult one of our IM Certified Partners.
Activity Synthesis
- Select students to share their responses to the first question.
- Select other students to share their labeled drawings for the second question, or display the drawing of the roof structure for them to mark up.
- As students share, add images and labels to the chart with language describing obtuse and acute angles from the first activity.
- Invite students who haven’t shared before to discuss their responses to the last set of questions. Ask them to point to the angles in the pattern blocks to support their responses.
- If students mention only one pattern block, ask: “Are there other shapes Diego could be holding? Which one(s)? How do you know?”
Lesson Synthesis
Lesson Synthesis
“Earlier in this unit, we categorized lines by their attributes or characteristics. Today, we categorized angles by their size. Let’s recall the types of lines and the types of angles we’ve come across so far.”
Create on chart paper a graphic organizer such as the one shown here. Give each student 1–2 blank sticky notes. Ask students to help complete the missing terms, definitions, and diagrams by writing the missing information on the sticky notes. Consider assigning 1–2 blank cells for each student to complete, or arranging students into groups, and ask each group to complete the missing information for each geometric figure.
Use students’ input as a way to check for understanding and use the completed graphic organizer as a reference in future lessons.
| attribute (if they...) | type (we call them...) | diagram (they look like...) | |
|---|---|---|---|
| lines | have one endpoint | ||
| line segments | |||
| never meet or cross | |||
 |
|||
| angles | measure less than \(90^\circ\) | ||
| right angle | |||
 |
|||
| measure \(180^\circ\) |
Cool-down: Obtuse, Acute, and Straight Angles (5 minutes)
Cool-Down
For access, consult one of our IM Certified Partners.