Lesson 8
Using Technology for Constructions
8.1: How Do Digital Construction Tools Work? (10 minutes)
Warm-up
The purpose of this activity is to gain familiarity with dynamic construction tools so students can make constructions using digital technology. The GeoGebra Construction App includes 9 construction tools, which can replicate all the moves that can be done with a pencil, straightedge, and compass. There are also 5 editing tools.
Launch
Arrange students in groups of 2. Provide each pair access to dynamic geometry technology. If students are using the digital version of the materials, show them how to open the GeoGebra Constructions App in the math tools.
Students need not write down responses to the questions in this task. They should discuss them with their partner.
Student Facing
Open the Constructions App in the Math Tools (or at ggbm.at/C9acgzUx).
Try all the tools in the workspace.
-
Find the Undo button.
undo

-
Click on the image of 3 stacked segments, the Main Menu, to save your work or go to a new page.
main menu

- Which tools do the same work as a straightedge?
- The Constructions App has 3 tools to make a point. To learn about them, open the applet at ggbm.at/cuupdskk. In this applet, all 3 point tools have been used.
- Drag each point and each line around to see what happens in the Graphics View on the right.
- Look at the way the points are defined in the Algebra View on the left.
- Explain how each definition is related to the behavior of the corresponding point .
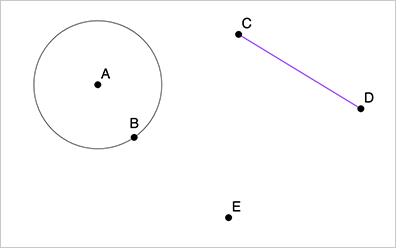
- There are several ways to use the compass tool. First, set up a workspace that looks something like the image:
- Open a new blank page in the Constructions App.
- Draw circle \(A\) through point \(B\).
- Draw segment \(CD\) not intersecting the circle centered at \(A\).
- Draw point \(E\) not intersecting the circle centered at \(A\) or segment \(CD.\)
- Select the compass tool and then click on segment \(CD.\) What happens?
- Now click on the point \(E.\) What happens?
- Make a new segment \(EF\) that is the same length as \(CD\).
- Make a circle with the same radius as the circle centered at \(A\).
- Explain how the digital compass tool is the same and how it is different from a physical compass.
Student Response
For access, consult one of our IM Certified Partners.
Activity Synthesis
Invite students to share what they learned. If not mentioned by students, point out these tips:
- If you try to make a free point very close to an object, GeoGebra may snap that point on the object. Point A in the applet was made in an empty space and dragged to the line. That’s why it’s still free.
- The digital compass tool can be used to draw a circle or to transfer a length. When you copy a length, you are really copying the radius of a circle. The compass tool lets you define a radius by selecting two points, a segment, or even another circle. Then the tool will drag that circle around until you select a point to be its center.
8.2: Digital Compass and Straightedge Construction (15 minutes)
Optional activity
In this activity, students recreate familiar constructions using digital tools.
Launch
Remind students they have done each of these constructions with paper, a pencil, a compass, and a straightedge in previous lessons. The goal is to recreate the construction using the new tools. The Constructions App can be found at ggbm.at/C9acgzUx.
Supports accessibility for: Memory; Conceptual processing
Student Facing
Use the Constructions App in the Math Tool Kit to create one or more of these figures:
- a perpendicular bisector of line segment \(AB\)
- an equilateral triangle
- a regular hexagon
- a square
- a square inscribed in a circle
- two congruent, right triangles that do not share a side
In order for your construction to be successful, it has to be impossible to mess it up by dragging a point. Make sure to test your constructions.
Student Response
For access, consult one of our IM Certified Partners.
Launch
Remind students they have done each of these constructions with paper, a pencil, a compass, and a straightedge in previous lessons. The goal is to recreate the construction using the new tools. The Constructions App can be found at ggbm.at/C9acgzUx.
Supports accessibility for: Memory; Conceptual processing
Student Facing
Use the Constructions App in the Math Toolkit to create one or more of these figures:
- a perpendicular bisector of line segment \(AB\)
- an equilateral triangle
- a regular hexagon
- a square
- a square inscribed in a circle
- two congruent, right triangles that do not share a side
In order for your construction to be successful, it has to be impossible to mess it up by dragging a point. Make sure to test your constructions.
Student Response
For access, consult one of our IM Certified Partners.
Activity Synthesis
Invite a few students to share their constructions. Use the drag test to demonstrate that each one is a construction and not a drawing based on estimation.
Design Principle(s): Support sense-making
8.3: More Helpful Digital Tools (10 minutes)
Optional activity
In this activity, students learn how to construct more figures using the tools available in a full dynamic geometry program.
Launch
“How many steps would it take to construct perpendicular or parallel lines using only the digital tools that mimic a pencil, compass, and straightedge?” (A lot!) Animate these constructions with the play/pause button at the bottom of the applet:
- perpendicular lines ggbm.at/AggMCCCc
- parallel lines ggbm.at/FbjY5DTr
“The dynamic geometry tools have been expanded to build these steps into single commands. The GeoGebra Geometry App (geogebra.org/geometry) has commands for perpendicular lines, parallel lines, and more. When you open it, you’ll see some basic tools, and at the bottom, there is a place to click for MORE.“
Supports accessibility for: Conceptual processing; Visual-spatial processing
Student Facing
When you open the GeoGebra Geometry App geogebra.org/geometry, you’ll see some basic tools. Click on the word “MORE” and you’ll see some categories of tools, including “Construct” tools.
perpendicular line tool

parallel line tool

- Construct a line or a line segment and an additional point that is not on it. Then try the perpendicular line tool and the parallel line tool. Use the move tool to drag some points around, and observe what happens.
- Use any of the digital tools to create one or more of these figures. Test your constructions by dragging a point.
- parallelogram
- rectangle
- rhombus
- square
Student Response
For access, consult one of our IM Certified Partners.
Anticipated Misconceptions
If students are stuck, invite them to construct the figure on paper or look up a similar construction on paper to reference.
Activity Synthesis
Invite a few students to share their constructions. Use the drag test to demonstrate that each one is a construction and not a drawing based on estimation.
Lesson Synthesis
Lesson Synthesis
The goal of this lesson is for students to use technology tools to construct a diagram. Here are some questions for discussion:
- “How do you construct a circle using technology?” (You plot two points and use the Circle with Center through Point tool or you choose the Compass tool, define a radius, and then choose a point for its center.)
- “What are some advantages of using technology to make geometric constructions?” (Precision, and the ability to see changes to the construction when an element is changed, such as in the drag test.)
- “When do you think it is appropriate to use technology to make geometric constructions?” (To test a conjecture with a dynamic model and see whether the conjecture is always true. It would also be helpful when making a really precise construction.)
8.4: Cool-down - Is it a Rectangle? (5 minutes)
Cool-Down
For access, consult one of our IM Certified Partners.
Student Lesson Summary
Student Facing
We will start with a small set of tools. The GeoGebra Constructions App can be found at https://ggbm.at/C9acgzUx. These are the GeoGebra tools that do the same jobs as a pencil, a compass, and a straightedge.
Three pencil tools:
free point

point plotted on object

point of intersection of objects

Four straightedge tools:
line

segment

ray

polygon

Two compass tools:
circle with center through point

compass

The GeoGebra Geometry App is at https://www.geogebra.org/geometry. Click “MORE” to see the hidden categories of tools. Instead of doing each step of a construction, GeoGebra Geometry will perform all the steps of the constructions on our inventory. It has commands for perpendicular lines, parallel lines, and more!
perpendicular line tool

parallel line tool
