Lesson 8
Moves in Parallel
8.1: Line Moves (10 minutes)
Warm-up
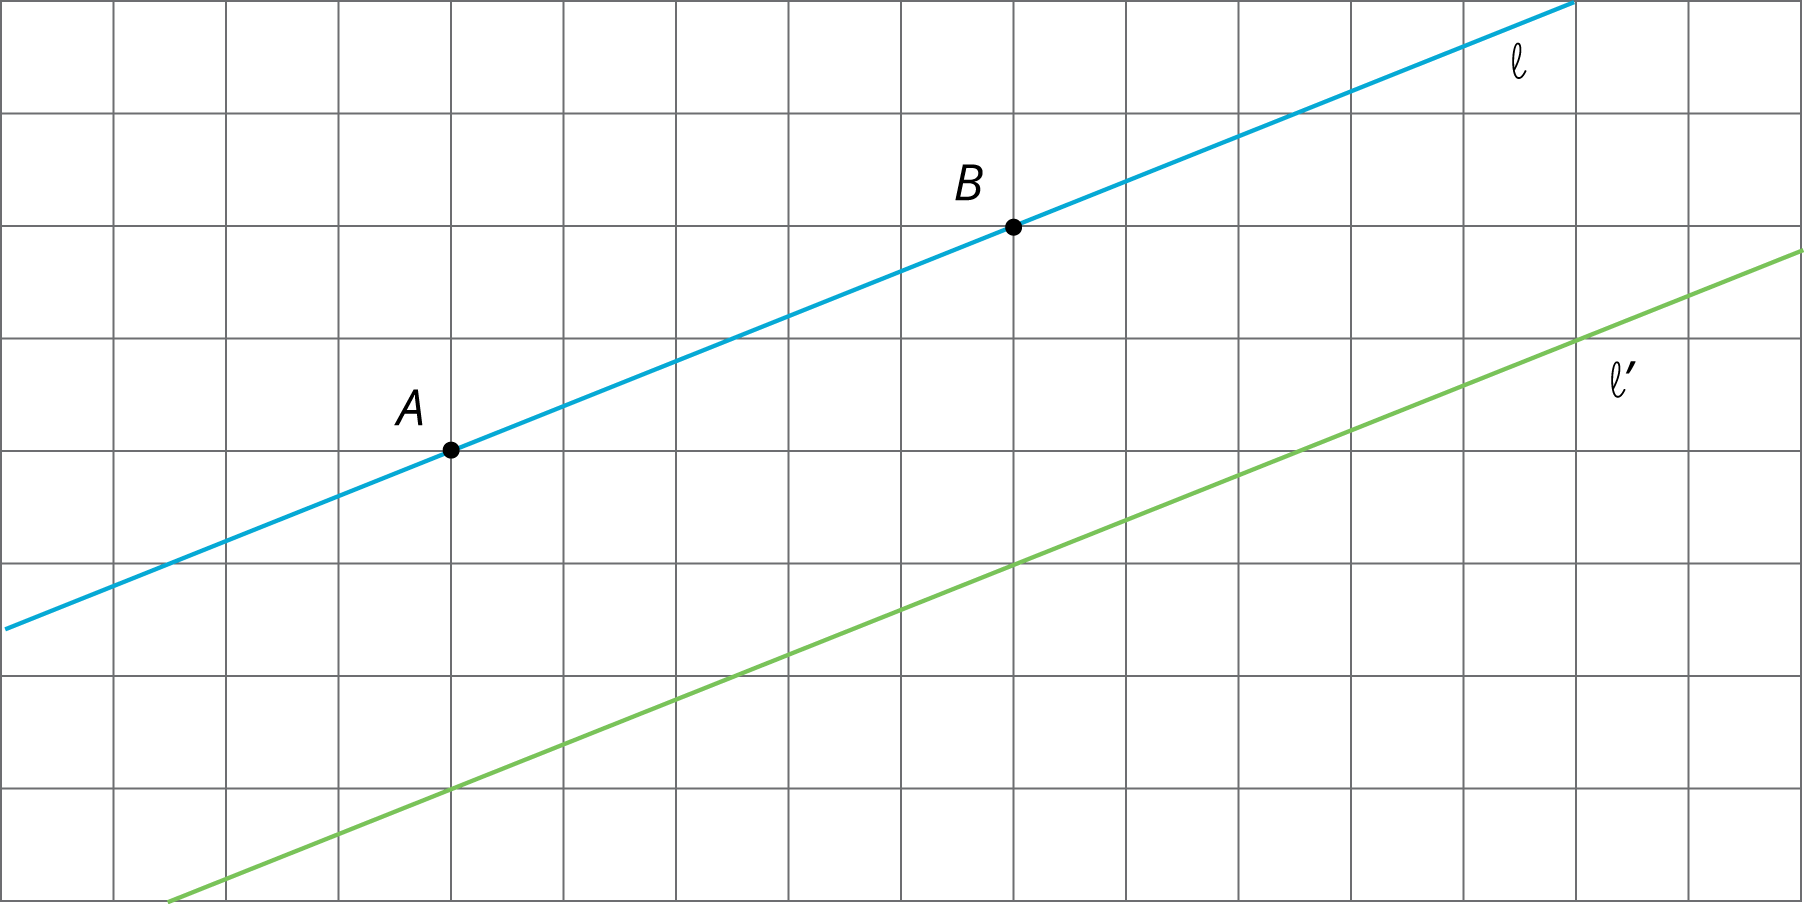
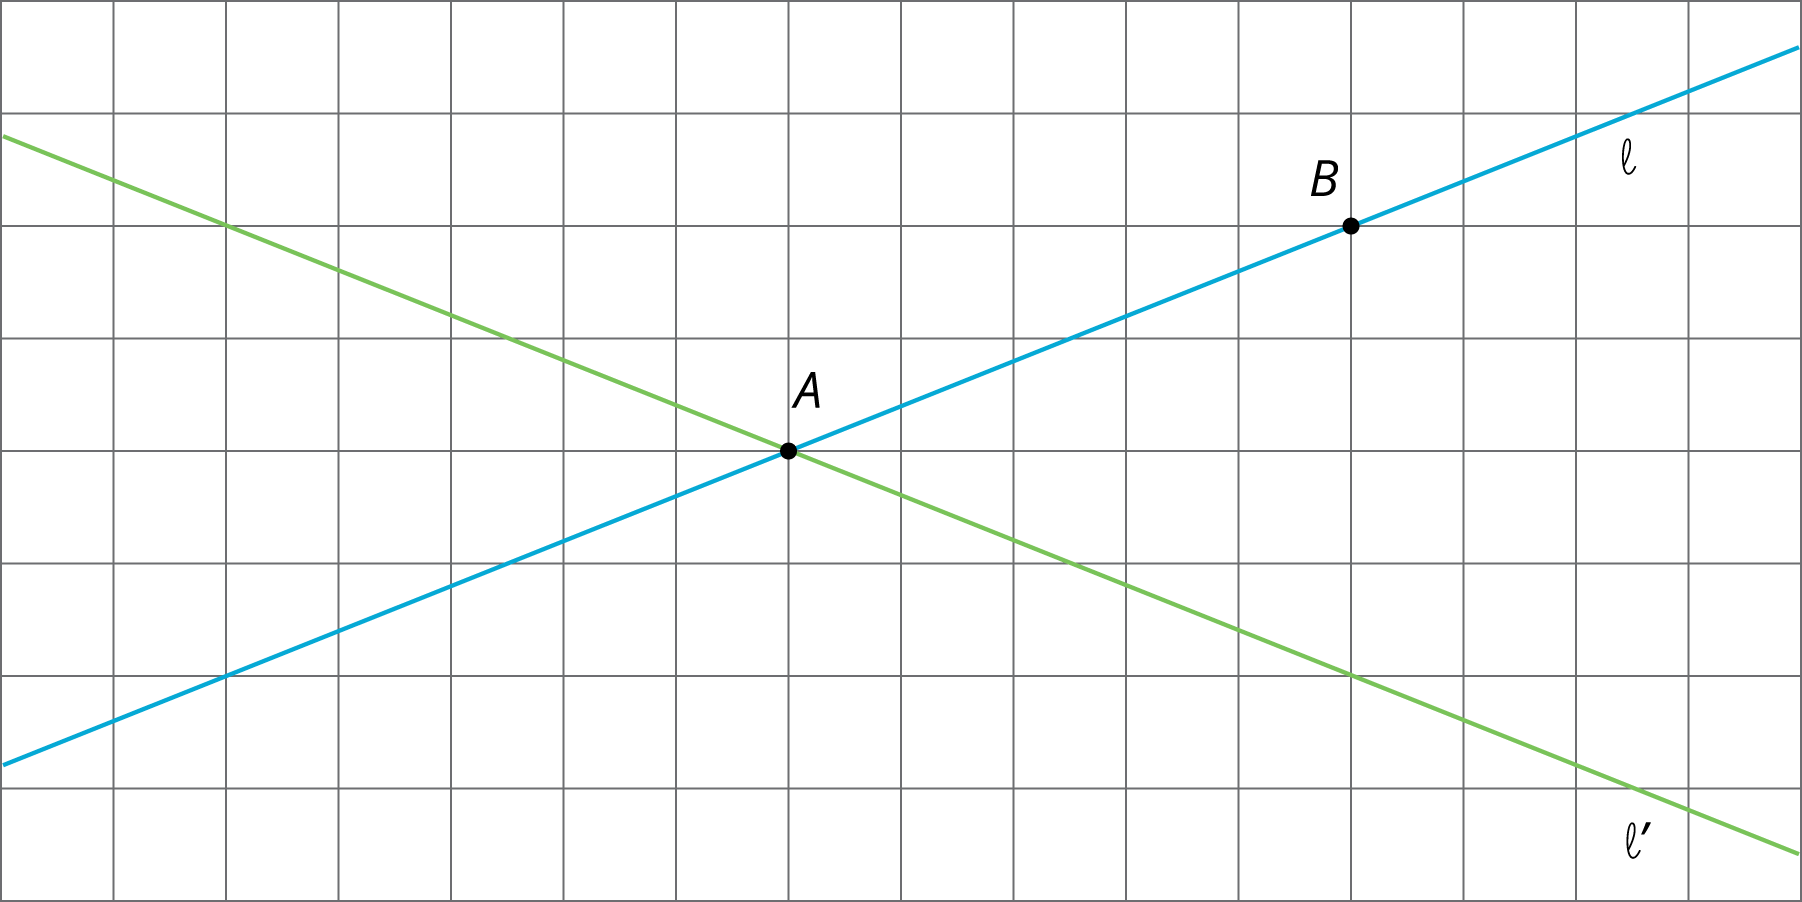
In this warm-up, students continue their work with transformations by shifting from applying rigid transformations to shapes to applying them specifically to lines. Each image in this activity has the same starting line and students are asked to name the translation, rotation, or reflection that takes this line to the second marked line. Because of their infinite and symmetric nature, different transformations of lines look the same unless specific points are marked, so 1–2 points on each line are marked.
While students have experience transforming a variety of figures, this activity provides the opportunity to use precise language when describing transformations of lines while exploring how sometimes different transformations can result in the same final figures. During the activity, encourage students to look for more than one way to transform the original line.
Launch
Provide access to tracing paper. Give students 2 minutes of quiet work time followed by whole-class discussion.
Student Facing
For each diagram, describe a translation, rotation, or reflection that takes line \(\ell\) to line \(\ell’\). Then plot and label \(A’\) and \(B’\), the images of \(A\) and \(B\).
Student Response
For access, consult one of our IM Certified Partners.
Activity Synthesis
Invite students to share the transformations they choose for each problem. Each diagram has more than one possible transformation that would result in the final figure. If the class only found one, pause for 2–3 minutes and encourage students to see if they can find another. For the first diagram, look for a single translation, single rotation, and single reflection that work. For the second diagram, look for a single rotation and a single reflection.
- "Will a translation work for the second diagram? Explain your reasoning." (A translation will not work. Since translations do not incorporate a turn, translations of a line are parallel to the original line or are the same line.)
8.2: Parallel Lines (15 minutes)
Activity
In this activity, students will investigate the question, “What happens to parallel lines under rigid transformations?” by performing three different transformations on a set of parallel lines. After applying each transformation, they will jot down what they notice by answering the questions for each listed transformation.
As students work through these problems they may remember essential features of parallel lines (they do not meet, they remain the same distance apart). Rigid transformations do not change either of these features which means that the image of a set of parallel lines after a rigid transformation is another set of parallel lines (MP7).
Identify the students who saw that the orientation of the lines changes but the lines remain parallel to each other regardless and select them to share during the discussion.
Launch
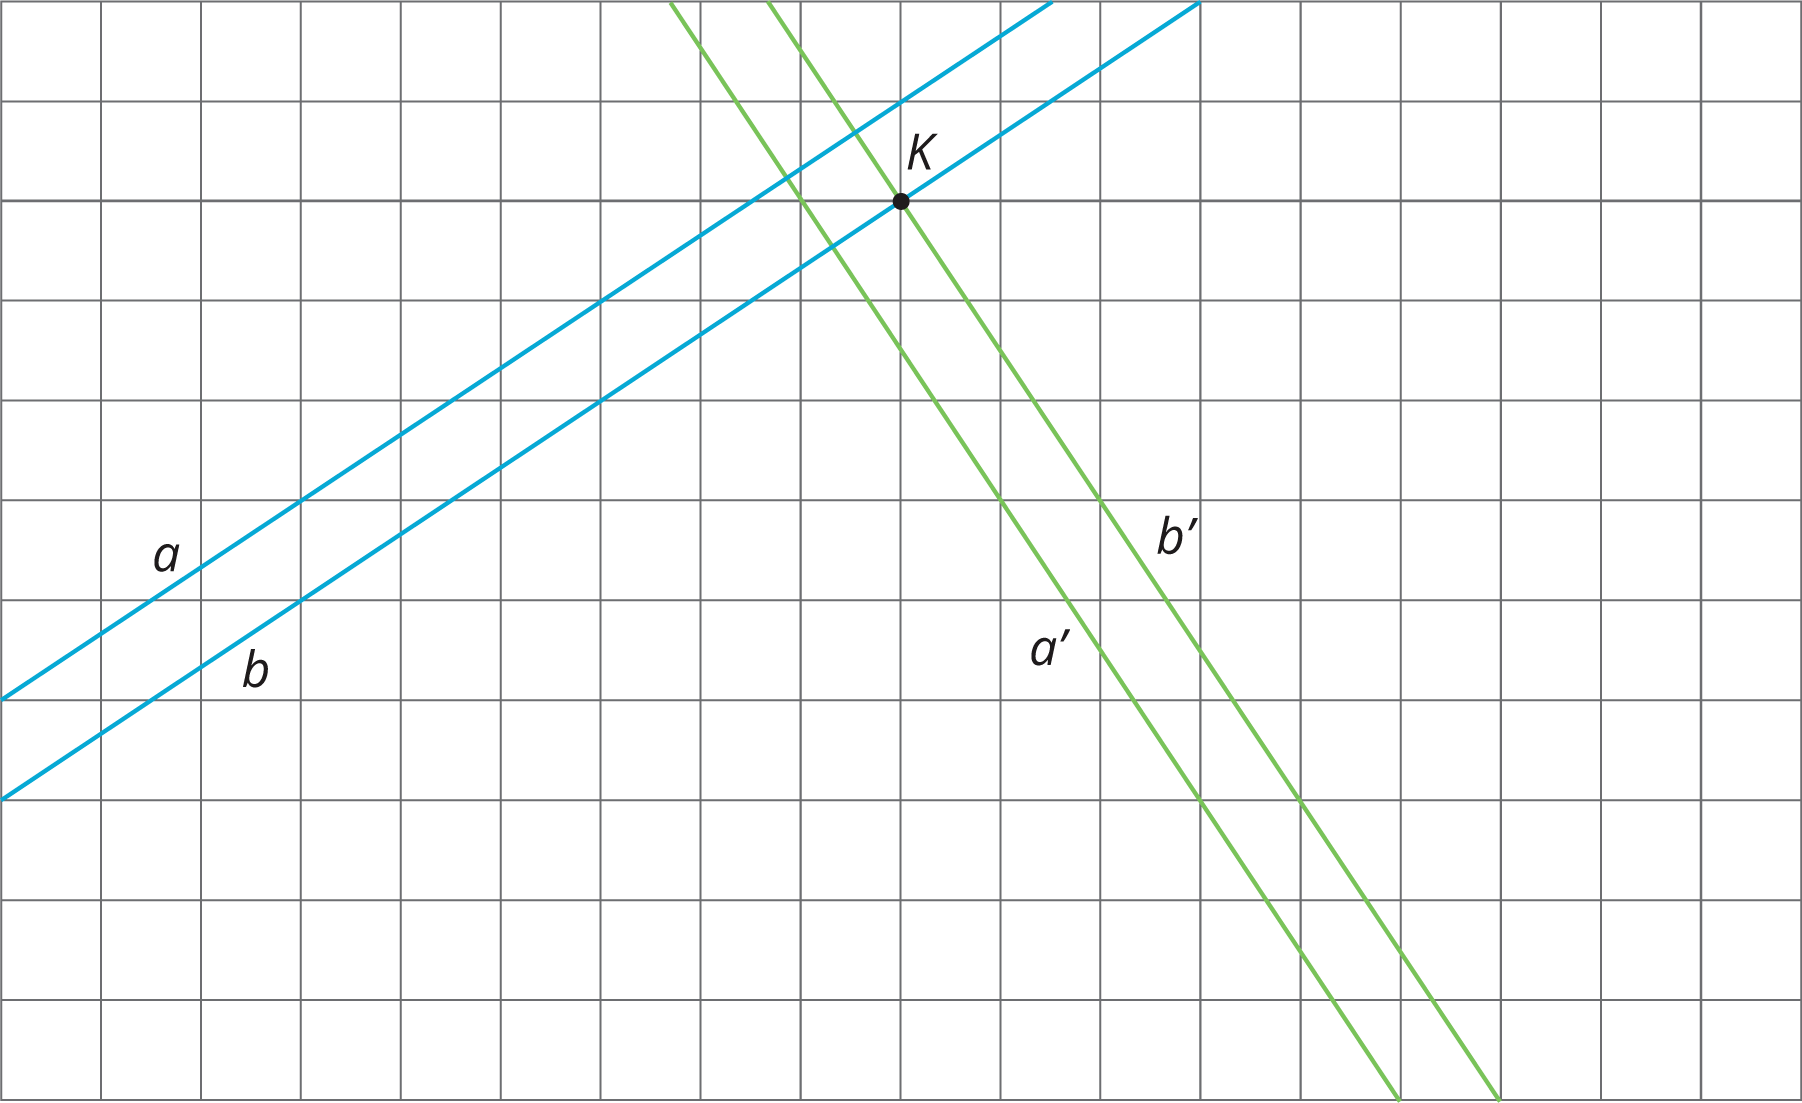
Before beginning, review with students what happens when we perform a rigid transformation. Demonstrate by moving the tracing paper on top of the image to replicate an example transformation (for example, rotation of the lines clockwise \(90^\circ\) around the center \(K\)). Tell students that the purpose of this activity is to investigate, “What happens to parallel lines when we perform rigid transformations on them?”
Arrange students in groups of 3. Provide access to tracing paper. Each student in the group does one of the problems and then the group discusses their findings.
Supports accessibility for: Organization; Attention
Student Facing
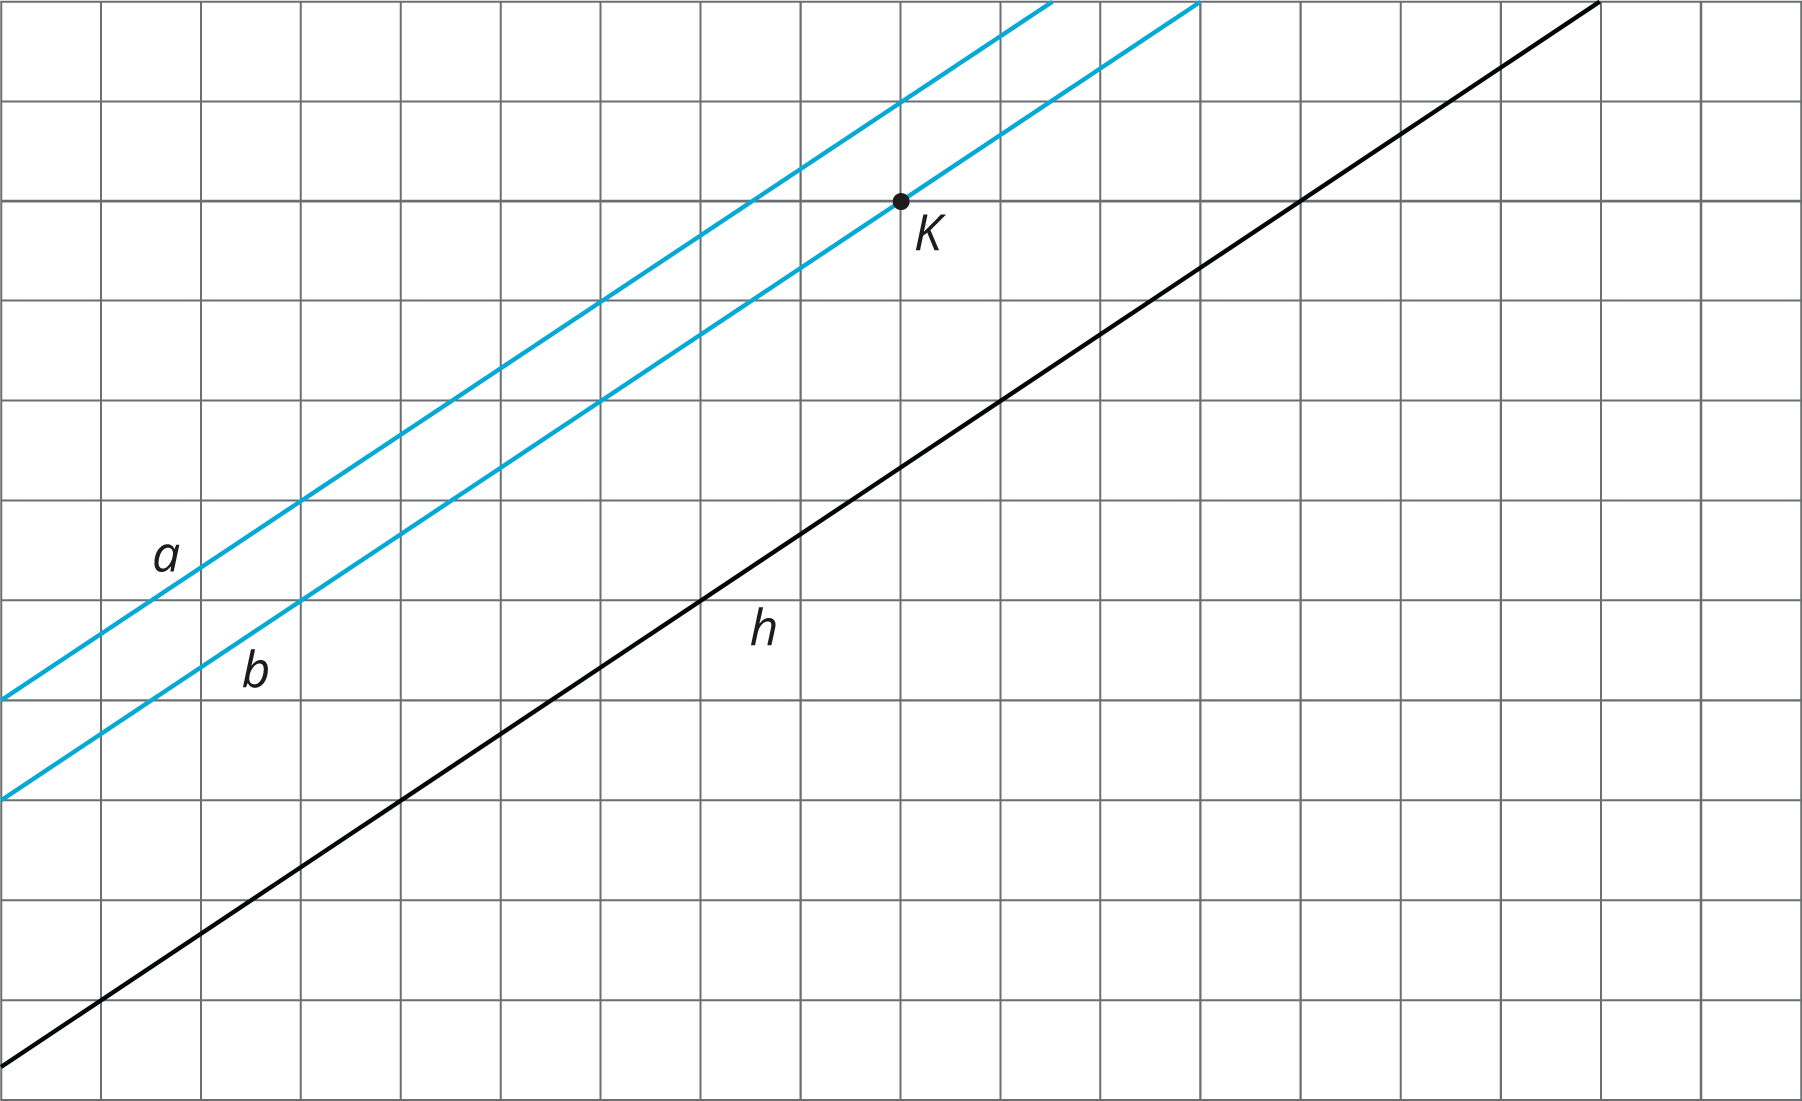
Use a piece of tracing paper to trace lines \(a\) and \(b\) and point \(K\). Then use that tracing paper to draw the images of the lines under the three different transformations listed.
As you perform each transformation, think about the question:
What is the image of two parallel lines under a rigid transformation?
-
Translate lines \(a\) and \(b\) 3 units up and 2 units to the right.
- What do you notice about the changes that occur to lines \(a\) and \(b\) after the translation?
- What is the same in the original and the image?
-
Rotate lines \(a\) and \(b\) counterclockwise 180 degrees using \(K\) as the center of rotation.
- What do you notice about the changes that occur to lines \(a\) and \(b\) after the rotation?
-
What is the same in the original and the image?
-
Reflect lines \(a\) and \(b\) across line \(h\).
- What do you notice about the changes that occur to lines \(a\) and \(b\) after the reflection?
- What is the same in the original and the image?
Student Response
For access, consult one of our IM Certified Partners.
Student Facing
Are you ready for more?
When you rotate two parallel lines, sometimes the two original lines intersect their images and form a quadrilateral. What is the most specific thing you can say about this quadrilateral? Can it be a square? A rhombus? A rectangle that isn’t a square? Explain your reasoning.

Student Response
For access, consult one of our IM Certified Partners.
Anticipated Misconceptions
Students may not perform the transformations on top of the original image. Ask these students to place the traced lines over the original and perform each transformation from there.
Activity Synthesis
Ask previously selected students who saw that the images of the parallel lines were parallel to the original in all three cases to share how they would answer the main question “What is the image of two parallel lines under a rigid transformation?” Make sure students understand that in general if \(\ell\) and \(m\) are parallel lines and \(\ell'\) and \(m'\) are their images under a rigid transformation then:
- \(\ell'\) and \(m'\) are parallel.
- \(\ell\) and \(m\) are not necessarily parallel to \(\ell'\) and \(m'\) (refer to the 90 degree rotation shown during the launch).
In addition to the fact that the parallel lines remain parallel to each other when rigid transformations are performed, the distance between the lines stay the same. What can change is the position of the lines in the plane, in relative terms (i.e., which line is ‘on top’) or in absolute terms (i.e., does a line contain a particular point in the plane).
Give students 1–2 minutes of quiet time to write a response to the main question, "What is the image of two parallel lines under a rigid transformation?"
8.3: Let’s Do Some 180’s (15 minutes)
Activity
In this activity, students apply their understanding of the properties of rigid transformations to \(180^\circ\) rotations of a line about a point on the line in order to establish the vertical angle theorem. Students have likely already used this theorem in grade 7, but this lesson informally demonstrates why the theorem is true. The demonstration of the vertical angle theorem exploits the structure of parallel lines and properties of both 180 degree rotations (studied in the previous lesson) and rigid transformations. This lesson is a good example of MP7, investigating the structure of different mathematical objects.
Students begin the activity by rotating a line with marked points \(180^\circ\) about a point on the line. Unlike the whole-class example discussed in the launch, this line contains marked points other than the center of rotation. Then students rotate an angle \(180^\circ\) about a point on the line to draw conclusions about lengths and angles. Finally, students are asked to consider the intersection of two lines, the angles formed, and how the measurements of those angles can be deduced using a \(180^\circ\) rotation about the intersection of the lines, which is the vertical angle theorem.
While students are working, encourage the use of tracing paper to show the transformations directly over the original image in order to help students keep track of what is happening with lines in each \(180^\circ\) rotation.
Launch
Rotations require the students to think about rotating an entire figure. It would be good to remind students about this before the start of this activity. This might help students see what is happening in the first question better.
Before students read the activity, draw a line \(\ell\) with a marked point \(D\) for all to see. Ask students to picture what the figure rotated \(180^\circ\) around point \(D\) looks like. After a minute of quiet think time, invite students share what they think the transformed figure would look like. Make sure all students agree that \(\ell’\) looks “the same” as the original. If no students bring it up in their explanations, ask for suggestions of features that would make it possible to quickly tell the difference between the \(\ell’\) and \(\ell\), such as another point or if the line were different colors on each side of point \(D\).
Provide access to tracing paper.
Supports accessibility for: Organization; Attention
Student Facing
- The diagram shows a line with points labeled \(A\), \(C\), \(D\), and \(B\).
-
On the diagram, draw the image of the line and points \(A\), \(C\), and \(B\) after the line has been rotated 180 degrees around point \(D\).
-
Label the images of the points \(A’\), \(B’\), and \(C’\).
-
What is the order of all seven points? Explain or show your reasoning.

-
- The diagram shows a line with points \(A\) and \(C\) on the line and a segment \(AD\) where \(D\) is not on the line.
-
Rotate the figure 180 degrees about point \(C\). Label the image of \(A\) as \(A’\) and the image of \(D\) as \(D’\).
-
What do you know about the relationship between angle \(CAD\) and angle \(CA’D’\)? Explain or show your reasoning.

-
- The diagram shows two lines \(\ell\) and \(m\) that intersect at a point \(O\) with point \(A\) on \(\ell\) and point \(D\) on \(m\).
-
Rotate the figure 180 degrees around \(O\). Label the image of \(A\) as \(A’\) and the image of \(D\) as \(D’\).
-
What do you know about the relationship between the angles in the figure? Explain or show your reasoning.

-
Student Response
For access, consult one of our IM Certified Partners.
Anticipated Misconceptions
In the second question, students may not understand that rotating the figure includes both segment \(CA\) and segment \(AD\) since they have been working with rotating one segment at a time. Explain to these students that the figure refers to both of the segments. Encourage them to use tracing paper to help them visualize the rotation.
Activity Synthesis
The focus of the discussion should start with the relationships students find between the lengths of segments and angle measures and then move to the final problem, which establishes the vertical angle theorem as understood through rigid transformations. Questions to connect the discussion include:
- "What relationships between lengths did we find after performing transformations?" (They are the same.)
- "What relationships between angle measures did we find after performing transformations?" (They are the same.)
- "What does this transformation informally prove?" (Vertical angles are congruent.)
If time permits, consider discussing how the vertical angle theorem was approached in grade 7, namely by looking for pairs of supplementary angles. Pairs of vertical angles have the same measure because they are both supplementary to the same angle. The argument using 180 degree rotations is different because no reference needs to be made to the supplementary angle. The 180 degree rotation shows that both pairs of vertical angles have the same measure directly by mapping them to each other!
Design Principle(s): Maximize meta-awareness
Lesson Synthesis
Lesson Synthesis
In this lesson, students apply different rigid transformations to lines with a focus on parallel lines. They should be able to articulate what happens to parallel lines when a rigid transformation is performed on them. In addition, students gain a better understanding of why the vertical angle theorem they learned in grade 7 is true.
To highlight how transformations affect parallel lines, ask students:
- "When we perform rigid transformations on parallel lines, what do we know about their image?"
- "Does the distance between the lines change?"
To help students make a connection to how rotations affect lines in the second activity, ask:
- "When we rotate a line \(180^\circ\) around a point on the line where does the line land?"
- "How does the rotation affect the angle measurements for a pair of intersecting lines?"
- "How does this help us prove the vertical angle theorem?"
Students should see that a rotation of two intersecting lines about the point of intersection by \(180^\circ\) moves each angle to the angle that is vertical to it. Since rotation is a rigid transformation, the vertical angles must have the same measure.
In general, rigid transformations help us see that when we transform lines it might change the orientation but the lines retain their original properties.
8.4: Cool-down - Finding Missing Measurements (5 minutes)
Cool-Down
For access, consult one of our IM Certified Partners.
Student Lesson Summary
Student Facing
Rigid transformations have the following properties:
-
A rigid transformation of a line is a line.
-
A rigid transformation of two parallel lines results in two parallel lines that are the same distance apart as the original two lines.
-
Sometimes, a rigid transformation takes a line to itself. For example:
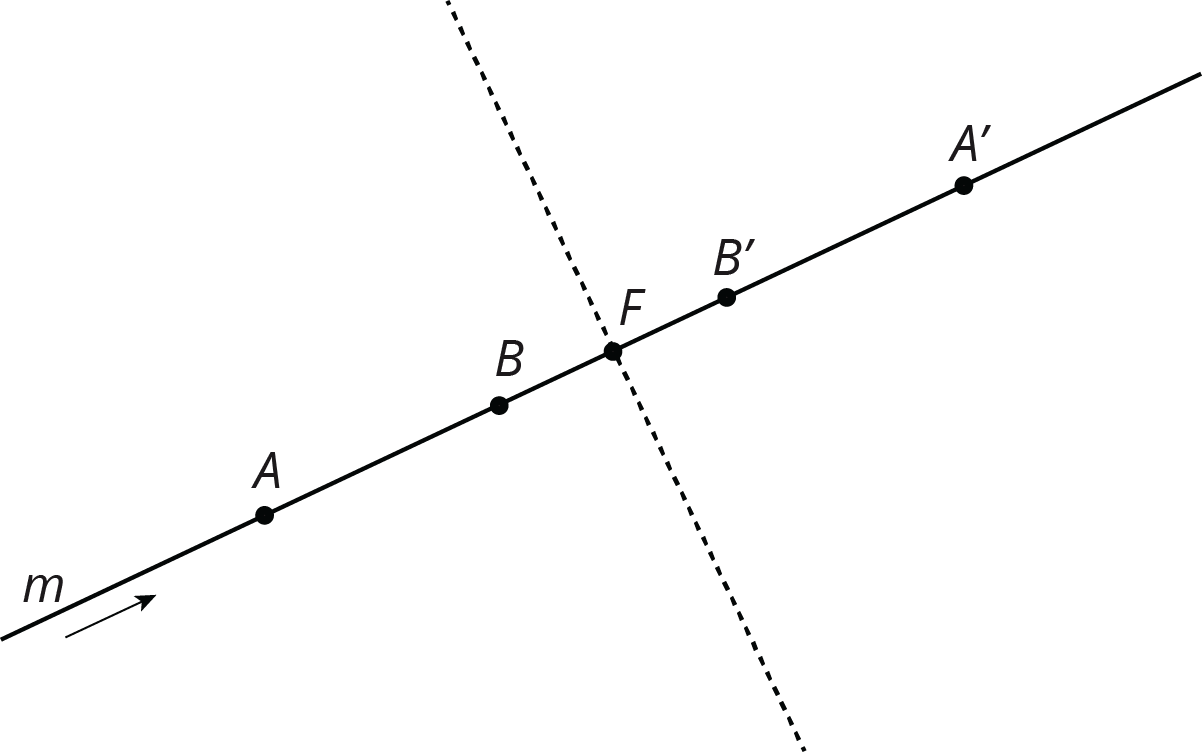
-
A translation parallel to the line. The arrow shows a translation of line \(m\) that will take \(m\) to itself.
-
A rotation by \(180^\circ\) around any point on the line. A \(180^\circ\) rotation of line \(m\) around point \(F\) will take \(m\) to itself.
-
A reflection across any line perpendicular to the line. A reflection of line \(m\) across the dashed line will take \(m\) to itself.
-
These facts let us make an important conclusion. If two lines intersect at a point, which we’ll call \(O\), then a \(180^\circ\) rotation of the lines with center \(O\) shows that vertical angles are congruent. Here is an example:
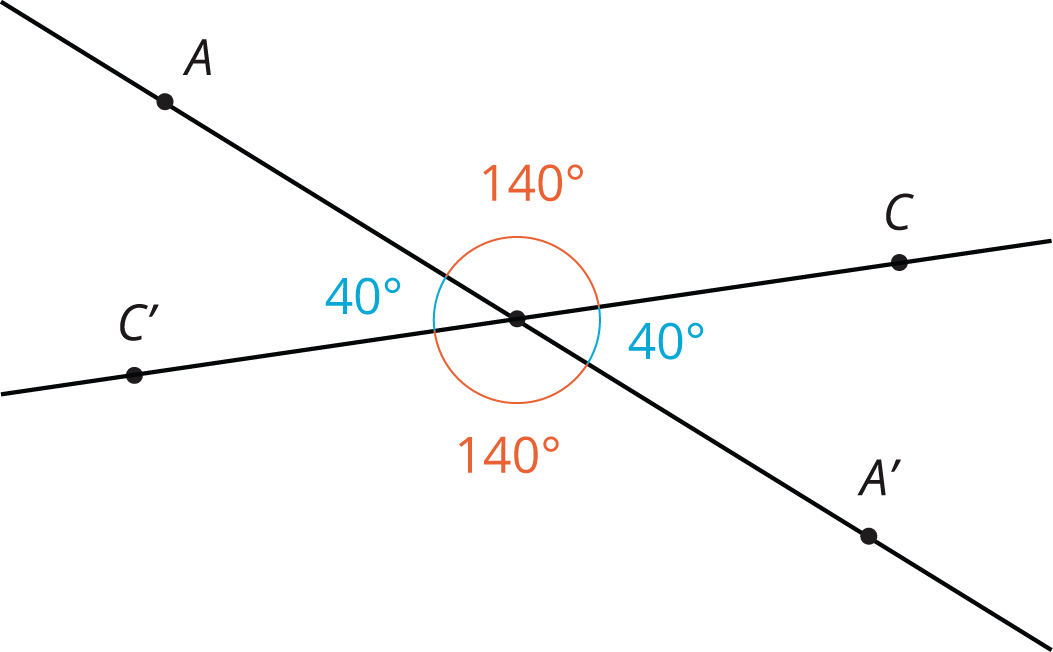
Rotating both lines by \(180^\circ\) around \(O\) sends angle \(AOC\) to angle \(A’OC’\), proving that they have the same measure. The rotation also sends angle \(AOC’\) to angle \(A’OC\).
