Lesson 10
What Is the Same?
10.1: Find the Right Hands (5 minutes)
Warm-up
In this activity, students get their first formal introduction to the idea of mirror orientation, sometimes called “handedness” because left and right hands are reflections of each other. The easiest way to decide which are the right hands is to hold one’s hands up and rotate them until they match a particular figure (or don’t). This prepares them for a discussion about whether figures with different mirror orientation are the same or not.
Launch
Arrange students in groups of 2, and provide access to geometry toolkits. Give 2 minutes of quiet work time, followed by time for sharing with a partner and a whole-class discussion.
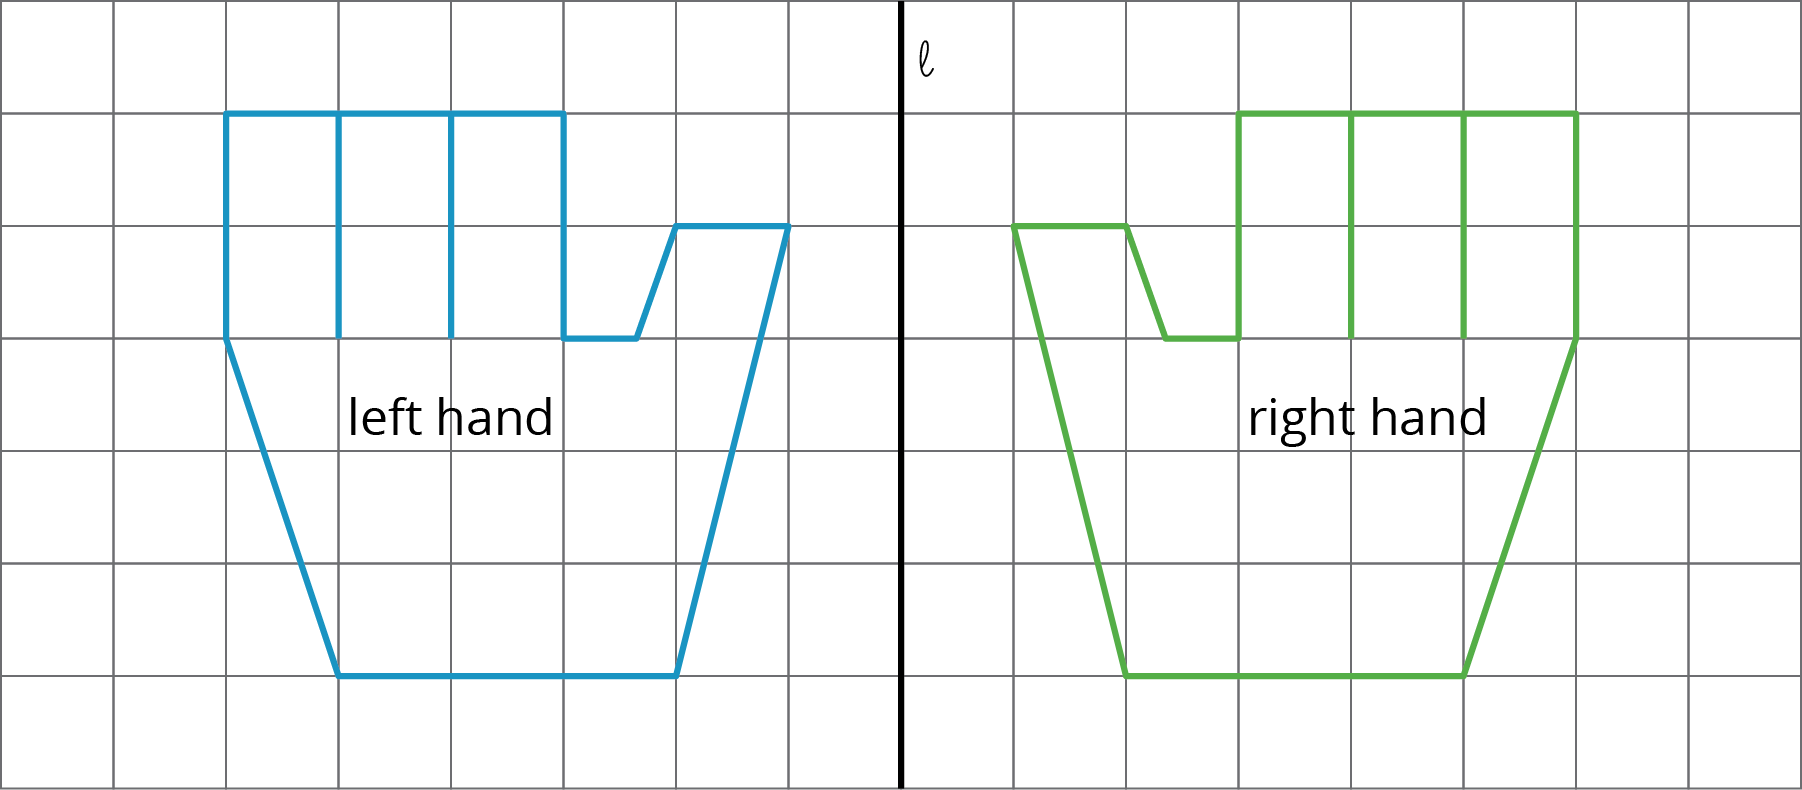
Show students this image or hold up both hands and point out that our hands are mirror images of each other. These are hands shown from the back. If needed, clarify for students that all of the hands in the task are shown from the back.
Student Facing
A person’s hands are mirror images of each other. In the diagram, a left hand is labeled. Shade all of the right hands.
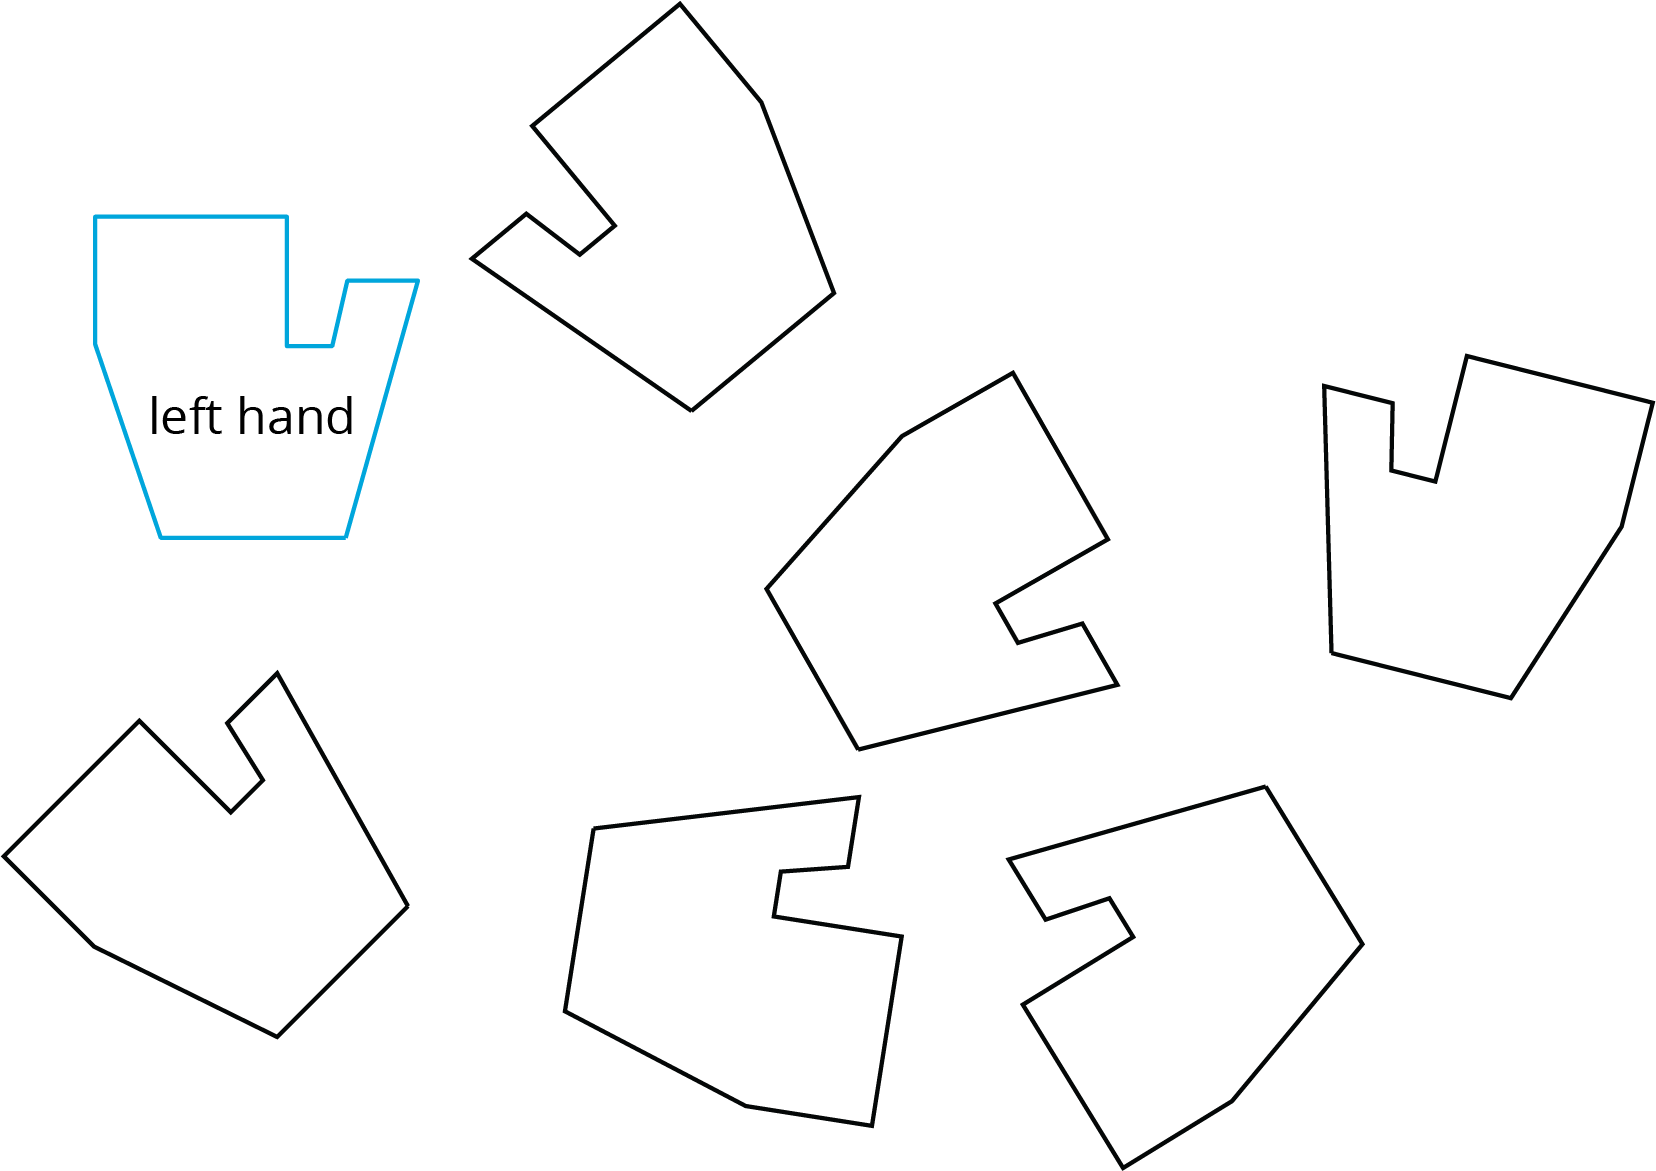
Student Response
For access, consult one of our IM Certified Partners.
Activity Synthesis
Ask students to think about the ways in which the left and right hands are the same, and the ways in which they are different.
Some ways that they are the same include:
- The side lengths and angles on the left and right hands match up with one another.
- If a left hand is flipped, it can match it up perfectly with a right hand (and vice versa).
Some ways that they are different include:
- They can not be lined up with one another without flipping one of the hands over.
- It is not possible to make a physical left and right hand line up with one another, except as “mirror images.”
10.2: Are They the Same? (15 minutes)
Activity
In previous work, students learned to identify translations, rotations, and reflections. They started to study what happens to different shapes when these transformations are applied. They used sequences of translations, rotations, and reflections to build new shapes and to study complex configurations in order to compare, for example, vertical angles made by a pair of intersecting lines. Starting in this lesson, rigid transformations are used to formalize what it means for two shapes to be the same, a notion which students have studied and applied since the early grades of elementary school.
In this activity, students express what it means for two shapes to be the same by considering carefully chosen examples. Students work to decide whether or not the different pairs of shapes are the same. Then the class discusses their findings and comes to a consensus for what it means for two shapes to be the same: the word “same” is replaced by “congruent” moving forward.
There may be discussion where a reflection is required to match one shape with the other. Students may disagree about whether or not these should be considered the same and discussion should be encouraged. This activity encourages MP3 as students need to explain why they believe that a pair of figures is the same or is not the same.
Monitor for students who use these methods to decide whether or not the shapes are the same and invite them to share during the discussion:
- Observation (this is often sufficient to decide that they are not the same): Encourage students to articulate what feature(s) of the shapes help them to decide that they are not the same.
- Measuring side lengths using a ruler or angles using a protractor: Then use differences among these measurements to argue that two shapes are not the same.
- Cutting out one shape and trying to move it on top of the other: A variant of this would be to separate the two images and then try to put one on top of the other or use tracing paper to trace one of the shapes. This is a version of applying transformations studied extensively prior to this lesson.
Launch
Give 5 minutes of quiet work time followed by a whole-class discussion. Provide access to geometry toolkits.
Supports accessibility for: Language; Organization
Design Principle(s): Support sense-making
Student Facing
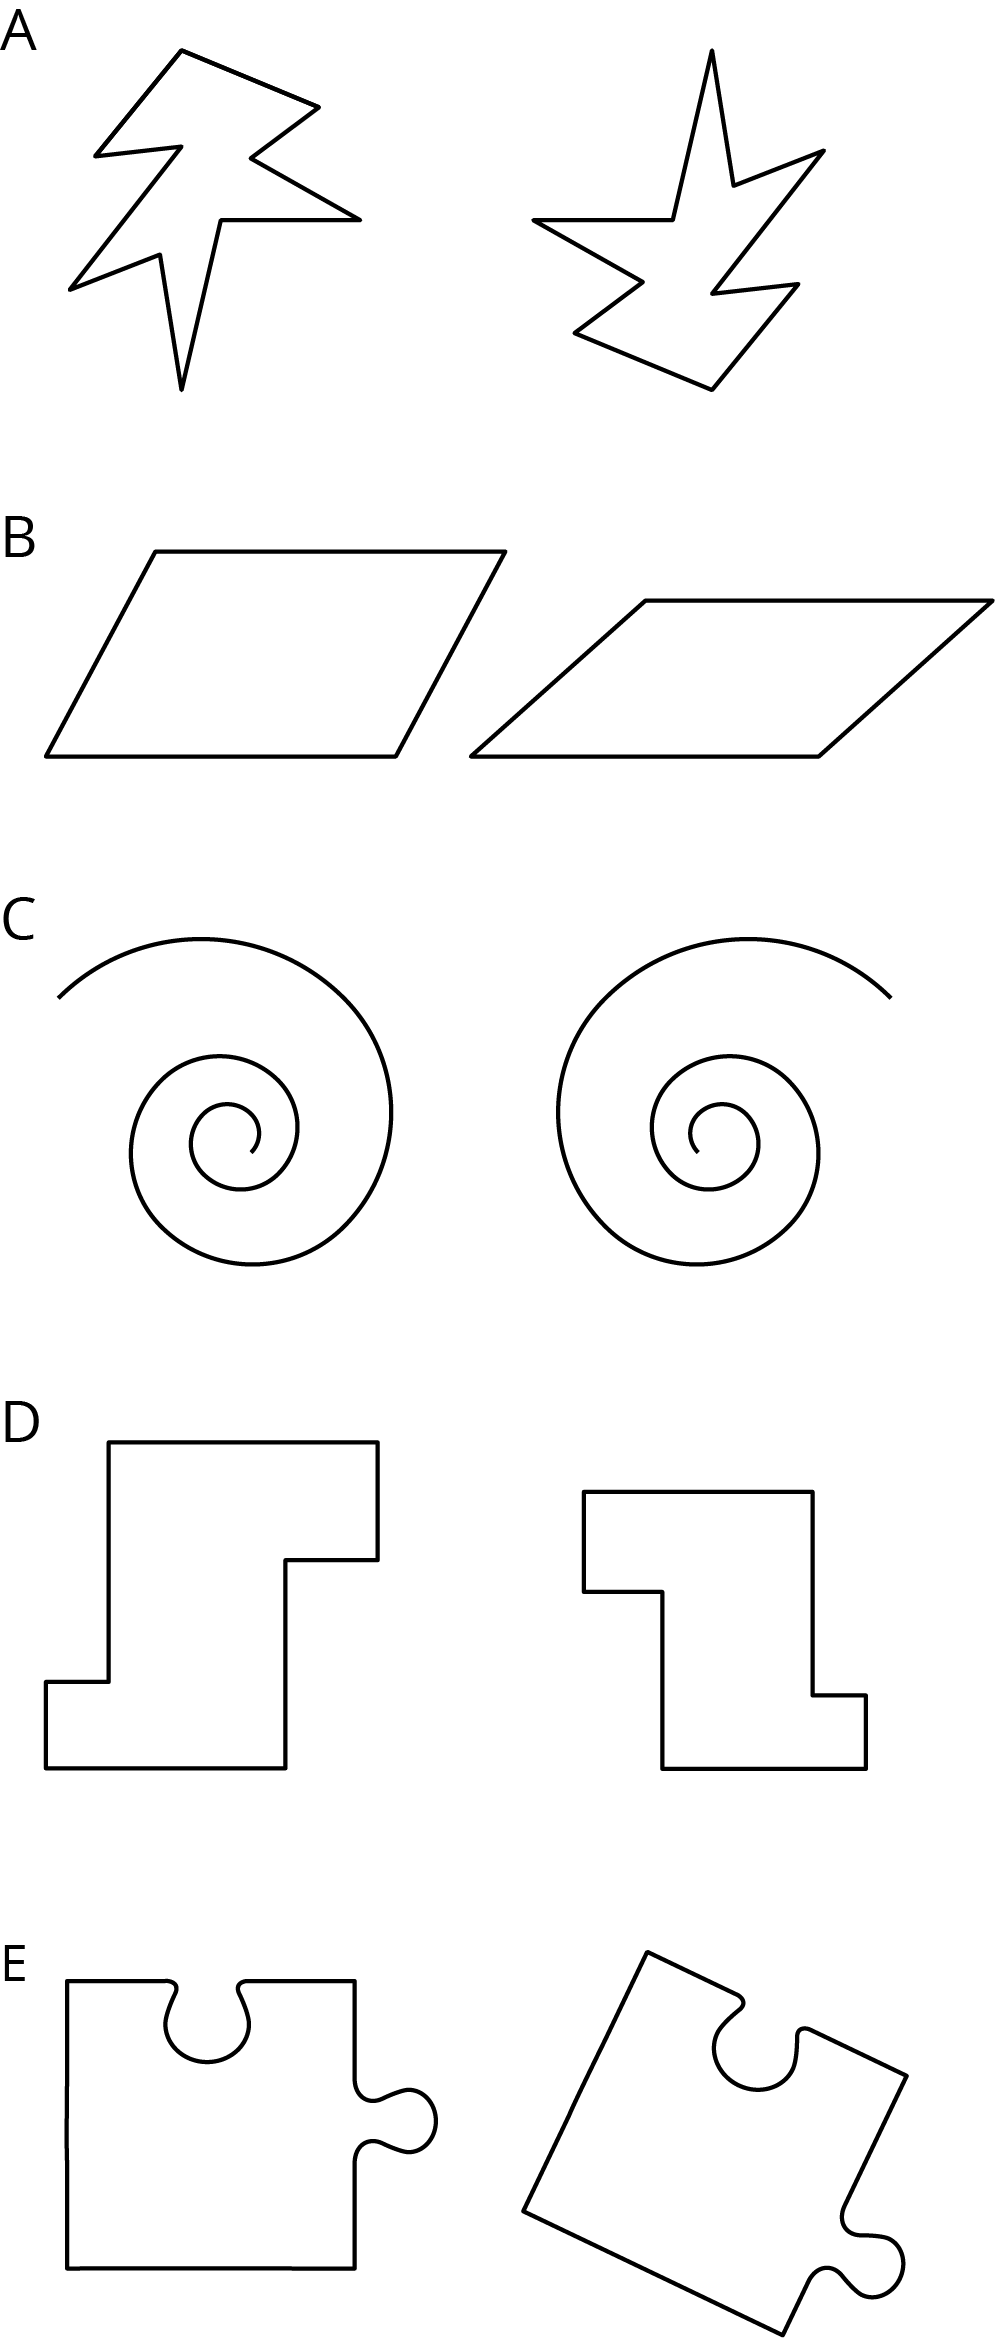
For each pair of shapes, decide whether or not they are the same.
Student Response
For access, consult one of our IM Certified Partners.
Anticipated Misconceptions
Students may think all of the shapes are the same because they are the same general shape at first glance. Ask these students to look for any differences they can find among the pairs of shapes.
Activity Synthesis
For each pair of shapes, poll the class. Count how many students decided each pair was the same or not the same. Then for each pair of shapes, select at least one student to defend their reasoning. (If there is unanimous agreement over any of the pairs of shapes, these can be dealt with quickly, but allow the class to hear at least one argument for each pair of shapes.)
Sequence these explanations in the order suggested in the Activity Narrative: general observations, taking measurements, and applying rigid transformations with the aid of tracing paper.
The most general and precise of these criteria is the third which is the foundation for the mathematical definition of congruence: The other two are consequences. The moves allowed by rigid transformations do not change the shape, size, side lengths, or angle measures.
There may be disagreement about whether or not to include reflections when deciding if two shapes are the same. Here are some reasons to include reflections:
- A shape and its reflected image can be matched up perfectly (using a reflection).
- Corresponding angles and side lengths of a shape and its reflected image are the same.
And here are some reasons against including reflections:
- A left foot and a right foot (for example) do not work exactly the same way. If we literally had two left feet it would be difficult to function normally!
- Translations and rotations can be enacted, for example, by putting one sheet of tracing paper on top of another and physically translating or rotating it. For a reflection the typical way to do this is to lift one of the sheets and flip it over.
If this disagreement doesn't come up, ask students to think about why someone might conclude that the pair of figures in C were not the same. Explain to students that people in the world can mean many things when they say two things are "the same." In mathematics there is often a need to be more precise, and one kind of "the same" is congruent. (Two figures are congruent if one is a reflection of the other, but one could, if one wanted, define a different term, a different kind of "the same," where flipping was not allowed!)
Explain that Figure A is congruent to Figure B if there is a sequence of translations, rotations, and reflections which make Figure A match up exactly with Figure B.
Combining this with the earlier discussion a few general observations about congruent figures include
- Corresponding sides of congruent figures are congruent.
- Corresponding angles of congruent figures are congruent.
- The area of congruent figures are equal.
What can be “different” about two congruent figures? The location (they don't have to be on top of each other) and the orientation (requiring a reflection to move one to the other) can be different.
10.3: Area, Perimeter, and Congruence (10 minutes)
Activity
Sometimes people characterize congruence as “same size, same shape.” The problem with this is that it isn’t clear what we mean by “same shape.” All of the figures in this activity have the same shape because they are all rectangles, but they are not all congruent. Students examine a set of rectangles and classify them according to their area and perimeter. Then they identify which ones are congruent. Because congruent shapes have the same side lengths, congruent rectangles have the same perimeter. But rectangles with the same perimeter are not always congruent. Congruent shapes, including rectangles, also have the same area. But rectangles with the same area are not always congruent. Highlighting important features, like perimeter and area, which can be used to quickly establish that two shapes are not congruent develops MP7, identifying fundamental properties shared by any pair of congruent shapes.
Launch
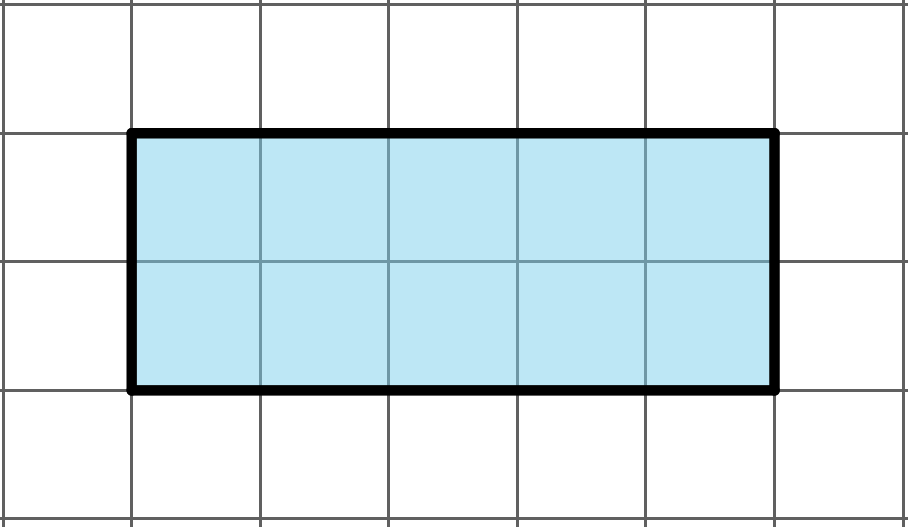
Tell students that they will investigate further how finding the area and perimeter of a shape can help show that two figures are not congruent. It may have been a while since students have thought about the terms area and perimeter. If necessary, to remind students what these words mean and how they can be computed, display a rectangle like this one for all to see. Ask students to explain what perimeter means and how they can find the perimeter and area of this rectangle.
Arrange students in groups of 2. Provide access to geometry toolkits (colored pencils are specifically called for). Give 2 minutes for quiet work time followed by sharing with a partner and a whole-class discussion.
Supports accessibility for: Conceptual processing; Organization
Student Facing
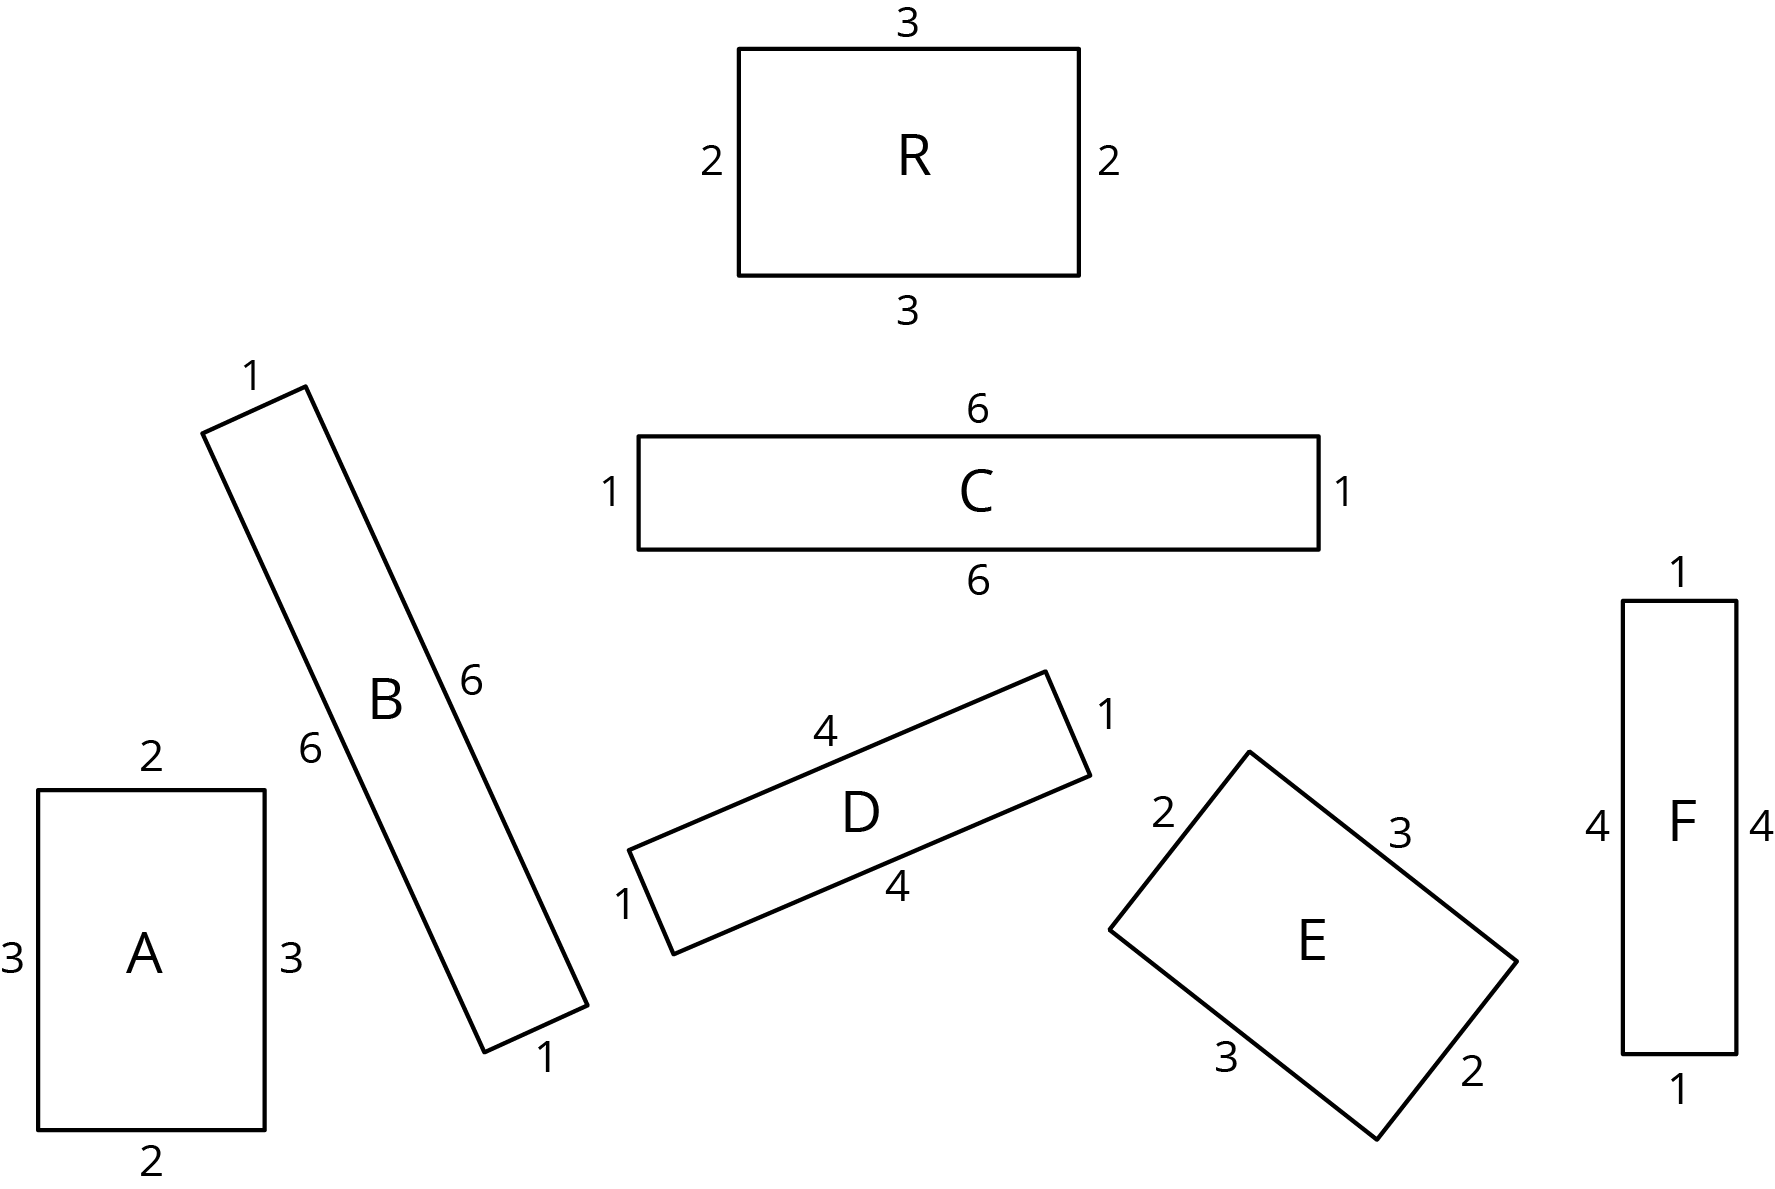
- Which of these rectangles have the same area as Rectangle R but different perimeter?
- Which rectangles have the same perimeter as Rectangle R but different area?
- Which have the same area and the same perimeter as Rectangle R?
- Use materials from the geometry tool kit to decide which rectangles are congruent. Shade congruent rectangles with the same color.
Student Response
For access, consult one of our IM Certified Partners.
Student Facing
Are you ready for more?
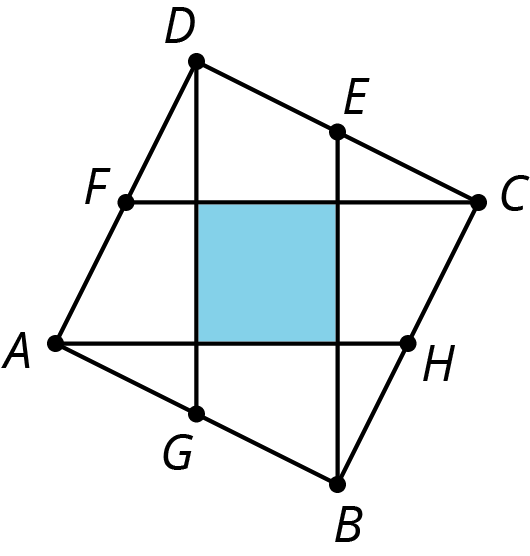
In square \(ABCD\), points \(E\), \(F\), \(G\), and \(H\) are midpoints of their respective sides. What fraction of square \(ABCD\) is shaded? Explain your reasoning.
Student Response
For access, consult one of our IM Certified Partners.
Anticipated Misconceptions
Watch for students who think about the final question in terms of “same shape and size.” Remind them of the definition of congruence introduced in the last activity.
Activity Synthesis
Invite students who used the language of transformations to answer the final question to describe how they determined that a pair of rectangles are congruent.
Perimeter and area are two different ways to measure the size of a shape. Ask the students:
- "Do congruent rectangles have the same perimeter? Explain your reasoning." (Yes. Rigid motions do not change distances, and so congruent rectangles have the same perimeter.)
- "Do congruent rectangles have the same area? Explain your reasoning." (Yes. Rigid motions do not change area or rigid motions do not change distances and so do not change the length times the width in a rectangle.)
- "Are rectangles with the same perimeter always congruent?" (No. Rectangles D and F have the same perimeter but they are not congruent.)
- "Are rectangles with the same area always congruent?" (No. Rectangles B and C have the same area but are not congruent.)
One important take away from this lesson is that measuring perimeter and area is a good method to show that two shapes are not congruent if these measurements differ. When the measurements are the same, more work is needed to decide whether or not two shapes are congruent.
A risk of using rectangles is that students may reach the erroneous conclusion that if two figures have both the same area and the same perimeter, then they are congruent. If this comes up, challenge students to think of two shapes that have the same area and the same perimeter, but are not congruent. Here is an example:

Design Principle(s): Optimize output (for explanation)
Lesson Synthesis
Lesson Synthesis
Ask students to state their best definition of congruent. (Two shapes are congruent when there is a sequence of translations, rotations, and reflections that take one shape to the other.)
Some important concepts to discuss:
- "How can you check if two shapes are congruent?" (For rectangles, the side lengths are enough to tell. For more complex shapes, experimenting with transformations is needed.)
- "Are a shape and its mirror image congruent?" (Yes, because a reflection takes a shape to its mirror image.)
- "What are some ways to know that two shapes are not congruent?" (Two shapes are not congruent if they have different areas, side lengths, or angles.)
- "What are some properties that are shared by congruent shapes?" (They have the same number of sides, same length sides, same angles, same area.)
10.4: Cool-down - Mirror Images (5 minutes)
Cool-Down
For access, consult one of our IM Certified Partners.
Student Lesson Summary
Student Facing
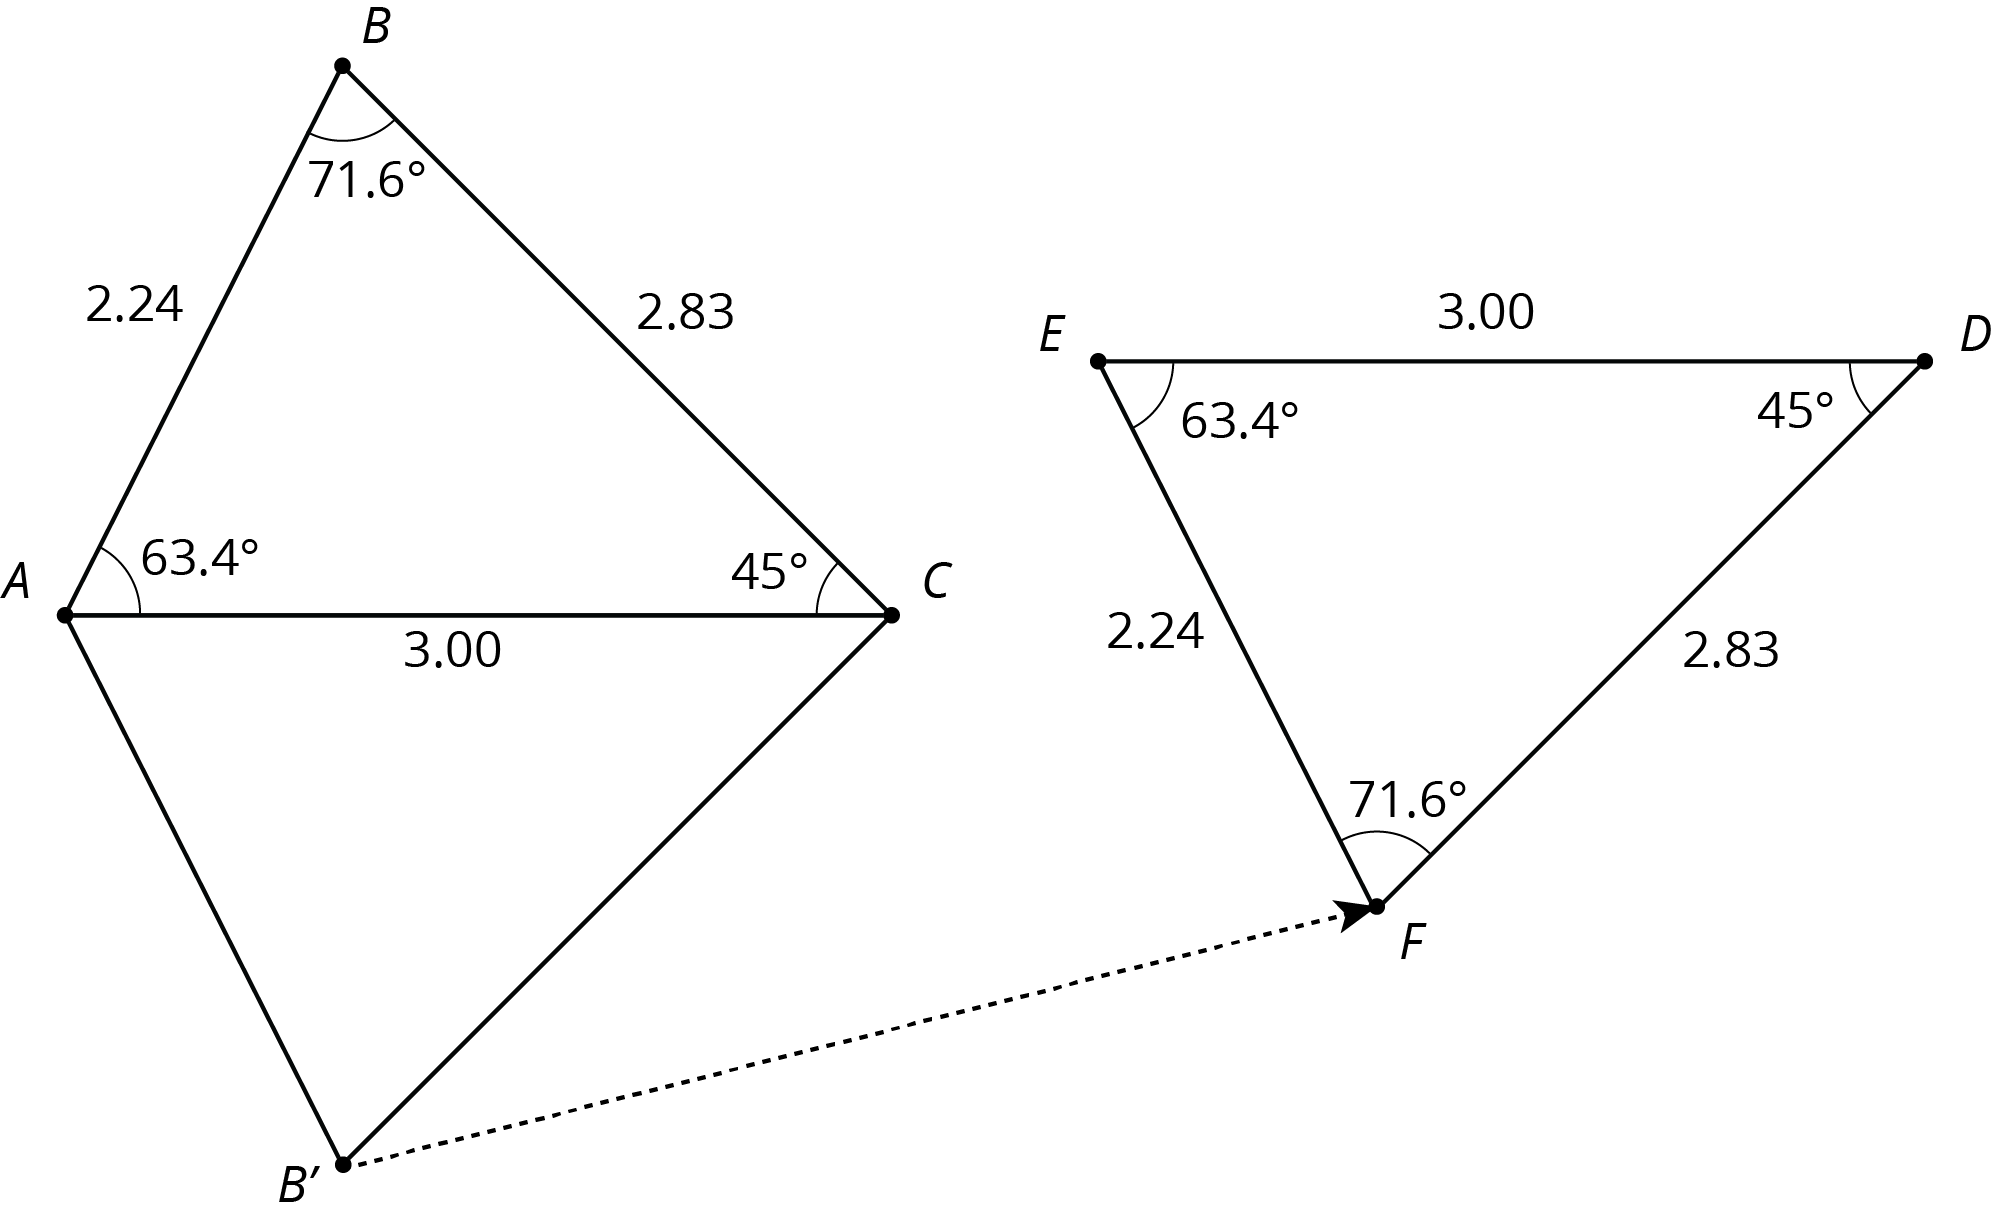
Congruent is a new term for an idea we have already been using. We say that two figures are congruent if one can be lined up exactly with the other by a sequence of rigid transformations. For example, triangle \(EFD\) is congruent to triangle \(ABC\) because they can be matched up by reflecting triangle \(ABC\) across \(AC\) followed by the translation shown by the arrow. Notice that all corresponding angles and side lengths are equal.
Here are some other facts about congruent figures:
-
We don’t need to check all the measurements to prove two figures are congruent; we just have to find a sequence of rigid transformations that match up the figures.
-
A figure that looks like a mirror image of another figure can be congruent to it. This means there must be a reflection in the sequence of transformations that matches up the figures.
-
Since two congruent polygons have the same area and the same perimeter, one way to show that two polygons are not congruent is to show that they have a different perimeter or area.